Containerization is a mechanism often used in practice. For example, when you search headhunter, you will find 477 jobs for the current day that mention Docker. Therefore, it will not be superfluous to get acquainted with what it is. I hope this short review will help form the first impression. Well, and back it up with additional materials, like courses on Udemy.
Introduction
In this short review, I would like to touch on such a topic as containerization. And you need to start with an understanding of what containerization is in general. According to Wikipedia, " Containerization " is operating system-level (i.e. NOT hardware) virtualization in which the operating system kernel maintains multiple isolated user-space instances instead of just one. " User spaceThis allows you to get rid of the overhead of emulating virtual hardware and running a full-fledged instance of the operating system. We can say that this is a "lightweight" virtualization. The kernel (kernel) is the central part of the OS, which provides applications with coordinated access to computer resources, such as processor time, memory, external hardware, and an external input and output device. The kernel also typically provides file system and network protocol services. In general, this is the heart of the whole system. For additional information, it may be useful to read the material " such as processor time, memory, external hardware, external input and output device. The kernel also typically provides file system and network protocol services. In general, this is the heart of the whole system. For additional information, it may be useful to read the material " such as processor time, memory, external hardware, external input and output device. The kernel also typically provides file system and network protocol services. In general, this is the heart of the whole system. For additional information, it may be useful to read the material "General information about containers ". And a couple of words to complete the introduction. We now have an understanding that the operating system has a kernel. It provides isolation for user space instances. In this context, you may come across such a term as " cgroups " . So called just the same Linux kernel mechanism that allows this to be achieved.Therefore, we can say that the containerization path began with Linux systems.However, starting with Windows 10, containerization support also appeared.To work with virtualization, you need to configure virtualization support in the BIOS of the computer. How to do this depends on the computer, for example, it might look like this:
On Windows, this can be checked in many ways. For example, you can download a special utility from the Microsoft website: Hardware-Assisted Virtualization Detection Tool . Well, it is worth mentioning another important concept - the Hypervisor. Hypervisor is a virtual machine monitor, a program for ensuring the parallel execution of several operating systems on the same computer. The hypervisor provides isolation of operating systems from each other, shares resources between running OSes. One such hypervisor is Oracle VirtualBox .
Docker
So, what is virtualization? But how to use it? This is where Docker comes to the rescue. Docker is software for automating the deployment and management of applications in containerized environments. It is worth starting with the fact that Docker is represented by such a concept as Docker Enginge. And you should start with the official docker website and the " Docker Overview " section.
The documentation says that docker consists of:
Docker server called Docker Daemon process (dockerd).
Command line interface, aka CLI (docker).
A REST API that describes how programs can "talk" to deamon and tell it what to do.
Before we dive further, let's install docker, that is, install the docker daemon. The Docker site has instructions for installing " Docker for Windows ". Interestingly, Docker has its own system requirements. And if you, like me, have an old Windows, such as Windows 7, then you need to use the Docker Toolbox.
Docker Toolbox
To install Docker on old, non-compliant machines. The site says so, "Legacy Desktop Solution". Let's go to the " Docker Toolbox " page and download it. This set weighs about 211 megabytes. We will install it in the default configuration, that is, we will simply meekly agree with everything without rearranging the flags. After installation, check that everything is fine. In the future, our battlefield will be the command line. I recommend not to use the Windows command line, because there may be non-obvious problems with it. Better to use bash shell. On Windows, the most recommended way to get it is to install yourself the git version control system, it will still come in handy. Because "complete" with it will be the bash we need. For this review, I will use git bash. You can also put bash with CYGWIN . Let's start bash or git bash. Let's make sure that we have a docker machine installed, aka Docker Machine: docker-machine -version What is this Docker Machine? Docker Machine is a utility for managing dockerized hosts (these are the hosts on which the Docker Engine is installed). If we immediately after installing the Docket Toolbox docker machine browsing using the command docker-machine ls, we will see an empty list:
Let's create a new car. To do this, we need to execute the create command : docker-machine create -- driver virtualbox codegym: We will see the log of the creation of the docker machine:
Here we are interested in the following. What is Boot2Docker? This is a minimalistic Linux distribution to run the Docker Engine (we understand that Docker works thanks to Linux virtualization tools, and in Windows the necessary mechanism appeared only starting with Windows 10). This distribution is based on the " Tiny Core Linux " distribution. It is also mentioned about VirtualBox VM. This is because we specified --driver virtualbox. A new virtual machine has been created in VirtualBox from the Boot2Docker image. After creation, we can start VirtualBox (because VirtualBox is installed with Docker Toolbox) and see the created virtual machine for the docker machine:
Once created, we will be prompted to run the " docker-machine env " command to get the environment variables we need to set up to connect to the docker machine:
After executing this command using docker-machine, we connect to a remote dockerized host (in this case, a virtual host hosted on Virtual Box) and can execute docker commands locally as if we were executing them on a remote host. To check, we can run the " docker info " command. If the connection to the docker machine is not established, we will get an error. And if everything is fine - information about the docker on the docker machine. Now is the time to understand how docker works in general and how to use it.
Docker Containers
So we have docker. What is this docker anyway? The Docker documentation and the " Get started " section will help us understand this . The introductory part of this section introduces the concept of docker ( Docker Concepts ). It states that docker is a platform for developing, debugging and running applications in containers. Therefore, the main thing for docker is containers. Even if you look at the docker logo, it's a whale holding containers on its back. But what is a container? Further in the " Images and Containers " section, it says that a container is a running Image instance. And Image - we execute a "package" that contains everything necessary for the application (code, environment, libraries, settings, etc.). Now let's try it ourselves. On the Docker websiteDocker samples ", which has " Docker for Beginners ". The examples from here seem more interesting to me. So, we suddenly want to get acquainted with Alpine Linux and we can do this using docker containers. To get an image, we must "pull" or " pull". Therefore, we execute the docker pull command :docker pull apline
As we can see, we are downloading from somewhere. By default, docker looks at its repository on the https://hub.docker.com network . After successfully fetching the image, we can check the list of available images by running the docker images command :
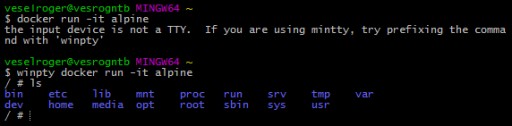
Now, we have an apline image. Since the container is a running image instance, let's start this very image. Let's start the container using the command docker run alpine. As we can see, nothing happened. If we execute a command docker psto display all active containers, we will also get nothing. But if we execute, docker ps -awe will see all the containers:
The thing is that we started the docker in a non-interactive mode. Therefore, he carried out the command and stopped. The command was to open a terminal. Let's do the same, but interactively (with the -it flag ):
As you can see, having overcome one mistake and using the hint, we got to the container and can work in it! To exit the container without stopping its work, you can press Ctrl + p + q. If we execute now docker ps, then we will see one active container. To access an already running container, run the docker exec command :
An excellent description of how this all happens is recommended to read in the description of the docker sample: " 1.0 Running your first container ". I like it because everything is written there in a very accessible and understandable way. To rephrase briefly, we are connected using docker-machine to a virtual machine running the Docker Daemon. Using the CLI over the REST API, we are asking to run the alpine image. Docker finds it and therefore does not download it. Docker creates a new container and runs the command we specified in this container. And all this, of course, is good. But why do we need all this? And here we need to figure out how docker creates image in general. And he creates them based on the dockerfile (dockerfile).
Dockerfile
As stated in the Dockerfile reference , a dockerfile is a text file that contains all the commands to get an image. In fact, all the images we get (even Alpine, from the example above) were built from a dockerfile. Let's build our image with a Java application. And first we need this Java application. I suggest using the Gradle build system, which you can read more about in a brief overview: " A Brief Introduction to Gradle ". Will help us in building the project " Gradle Build init plugin ". Let's create a new Java application using Gradle: gradle init --type java-application This command creates a draft Java project. This is a standalone application, and we would like to create a web application. Let's remove the App and AppTest classes (they were automatically generated by Gradle Build Init Plugin). To quickly create a web application, let's use the tutorial from Gradle: " Building Java Web Applications ". According to the tutorial, let's do:
Let's open the build script build.gradle and fix it according to the section: " Add a Gradle build file ".
plugins {
id 'war'
id 'org.gretty' version '2.2.0'}
Interestingly, Gretty does not see the error in HelloServletthe above. This proves that an application can behave differently in different environments. Gretty can work where a normal standalone server would fail. It remains to check that the application works correctly. Let's do:gradle appRun
If everything is fine, then use the command gradle warto compile an archive with the war (web archive) extension. By default, gradle builds it in the \build\libs. Now, we are ready to write our dockerfile. Based on the " Dockerfile reference " let's create a dockerfile. Let's create a file called "Dockerfile" in the root of our Java project (in the same place as the build script). Let's open it for editing. This file has its own format, described in the Dockerfile reference : Format". Any dockerfile starts with a FROM statement, indicating the "base image" (base image). We can say that this is the parent image, on the basis of which we make our image. It is very easy for us to choose a parent image. A web application needs a web server. For example, we can use the Tomcat web server, go to the official docker repository called docker hub , and look there if there is an image we need:
It is also worth understanding what the tomcat image is called. But besides the name, it has a tag. A tag is like a version. Tomcat images of different versions differ in which version of Tomcat is used, which jre version, and which base image. For example, we can get an image. docker pull tomcat:9-jre8-alpine It uses version 9 of tomcat, jre version 8, and the alpine image as a base. This can be important to reduce the size of our image:
As we can see, the difference is huge. If we build our image based on tomcata alpine, then we will start with only 100 megabytes, not 600. Accordingly, we will add the following content to the previously created dockerfile:
# Базовый образ,"наследуемся" от него
FROM tomcat:9-jre8-alpine
# Копируем из BuildContext'а собранный web archive в каталог томката
COPY build/libs/docker.war /usr/local/tomcat/webapps/docker.war
# Меняем рабочий каталог на томкатовский
WORKDIR /usr/local/tomcat
# Открываем порт 8080 для контейнера, т.к. его слушает томкат
EXPOSE 8080
And now let's execute the command to build the image: docker build -t jrdocker ..
-t- this is a tag, that is, how to name the assembled image. With a dot at the end, we indicate that the current directory (the directory where the dockerfile is located and where we ran the command from) is added to Build context. Build contextis the context of those files that are available when creating the dockerfile. As you can see, we were able to copy the built war file thanks to this into our image, to the web server directory. Now let's run our image:docker run -d --rm -p 8888:8080 jrdocker
To understand if the server has started, you can look at the log from the container. The log can be obtained using the docker logs command, specifying the container by its ID or name. For example:
Well, do not forget that we can always go to the running container by name with the command: winpty docker exec -it NameКонтейнера sh Now it remains to connect. Earlier, we specified EXPOSE , that is, we allowed access to port 8080 from inside the container. When we started the container itself, we specified the -p tag ( incoming ports ), thereby correlating port 8080 on the container (the Tomcat web server is waiting there) with the port 8888 on the docker daemon machine. As we remember, we launched the docker daemon not directly, but through docker-machine. Therefore, once again we will ask for data on our docker machines using the docker-machine ls command and turn to the server in the container:
Thus, you and I have just launched our web application in a docker container! ) I would also like to note the following. In case of access problems, you should remember that the docker machine is primarily a Virtual BOx virtual machine. Perhaps there are problems in the network settings of the virtual machine. A working VMBox configuration might look like this:
Layers
We have already figured out that images are created from dockerfiles and that dockerfiles are a set of commands. We also figured out that the dockerfile has a parent. And that the size of the images is different. Interestingly, you can see the history of how the image was built using the docker history command . For example:
It is important to say this in order to understand that, in essence, each image is a set of images. Each image change (each new command in the dockerfile) creates a new layer, which has its own ID. You can read more about layers in the " Docker: Images and Layers " documentation. I also highly recommend the article on Habré for review: " Images and Docker containers in pictures ".
Conclusion
I hope this little overview was enough to get you interested in containerization. Below are links to additional material that may be helpful:


GO TO FULL VERSION