In the modern world, there is no way without data storage. And the history of working with databases began a very long time ago, with the advent of JDBC. I propose to remember something that no modern framework built on top of JDBC can do without. In addition, even when working with them, at times you may need the opportunity to “return to your roots.” I hope this review will help as an introduction or help refresh your memory.
Introduction
One of the main purposes of a programming language is storing and processing information. To better understand how data storage works, it’s worth spending a little time on the theory and architecture of applications. For example, you can read the literature, namely the book " Software Architect's Handbook: Become a successful software architect by implementing effective arch... " by Joseph Ingeno. As said, there is a certain Data Tier or “Data Layer”. It includes a place to store data (for example, a SQL database) and tools for working with a data store (for example, JDBC, which will be discussed). There is also an article on the Microsoft website: “ Designing an infrastructure persistence layer ,” which describes the architectural solution of separating an additional layer from the Data Tier - the Persistence Layer. In this case, the Data Tier is the level of storage of the data itself, while the Persistence Layer is some level of abstraction for working with data from the storage from the Data Tier level. The Persistence Layer can include the "DAO" template or various ORMs. But ORM is a topic for another discussion. As you may have already understood, the Data Tier appeared first. Since the time of JDK 1.1, JDBC (Java DataBase Connectivity - connection to databases in Java) has appeared in the Java world. This is a standard for interaction of Java applications with various DBMSs, implemented in the form of java.sql and javax.sql packages included in Java SE:
This standard is described by the specification " JSR 221 JDBC 4.1 API ". This specification tells us that the JDBC API provides programmatic access to relational databases from programs written in Java. It also tells that the JDBC API is part of the Java platform and is therefore included in Java SE and Java EE. The JDBC API is provided in two packages: java.sql and javax.sql. Let's get to know them then.
Beginning of work
To understand what the JDBC API is in general, we need a Java application. It is most convenient to use one of the project assembly systems. For example, let's use Gradle . You can read more about Gradle in a short review: " A Brief Introduction to Gradle ". First, let's initialize a new Gradle project. Since Gradle functionality is implemented through plugins, we need to use “ Gradle Build Init Plugin ” for initialization:
gradle init --type java-application
After this, let’s open the build script - the build.gradle file , which describes our project and how to work with it. We are interested in the " dependencies " block, where dependencies are described - that is, those libraries/frameworks/api, without which we cannot work and on which we depend. By default we will see something like:
dependencies {// This dependency is found on compile classpath of this component and consumers.
implementation 'com.google.guava:guava:26.0-jre'// Use JUnit test framework
testImplementation 'junit:junit:4.12'}
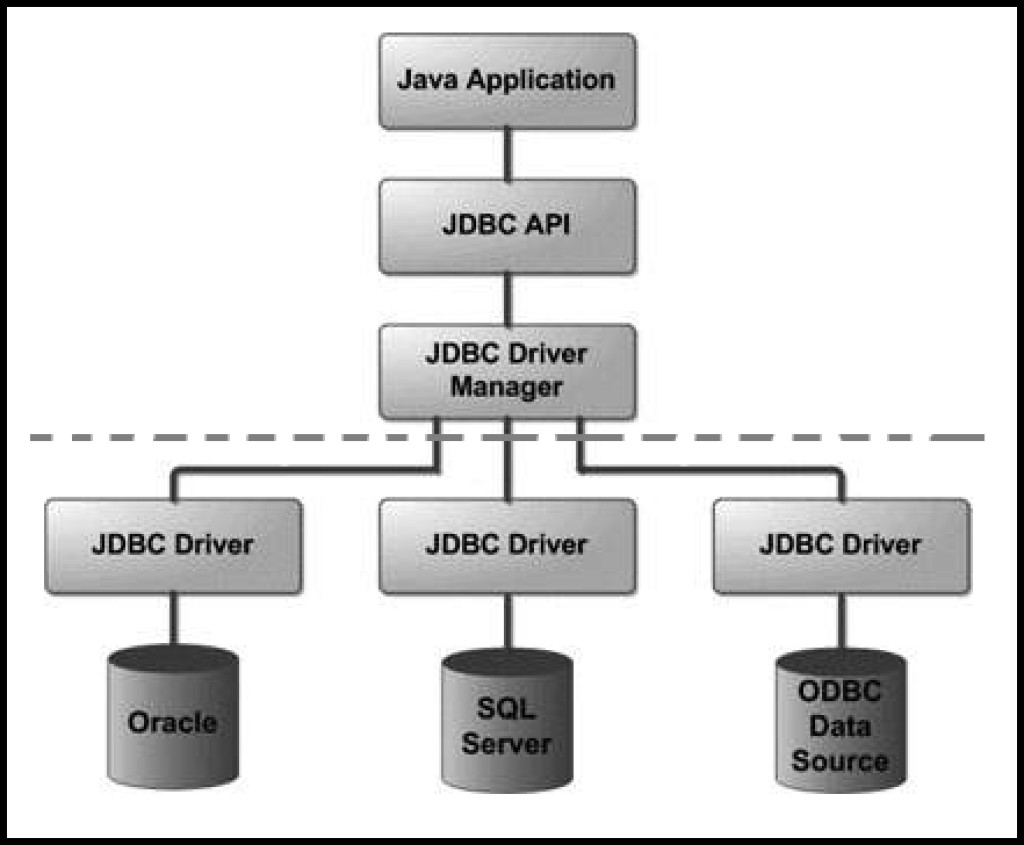
Why are we seeing this here? These are the dependencies of our project that Gradle automatically generated for us when creating the project. And also because guava is a separate library that is not included with Java SE. JUnit is also not included with Java SE. But we have JDBC out of the box, that is, it is part of Java SE. It turns out we have JDBC. Great. What else do we need? There is such a wonderful diagram:
As we can see, and this is logical, the database is an external component that is not native to Java SE. This is explained simply - there are a huge number of databases and you can work with any one. For example, there is PostgreSQL, Oracle, MySQL, H2. Each of these databases is supplied by a separate company called database vendors. Each database is written in its own programming language (not necessarily Java). In order to be able to work with the database from a Java application, the database provider writes a special driver, which is its own image adapter. Such JDBC compatible ones (that is, those that have a JDBC driver) are also called “JDBC-Compliant Database”. Here we can draw an analogy with computer devices. For example, in a notepad there is a "Print" button. Every time you press it, the program tells the operating system that the notepad application wants to print. And you have a printer. To teach your operating system to communicate uniformly with a Canon or HP printer, you will need different drivers. But for you, as a user, nothing will change. You will still press the same button. Same with JDBC. You are running the same code, it's just that different databases may be running under the hood. I think this is a very clear approach. Each such JDBC driver is some kind of artifact, library, jar file. This is the dependency for our project. For example, we can select the database " H2 Database " and then we need to add a dependency like this:
How to find a dependency and how to describe it is indicated on the official websites of the database provider or on " Maven Central ". The JDBC driver is not a database, as you understand. But he is only a guide to it. But there is such a thing as " In memory databases ". These are databases that exist in memory for the lifetime of your application. Typically, this is often used for testing or training purposes. This allows you to avoid installing a separate database server on the machine. Which is very suitable for us to get acquainted with JDBC. So our sandbox is ready and we get started.
Connection
So, we have a JDBC driver, we have a JDBC API. As we remember, JDBC stands for Java DataBase Connectivity. Therefore, it all starts with Connectivity - the ability to establish a connection. And connection is Connection. Let's turn again to the text of the JDBC specification and look at the table of contents. In the chapter " CHAPTER 4 Overview " (overview) we turn to the section " 4.1 Establishing a Connection " (establishing a connection) it is said that there are two ways to connect to the database:
Via DriverManager
Via DataSource
Let's deal with DriverManager. As said, DriverManager allows you to connect to the database at the specified URL, and also loads JDBC Drivers that it found in the CLASSPATH (and before, before JDBC 4.0, you had to load the driver class yourself). There is a separate chapter “CHAPTER 9 Connections” about connecting to the database. We are interested in how to get a connection through the DriverManager, so we are interested in the section "9.3 The DriverManager Class". It indicates how we can access the database:
Connection con =DriverManager.getConnection(url, user, passwd);
The parameters can be taken from the website of the database we have chosen. In our case, this is H2 - " H2 Cheat Sheet ". Let's move on to the AppTest class prepared by Gradle. It contains JUnit tests. A JUnit test is a method that is marked with an annotation @Test. Unit tests are not the topic of this review, so we will simply limit ourselves to the understanding that these are methods described in a certain way, the purpose of which is to test something. According to the JDBC specification and the H2 website, we will check that we have received a connection to the database. Let's write a method for obtaining a connection:
privateConnectiongetNewConnection()throwsSQLException{String url ="jdbc:h2:mem:test";String user ="sa";String passwd ="sa";returnDriverManager.getConnection(url, user, passwd);}
Now let's write a test for this method that will check that the connection is actually established:
This test, when executed, will verify that the resulting connection is valid (created correctly) and that it is not closed. By using try-with-resources we will release resources once we no longer need them. This will protect us from sagging connections and memory leaks. Since any actions with the database require a connection, let’s provide the remaining test methods marked @Test with a Connection at the beginning of the test, which we will release after the test. To do this, we need two annotations: @Before and @After Let's add a new field to the AppTest class that will store the JDBC connection for tests:
Now, any test method is guaranteed to have a JDBC connection and does not have to create it itself every time.
Statements
Next we are interested in Statements or expressions. They are described in the documentation in the chapter " CHAPTER 13 Statements ". Firstly, it says that there are several types or types of statements:
Statement: SQL expression that contains no parameters
CallableStatement: SQL expression with the ability to obtain a return value from SQL Stored Procedures.
So, having a connection, we can execute some request within the framework of this connection. Therefore, it is logical that we initially obtain an instance of the SQL expression from Connection. You need to start by creating a table. Let's describe the table creation request as a String variable. How to do it? Let's use some tutorial like " sqltutorial.org ", " sqlbolt.com ", " postgresqltutorial.com ", " codecademy.com ". Let's use, for example, an example from the SQL course on khanacademy.org . Let's add a method for executing an expression in the database:
privateintexecuteUpdate(String query)throwsSQLException{Statement statement = connection.createStatement();// Для Insert, Update, Deleteint result = statement.executeUpdate(query);return result;}
Let's add a method for creating a test table using the previous method:
privatevoidcreateCustomerTable()throwsSQLException{String customerTableQuery ="CREATE TABLE customers "+"(id INTEGER PRIMARY KEY, name TEXT, age INTEGER)";String customerEntryQuery ="INSERT INTO customers "+"VALUES (73, 'Brian', 33)";executeUpdate(customerTableQuery);executeUpdate(customerEntryQuery);}
Now let's test this:
@TestpublicvoidshouldCreateCustomerTable()throwsSQLException{createCustomerTable();
connection.createStatement().execute("SELECT * FROM customers");}
Now let's execute the request, and even with a parameter:
@TestpublicvoidshouldSelectData()throwsSQLException{createCustomerTable();String query ="SELECT * FROM customers WHERE name = ?";PreparedStatement statement = connection.prepareStatement(query);
statement.setString(1,"Brian");boolean hasResult = statement.execute();assertTrue(hasResult);}
JDBC does not support named parameters for PreparedStatement, so the parameters themselves are specified by questions, and by specifying the value we indicate the question index (starting from 1, not zero). In the last test we received true as an indication of whether there is a result. But how is the query result represented in the JDBC API? And it is presented as a ResultSet.
ResultSet
The concept of a ResultSet is described in the JDBC API specification in the chapter "CHAPTER 15 Result Sets". First of all, it says that ResultSet provides methods for retrieving and manipulating the results of executed queries. That is, if the execute method returned true to us, then we can get a ResultSet. Let's move the call to the createCustomerTable() method into the init method, which is marked as @Before. Now let's finalize our shouldSelectData test:
@TestpublicvoidshouldSelectData()throwsSQLException{String query ="SELECT * FROM customers WHERE name = ?";PreparedStatement statement = connection.prepareStatement(query);
statement.setString(1,"Brian");boolean hasResult = statement.execute();assertTrue(hasResult);// Обработаем результатResultSet resultSet = statement.getResultSet();
resultSet.next();int age = resultSet.getInt("age");assertEquals(33, age);}
It’s worth noting here that next is a method that moves the so-called “cursor”. The cursor in the ResultSet points to some row. Thus, in order to read a line, you need to place this very cursor on it. When the cursor is moved, the cursor move method returns true if the cursor is valid (correct, correct), that is, it points to data. If it returns false, then there is no data, that is, the cursor is not pointing to the data. If we try to get data with an invalid cursor, we will get the error: No data is available It’s also interesting that through ResultSet you can update or even insert rows:
In addition to ResultSet, JDBC introduces the concept of RowSet. You can read more here: " JDBC Basics: Using RowSet Objects ". There are various variations of use. For example, the simplest case might look like this:
@TestpublicvoidshouldUseRowSet()throwsSQLException{JdbcRowSet jdbcRs =newJdbcRowSetImpl(connection);
jdbcRs.setCommand("SELECT * FROM customers");
jdbcRs.execute();
jdbcRs.next();String name = jdbcRs.getString("name");assertEquals("Brian", name);}
As you can see, RowSet is similar to a symbiosis of statement (we specified command through it) and executed command. Through it we control the cursor (by calling the next method) and get data from it. Not only this approach is interesting, but also possible implementations. For example, CachedRowSet. It is "disconnected" (that is, it does not use a persistent connection to the database) and requires explicit synchronization with the database:
In addition to queries, a connection to the database (i.e., an instance of the Connection class) provides access to metadata - data about how our database is configured and organized. But first, let’s mention a few key points: The URL for connecting to our database: “jdbc:h2:mem:test”. test is the name of our database. For the JDBC API, this is a directory. And the name will be in uppercase, that is, TEST. The default schema for H2 is PUBLIC. Now, let's write a test that shows all user tables. Why custom? Because databases contain not only user tables (those that we ourselves created using create table expressions), but also system tables. They are necessary to store system information about the structure of the database. Each database can store such system tables differently. For example, in H2 they are stored in the " INFORMATION_SCHEMA " schema. Interestingly, INFORMATION SCHEMA is a common approach, but Oracle went a different route. You can read more here: " INFORMATION_SCHEMA and Oracle ". Let's write a test that receives metadata on user tables:
@TestpublicvoidshoudGetMetadata()throwsSQLException{// У нас URL = "jdbc:h2:mem:test", где test - название БД// Название БД = catalogDatabaseMetaData metaData = connection.getMetaData();ResultSet result = metaData.getTables("TEST","PUBLIC","%",null);List<String> tables =newArrayList<>();while(result.next()){
tables.add(result.getString(2)+"."+ result.getString(3));}assertTrue(tables.contains("PUBLIC.CUSTOMERS"));}
Connection pool
The connection pool in the JDBC specification has a section called "Chapter 11 Connection Pooling". It also provides the main justification for the need for a connection pool. Each Coonection is a physical connection to the database. Its creation and closing is quite an "expensive" job. JDBC only provides a connection pooling API. Therefore, the choice of implementation remains ours. For example, such implementations include HikariCP . Accordingly, we will need to add a pool to our project dependency:
And let’s write a test to receive a connection from the pool:
@TestpublicvoidshouldGetConnectionFromDataSource()throwsSQLException{DataSource datasource =getDatasource();try(Connection con = datasource.getConnection()){assertTrue(con.isValid(1));}}
Transactions
One of the most interesting things about JDBC is transactions. In the JDBC specification, they are assigned the chapter "CHAPTER 10 Transactions". First of all, it is worth understanding what a transaction is. A transaction is a group of logically combined sequential operations on data, processed or canceled as a whole. When does a transaction start when using JDBC? As the specification states, this is handled directly by the JDBC Driver. But usually, a new transaction begins when the current SQL statement requires a transaction and the transaction has not yet been created. When does the transaction end? This is controlled by the auto-commit attribute. If autocommit is enabled, the transaction will be completed after the SQL statement is "completed". What "done" means depends on the type of SQL expression:
Data Manipulation Language, also known as DML (Insert, Update, Delete)
The transaction is completed as soon as the action is completed
Select Statements
The transaction is completed when the ResultSet is closed ( ResultSet#close )
CallableStatement and expressions that return multiple results
When all associated ResultSets have been closed and all output has been received (including the number of updates)
This is exactly how the JDBC API behaves. As usual, let's write a test for this:
It's simple. But this is true as long as we only have one transaction. What to do when there are several of them? They need to be isolated from each other. Therefore, let's talk about transaction isolation levels and how JDBC deals with them.
Insulation levels
Let's open the subsection "10.2 Transaction Isolation Levels" of the JDBC specification. Here, before moving further, I would like to remember about such a thing as ACID. ACID describes the requirements for a transactional system.
Atomicity:
No transaction will be partially committed to the system. Either all of its sub-operations will be performed, or none will be performed.
Consistency:
Each successful transaction, by definition, records only valid results.
Isolation:
While a transaction is running, concurrent transactions should not affect its outcome.
Durability:
If a transaction is successfully completed, the changes made to it will not be undone due to any failure.
When talking about transaction isolation levels, we are talking about the “Isolation” requirement. Isolation is an expensive requirement, so in real databases there are modes that do not completely isolate a transaction (Repeatable Read isolation levels and lower). Wikipedia has an excellent explanation of the problems that can arise when working with transactions. It’s worth reading more here: “ Problems of parallel access using transactions .” Before we write our test, let's slightly change our Gradle Build Script: add a block with properties, that is, with the settings of our project:
You may have noticed that the h2 version has become lower. We'll see why later. So how do you apply isolation levels? Let's look at a small practical example right away:
@TestpublicvoidshouldGetReadUncommited()throwsSQLException{Connection first =getNewConnection();assertTrue(first.getMetaData().supportsTransactionIsolationLevel(Connection.TRANSACTION_READ_UNCOMMITTED));
first.setTransactionIsolation(Connection.TRANSACTION_READ_UNCOMMITTED);
first.setAutoCommit(false);// Транзакиця на подключение. Поэтому первая транзакция с ReadUncommited вносит измененияString insertQuery ="INSERT INTO customers VALUES (5, 'Max', 15)";
first.createStatement().executeUpdate(insertQuery);// Вторая транзакция пытается их увидетьint rowCount =0;JdbcRowSet jdbcRs =newJdbcRowSetImpl(getNewConnection());
jdbcRs.setCommand("SELECT * FROM customers");
jdbcRs.execute();while(jdbcRs.next()){
rowCount++;}assertEquals(2, rowCount);}
Interestingly, this test may fail on a vendor that does not support TRANSACTION_READ_UNCOMMITTED (for example, sqlite or HSQL). And the transaction level may simply not work. Remember we indicated the version of the H2 Database driver? If we raise it to h2Version = '1.4.177' and higher, then READ UNCOMMITTED will stop working, although we did not change the code. This once again proves that the choice of vendor and driver version is not just letters, it will actually determine how your requests will be executed. You can read about how to fix this behavior in version 1.4.177 and how it does not work in higher versions here: " Support READ UNCOMMITTED isolation level in MVStore mode ".
Bottom line
As we can see, JDBC is a powerful tool in the hands of Java for working with databases. I hope this short review will help give you a starting point or help refresh your memory. Well, for a snack, some additional materials:


GO TO FULL VERSION