Let's take a look at the simplest example of implementing MVC using Spring-MVC as an example. To do this, we will write a small Hello World application on spring-boot. So that you can repeat everything yourself, I will give you step by step instructions. First, we will write a small application, and then we will analyze it.
Step 1. Create a spring-boot application in IntelliJ IDEA
Using File -> New -> Project… create a new project. In the window that opens, in the left side menu, select Spring Initializr, select Project SDK, leave the Initializr Service URL option as default. Click the Next button. In the next window, we need to select project options. We will have a Maven project. Select Type - Maven Project, fill in the Group and Artifact. Press the Next button. In the next window, you need to select the components of the Spring Framework, which we will use. We need two:
Spring Web is a component that will allow us to create Web applications. This component includes Spring MVC.
Thymeleaf - The so-called templating engine. A thing that will allow us to pass data from Java to HTML pages
In the next window, select the name and location of the project in the file system: Click the Finish button. The project has been created. We have the following project structure: Here we are interested in 2 files: pom.xml - deployment descriptor. A thing that allows us to quickly and easily import libraries from different frameworks into our project, as well as a thing in which we configure the assembly of our application. Our application is built using Maven, pom.xml is the configuration file of this build system. Java class - MvcDemoApplication. This is the main class of our application from which we will start our spring-boot project. To start, just run the main method in this class. Here is the code of this class, as well as the pom.xml file: MvcDemoApplication:
Our application will be extremely simple. We will have a main page - index.html, inside of which there will be a link to the greeting page - greeting.html. On the greeting page, we will display a greeting. Let's implement the ability to pass the name for the greeting to the greeting.html page via url parameters. Let's create the main page of our application - index.html:
<!DOCTYPE html><html lang="en"><head><meta charset="UTF-8"><title>Main page</title></head><body><p>Get your greeting <a href="/greeting">here</a></p></body></html>
Here, from a non-typical html page, you can see the tag: The tag's <p th:text="'Hello, ' + ${name} + '!'" /> attribute is a tool of the Thymeleaf template engine. Thanks to it, the value of the tag will be the text “Hello, “ + the value of the variable , which we will set from the Java code. thppname
Step 3: Create a Controller
Inside the mvc_demo package we will create the contoller package, inside which we will create our controller, HelloWorldController:
On the one hand, there is very little code here, but on the other hand, there is a lot going on. Let's start the analysis. The @Controller annotation indicates that this class is a controller. Controllers in Spring process HTTP requests to specific addresses. Our class has a helloWorldController method annotated with the @RequestMapping(value = "/greeting") annotation. This annotation tells us that this method processes HTTP GET requests to the /greeting address. In other words, this method will work if someone goes to /greeting. This method returns a String. According to Spring-MVC, a controller method must return the name of a view. Next, Spring will look for an html file with that name, which it will return as a response to an HTTP request. As you can see, our method returns the name of the web page, Our method takes 2 arguments. Let's break them down: Parameter 1: @RequestParam(name = "name", required = false, defaultValue = "World") String name. The @RequestParam annotation says that the String name parameter is a url parameter. The annotation brackets indicate that this parameter in the url is optional (required = false), if it is absent, the value of the String name parameter will be World (defaultValue = "World"), and if it is present, then this parameter in the url will be be named name (name = "name") There may be a lot of things that are unclear here. Let's give examples. The table below shows what the value of the String name parameter will be for various options for addressing the /greeting address (with and without parameters in the URL)
Example URL
The value of the String name parameter
/greeting
World
/greeting?name=Amigo
Amigo
/greeting?name=Zor
Zor
Parameter 2: The second parameter is Model model. This parameter is some model. This model consists internally of various attributes. Each attribute has a name and a value. Something like key-value pairs. With this parameter, we can transfer data from Java code to html pages. Or, speaking in MVC terminology, to transfer data from the Model (Model) to the View (View). It remains to parse the last line. The way we pass data from Java to html or from Model to View. The body of the method contains the following line: model.addAttribute("name", name); Here we create a new attribute called name and assign the value of the name parameter to it. Remember, just recently we discussed the tag: <p th:text="'Hello, ' + ${name} + '!'" /> We said that the value of the p tag would be the text "Hello, " + the value of the variable name, which we set from the Java code. We set this value using the line model.addAttribute("name", name);
Step 5 Launch
To start, we need to run the main method in the MvcDemoApplication class: In the launch logs, we will see that our web application started on port 8080: This means that we can go to the browser page: http://localhost:8080 : Here we were shown the index.html page. Let's follow the link to greetin: Our controller worked with this transition. We did not pass any parameters through the URL, therefore, as indicated in the annotation, the value of the name attribute took the default value of World. Now let's try to pass the parameter via url: Everything works as intended. Now try to trace the path of the name variable:
The user passed via url the value of the parameter name = Amigo ->
The controller processed our action, accepted the name variable and set the model attribute, with the name name and the accepted value ->
From the model, this data got into the View, on the greeting.html page and displayed to the user
That's all!
Today we met you with a rather large and interesting topic MVC (Model - View - Controller). This is the end of a cycle that aims to introduce you to what you need to know before starting Enterprise development.
Leave the topics that interest you in the comments - let's do it!
 Let's take a look at the simplest example of implementing MVC using Spring-MVC as an example. To do this, we will write a small Hello World application on spring-boot. So that you can repeat everything yourself, I will give you step by step instructions. First, we will write a small application, and then we will analyze it.
 Click the Next button. In the next window, we need to select project options. We will have a Maven project. Select Type - Maven Project, fill in the Group and Artifact.
  Press the Next button. In the next window, you need to select the components of the Spring Framework, which we will use. We need two:

 In the next window, select the name and location of the project in the file system:
  Click the Finish button. The project has been created. We have the following project structure:
  Here we are interested in 2 files: pom.xml - deployment descriptor. A thing that allows us to quickly and easily import libraries from different frameworks into our project, as well as a thing in which we configure the assembly of our application. Our application is built using Maven, pom.xml is the configuration file of this build system. Java class - MvcDemoApplication. This is the main class of our application from which we will start our spring-boot project. To start, just run the main method in this class. Here is the code of this class, as well as the pom.xml file: MvcDemoApplication:

 Our method takes 2 arguments. Let's break them down: Parameter 1: @RequestParam(name = "name", required = false, defaultValue = "World") String name. The @RequestParam annotation says that the String name parameter is a url parameter. The annotation brackets indicate that this parameter in the url is optional (required = false), if it is absent, the value of the String name parameter will be World (defaultValue = "World"), and if it is present, then this parameter in the url will be be named name (name = "name") There may be a lot of things that are unclear here. Let's give examples. The table below shows what the value of the String name parameter will be for various options for addressing the /greeting address (with and without parameters in the URL)
 In the launch logs, we will see that our web application started on port 8080:
  This means that we can go to the browser page: http://localhost:8080 :
  Here we were shown the index.html page. Let's follow the link to greetin:
  Our controller worked with this transition. We did not pass any parameters through the URL, therefore, as indicated in the annotation, the value of the name attribute took the default value of World. Now let's try to pass the parameter via url:
 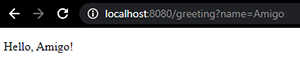 Everything works as intended. Now try to trace the path of the name variable:
GO TO FULL VERSION