Hello guys! Without understanding the basic concepts, it is quite difficult to delve into frameworks and approaches to building functionality. So today we’ll talk about one of these concepts - AOP, or aspect-oriented programming . This is not an easy topic and is not often used directly, but many frameworks and technologies use it under the hood. And of course, sometimes during interviews you may be asked to tell you in general terms what kind of animal this is and where it can be used. So let's look at the basic concepts and some simple examples of AOP in Java . So, AOP - aspect-oriented programming - is a paradigm aimed at increasing the modularity of various parts of an application by separating cross-cutting concerns. To do this, additional behavior is added to the existing code, without changing the original code. In other words, we seem to hang additional functionality on top of methods and classes without making amendments to the modified code. Why is this necessary? Sooner or later we come to the conclusion that the usual object-oriented approach cannot always effectively solve certain problems. At such a moment, AOP comes to the rescue and gives us additional tools to build the application. And additional tools mean increased flexibility in development, thanks to which there are more options for solving a particular problem.
Application of AOP
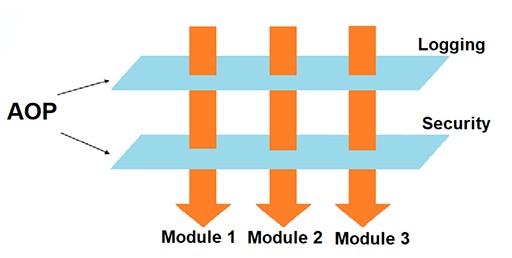
Aspect-oriented programming is designed to solve cross-cutting problems, which can be any code that is repeated many times in different ways, which cannot be completely structured into a separate module. Accordingly, with AOP we can leave this outside the main code and define it vertically. An example is the application of a security policy in an application. Typically, security cuts across many elements of an application. Moreover, the application security policy must be applied equally to all existing and new parts of the application. At the same time, the security policy used can itself evolve. This is where the use of AOP can come in handy . Also another example is logging . There are several advantages to using an AOP approach to logging compared to manually inserting logging:
Logging code is easy to implement and remove: you just need to add or remove a couple of configurations of some aspect.
All source code for logging is stored in one place and there is no need to manually find all places of use.
Code intended for logging can be added anywhere, be it already written methods and classes or new functionality. This reduces the number of developer errors.
Also, when you remove an aspect from a design configuration, you can be absolutely sure that all trace code is removed and nothing is missing.
Aspects are stand-alone code that can be reused and improved over and over again.
AOP is also used for exception handling, caching, and removal of some functionality to make it reusable.
Basic concepts of AOP
To move further in the analysis of the topic, let’s first get acquainted with the main concepts of AOP. Advice is additional logic, code, that is called from the connection point. The advice can be performed before, after or instead of the connection point (more on them below). Possible types of advice :
Before (Before) - advice of this type is launched before the execution of target methods - connection points. When using aspects as classes, we take the @Before annotation to mark the advice type as coming before. When using aspects as .aj files , this will be the before() method .
After (After) - advice that is executed after completion of execution of methods - connection points, both in normal cases and when an exception is thrown.
When using aspects as classes, we can use the @After annotation to indicate that this is a tip that comes after.
When using aspects as .aj files , this will be the after() method .
After Returning - these tips are executed only if the target method works normally, without errors.
When aspects are represented as classes, we can use the @AfterReturning annotation to mark the advice as being executed upon successful completion.
When using aspects as .aj files, this will be the after() method returning (Object obj) .
After Throwing - this type of advice is intended for those cases when a method, that is, a connection point, throws an exception. We can use this advice for some handling of the failed execution (for example, rolling back the entire transaction or logging with the required trace level).
For aspect classes, the @AfterThrowing annotation is used to indicate that this advice is used after an exception is thrown.
When using aspects in the form of .aj files , this will be the method - after() throwing (Exception e) .
Around is perhaps one of the most important types of advice that surrounds a method, that is, a connection point, with which we can, for example, choose whether to execute a given connection point method or not.
You can write advice code that runs before and after the join point method executes. Around advice's
responsibilities include calling the join point method and returning values if the method returns something. That is, in this tip you can simply imitate the operation of the target method without calling it, and return something of your own as a result. For aspects in the form of classes, we use the @Around annotation to create tips that wrap the connection point. When using aspects as .aj files , this will be the around() method .
Join point - a point in an executing program (calling a method, creating an object, accessing a variable) where advice should be applied. In other words, this is some kind of regular expression, with the help of which places for introducing code (places for applying tips) are found. A pointcut is a set of connection points . The cut determines whether a given connection point fits a given tip. Aspect is a module or class that implements end-to-end functionality. An aspect modifies the behavior of the rest of the code by applying advice at join points defined by some slice . In other words, it is a combination of tips and connection points. Introduction - changing the structure of a class and/or changing the inheritance hierarchy to add aspect functionality to foreign code. Target is the object to which the advice will be applied. Weaving is the process of linking aspects with other objects to create the recommended proxy objects. This can be done at compile time, load time, or run time. There are three types of weaving:
Compile-time weaving - If you have the source code of an aspect and the code in which you use aspects, you can compile the source code and aspect directly using the AspectJ compiler;
post-compilation weaving (binary weaving) - if you can't or don't want to use source code transformations to weave aspects into your code, you can take already compiled classes or jars and inject aspects;
load-time weaving is simply binary weaving deferred until the class loader loads the class file and defines the class for the JVM.
To support this, one or more "weave class loaders" are required. They are either explicitly provided by the runtime or activated by the "weaving agent".
AspectJ is a specific implementation of AOP paradigms that implements the ability to solve cross-cutting problems. Documentation can be found here .
Examples in Java
Next, to better understand AOP, we will look at small examples of the Hello World level. Let me immediately note that in our examples we will use compile-time weaving . First we need to add the following dependency to our pom.xml :
As a rule, a special Ajs compiler is used to use aspects . IntelliJ IDEA does not have it by default, so when choosing it as an application compiler you need to specify the path to the AspectJ distribution . You can read more about the method of choosing Ajs as a compiler on this page. This was the first method, and the second (which I used) was to add the following plugin to pom.xml :
Nothing complicated: they passed the name and displayed it in the console. If we run it now, the console will display:
Tolya Vova Sasha
Well, it's time to take advantage of the power of AOP. Now we need to create a file - aspect . They come in two types: the first is a file with the .aj extension , the second is a regular class that implements AOP capabilities using annotations. Let's first look at a file with a .aj extension :
public aspect GreetingAspect{
pointcut greeting():execution(*Main.printName(..));before():greeting(){System.out.print("Привет ");}}
This file is somewhat similar to a class. Let's figure out what's going on here: pointcut - a cut or a set of connection points; greeting() — the name of this slice; : execution - when executing * - all, call - Main.printName(..) - this method. Next comes the specific advice - before() - which is executed before the target method is called, : greeting() - the slice to which this advice reacts, and below we see the body of the method itself, which is written in the Java language we understand. When we run main with this aspect present, we will get the following output to the console:
Hello Tolya Hello Vova Hello Sasha
We can see that every call to the printName method has been modified by an aspect. Now let's take a look at what the aspect will look like, but as a Java class with annotations:
After the .aj aspect file , everything is more obvious:
@Aspect denotes that the given class is an aspect;
@Pointcut("execution(* Main.printName(String))") is a cut point that fires on all calls to Main.printName with an incoming argument of type String ;
@Before("greeting()") - advice that is applied before calling the code described at the greeting() cut point .
Running main with this aspect will not change the console output:
Hello Tolya Hello Vova Hello Sasha
Example No. 2
Let's say we have some method that performs some operations for clients and call this method from main :
publicclassMain{publicstaticvoidmain(String[] args){makeSomeOperation("Толя");}publicstaticvoidmakeSomeOperation(String clientName){System.out.println("Выполнение некоторых операций для клиента - "+ clientName);}}
Using the @Around annotation , let's do something like a “pseudo-transaction”:
Using the proceed method of the ProceedingJoinPoint object , we call the wrapper's method to determine its place in the board and, accordingly, the code in the method above joinPoint.proceed(); - this is Before , which is below - After . If we run main we will get in the console:
Opening a transaction... Performing some operations for the client - Tolya Closing a transaction....
If we add an exception throw to our method (suddenly the operation fails):
publicstaticvoidmakeSomeOperation(String clientName)throwsException{System.out.println("Выполнение некоторых операций для клиента - "+ clientName);thrownewException();}
Then we will get the output in the console:
Opening a transaction... Performing some operations for the client - Tolya The operation failed, the transaction was rolled back...
It turned out to be a pseudo-processing of failure.
Example No. 3
As the next example, let's do something like logging in the console. First, let's look at Main , where our pseudo business logic happens:
In main , using setValue, we will set the value of the internal variable - value , then using getValue, we will take this value and in checkValue we will check whether this value is longer than 10 characters. If yes, an exception will be thrown. Now let's look at the aspect with which we will log the operation of methods:
@AspectpublicclassLogAspect{@Pointcut("execution(* *(..))")publicvoidmethodExecuting(){}@AfterReturning(value ="methodExecuting()", returning ="returningValue")publicvoidrecordSuccessfulExecution(JoinPoint joinPoint,Object returningValue){if(returningValue !=null){System.out.printf("Успешно выполнен метод - %s, класса- %s, с результатом выполнения - %s\n",
joinPoint.getSignature().getName(),
joinPoint.getSourceLocation().getWithinType().getName(),
returningValue);}else{System.out.printf("Успешно выполнен метод - %s, класса- %s\n",
joinPoint.getSignature().getName(),
joinPoint.getSourceLocation().getWithinType().getName());}}@AfterThrowing(value ="methodExecuting()", throwing ="exception")publicvoidrecordFailedExecution(JoinPoint joinPoint,Exception exception){System.out.printf("Метод - %s, класса- %s, был аварийно завершен с исключением - %s\n",
joinPoint.getSignature().getName(),
joinPoint.getSourceLocation().getWithinType().getName(),
exception);}}
What's going on here? @Pointcut("execution(* *(..))") - will connect to all calls to all methods; @AfterReturning(value = "methodExecuting()", returning = "returningValue") - advice that will be executed after the target method has successfully completed. We have two cases here:
When a method has a return value if (returningValue != null) {
When there is no return value else {
@AfterThrowing(value = "methodExecuting()", throwing = "exception") - advice that will be triggered in case of an error, that is, when an exception is thrown from the method. And accordingly, by running main , we will get a kind of logging in the console:
The method - setValue, of the class - Main was successfully executed. The method - getValue, of the class - Main, was executed successfully, with the result of execution - <some value> The method - checkValue, of the class - Main, was terminated abnormally with an exception - java.lang.Exception Method - main, class-Main, crashed with an exception - java.lang.Exception
Well, since we did not handle the exception, we will also get its stacktrace: You can read about exceptions and their handling in these articles: Exceptions in Java and Exceptions and their handling . That's all for me today. Today we got acquainted with AOP , and you could see that this beast is not as scary as it is portrayed. Goodbye everyone!
 AOP is also used for exception handling, caching, and removal of some functionality to make it reusable.

 Let me immediately note that in our examples we will use compile-time weaving . First we need to add the following dependency to our pom.xml :
 You can read about exceptions and their handling in these articles: Exceptions in Java and Exceptions and their handling . That's all for me today. Today we got acquainted with AOP , and you could see that this beast is not as scary as it is portrayed. Goodbye everyone!
GO TO FULL VERSION