Hello everyone, dear friends. Today we will implement a template (a template is a pattern, in our context this is the same thing) of Command design for our needs. Using this template, we will conveniently and correctly work with the processing of commands from our bot.
Friends, do you like the Javarush Telegram Bot project ? Don't be lazy: put a star . So it will be clear that it is interesting, and it will be more pleasant to develop it!
To begin with, it would be good to talk about what kind of pattern it is - Command. But if I do this, the article will be very large and unwieldy. Therefore, I chose materials for self-study:
This is my post from 4 years ago. I wrote it when I was a junior, so do not judge strictly.
In the comments to my article, someone Nullptr35 recommended this video .
This should be enough to immerse yourself in the topic and be on the same wavelength with me. Well, those who are familiar with this design pattern can safely skip and move on.
Writing JRTB-3
Everything is the same as before:
Update main branch.
Based on the updated main branch, we create a new JRTB-3 .
Let's implement the pattern.
We create a new commit with a description of the work done.
We create a pull request, check it, and if everything is ok, we merge our work.
I will not show points 1-2: I described them very carefully in previous articles, so let's proceed immediately to the implementation of the template. Why is this template suitable for us? Yes, because every time we execute some command, we will go to the onUpdateReceived(Update update) method , and depending on the command, we will execute different logic. Without this pattern, we would have a whole bunch of if-else if statements. Something like this:
And where there are three dots, there may be several dozen more commands. And how to process it normally? How to support? Difficult and hard. So this is not an option for us. It needs to look something like this:
And that's it! And no matter how many commands we add, this piece of code will remain unchanged. What is he doing? The first if makes sure that the message starts with the command prefix "/". If this is the case, then we isolate the string up to the first space and look for the corresponding command from the CommandContainer, as soon as we find it, we launch the command. And that's all ...) If there is a desire and time, you can implement work with teams at first immediately in one class, with a bunch of conditions and all that, and then using a template. You will see the difference. What a beauty! First, let's create a package next to the bot package, which will be called command . And already in this package there will be all the classes that relate to the implementation of the command. We need one interface to work with commands. For this case, let's create it:
packagecom.github.codegymcommunity.jrtb.command;importorg.telegram.telegrambots.meta.api.objects.Update;/**
* Command interface for handling telegram-bot commands.
*/publicinterfaceCommand{/**
* Main method, which is executing command logic.
*
* @param update provided {@link Update} object with all the needed data for command.
*/voidexecute(Update update);}
At this stage, we do not need to implement the reverse operation of the command, so we will skip this method (unexecute). In the execute method, the Update object comes as an argument - just the one that comes to our main method in the bot. This object will contain everything needed to process the command. Next, let's add an enum that will store command values (start, stop, and so on). Why do we need it? So that we have only one source of truth for team names. We also create it in our command package . Let's call it CommandName :
We also need a service that will send messages through the bot. To do this, let's create a service package next to the command package , to which we will add all the necessary services. Here it is worth focusing on what I mean by the word service in this case. If we consider the application, then it is often divided into several layers: the layer of work with endpoints - controllers, the layer of business logic - services, and the layer of work with the database - the repository. Therefore, in our case, a service is a class that implements some kind of business logic. How to create a service? First, create an interface to it and an implementation. Add the implementation using the `@Service` annotation to the Application Context of our SpringBoot application, and, if necessary, pull it up using the `@Autowired` annotation. Therefore, we create the SendBotMessageService interface (in the naming of services, they usually add it at the end of the Service name):
packagecom.github.codegymcommunity.jrtb.service;/**
* Service for sending messages via telegram-bot.
*/publicinterfaceSendBotMessageService{/**
* Send message via telegram bot.
*
* @param chatId provided chatId in which messages would be sent.
* @param message provided message to be sent.
*/voidsendMessage(String chatId,String message);}
Next, we create its implementation:
packagecom.github.codegymcommunity.jrtb.service;importcom.github.codegymcommunity.jrtb.bot.JavarushTelegramBot;importorg.springframework.beans.factory.annotation.Autowired;importorg.springframework.stereotype.Service;importorg.telegram.telegrambots.meta.api.methods.send.SendMessage;importorg.telegram.telegrambots.meta.exceptions.TelegramApiException;/**
* Implementation of {@link SendBotMessageService} interface.
*/@ServicepublicclassSendBotMessageServiceImplimplementsSendBotMessageService{privatefinalJavarushTelegramBot codegymBot;@AutowiredpublicSendBotMessageServiceImpl(JavarushTelegramBot codegymBot){this.codegymBot = codegymBot;}@OverridepublicvoidsendMessage(String chatId,String message){SendMessage sendMessage =newSendMessage();
sendMessage.setChatId(chatId);
sendMessage.enableHtml(true);
sendMessage.setText(message);try{
codegymBot.execute(sendMessage);}catch(TelegramApiException e){//todo add logging to the project.
e.printStackTrace();}}}
This is what the implementation looks like. The most important magic is where the constructor is created. Using the @Autowired annotation on the constructor, SpringBoot will look for an object of this class in its Application Context. And he is already there. It works like this: in our application, anywhere we can access the bot and do something. And this service is responsible for sending messages. So that we do not write every time in every place something like this:
SendMessage sendMessage =newSendMessage();
sendMessage.setChatId(chatId);
sendMessage.setText(message);try{
codegymBot.execute(sendMessage);}catch(TelegramApiException e){//todo add logging to the project.
e.printStackTrace();}
We moved this logic into a separate class and will use it if necessary. Now we need to implement three commands: StartCommand, StopCommand and UnknownCommand. We need them so that we have something to fill our container for commands. For now, the texts will be dry and uninformative; within the framework of this task, this is not very important. So StartCommand:
packagecom.github.codegymcommunity.jrtb.command;importcom.github.codegymcommunity.jrtb.service.SendBotMessageService;importorg.telegram.telegrambots.meta.api.objects.Update;/**
* Start {@link Command}.
*/publicclassStartCommandimplementsCommand{privatefinalSendBotMessageService sendBotMessageService;publicfinalstaticString START_MESSAGE ="Привет. Я Javarush Telegram Bot. Я помогу тебе быть в курсе последних "+"статей тех авторов, котрые тебе интересны. Я еще маленький и только учусь.";// Здесь не добавляем сервис через получение из Application Context.// Потому что если это сделать так, то будет циклическая зависимость, которая// ломает работу applications.publicStartCommand(SendBotMessageService sendBotMessageService){this.sendBotMessageService = sendBotMessageService;}@Overridepublicvoidexecute(Update update){
sendBotMessageService.sendMessage(update.getMessage().getChatId().toString(), START_MESSAGE);}}
Read the comments before the constructor carefully. A circular dependency ( circular dependency ) can happen due to not quite correct architecture. In our case, we will do everything so that everything works and is correct. The real object from the Application Context will be added when the command is created already in the CommandContainer. StopCommand:
And UnknownCommand. Why do we need it? For us, this is an important command that will respond if we could not find the command that was given to us. We will also need NoCommand and HelpCommand.
NoCommand - will be responsible for the situation when the message does not begin with a command at all;
HelpCommand - will be a guide for the user, a kind of documentation.
Add HelpCommand:
packagecom.github.codegymcommunity.jrtb.command;importcom.github.codegymcommunity.jrtb.service.SendBotMessageService;importorg.telegram.telegrambots.meta.api.objects.Update;importstaticcom.github.codegymcommunity.jrtb.command.CommandName.*;/**
* Help {@link Command}.
*/publicclassHelpCommandimplementsCommand{privatefinalSendBotMessageService sendBotMessageService;publicstaticfinalString HELP_MESSAGE =String.format("✨<b>Дотупные команды</b>✨\n\n"+"<b>Начать\\закончить работу с ботом</b>\n"+"%s - начать работу со мной\n"+"%s - приостановить работу со мной\n\n"+"%s - получить помощь в работе со мной\n",
START.getCommandName(), STOP.getCommandName(), HELP.getCommandName());publicHelpCommand(SendBotMessageService sendBotMessageService){this.sendBotMessageService = sendBotMessageService;}@Overridepublicvoidexecute(Update update){
sendBotMessageService.sendMessage(update.getMessage().getChatId().toString(), HELP_MESSAGE);}}
NoCommand:
packagecom.github.codegymcommunity.jrtb.command;importcom.github.codegymcommunity.jrtb.service.SendBotMessageService;importorg.telegram.telegrambots.meta.api.objects.Update;/**
* No {@link Command}.
*/publicclassNoCommandimplementsCommand{privatefinalSendBotMessageService sendBotMessageService;publicstaticfinalString NO_MESSAGE ="Я поддерживаю команды, начинающиеся со слеша(/).\n"+"Whatбы посмотреть список команд введите /help";publicNoCommand(SendBotMessageService sendBotMessageService){this.sendBotMessageService = sendBotMessageService;}@Overridepublicvoidexecute(Update update){
sendBotMessageService.sendMessage(update.getMessage().getChatId().toString(), NO_MESSAGE);}}
And for this task, there is still an UnknownCommand:
packagecom.github.codegymcommunity.jrtb.command;importcom.github.codegymcommunity.jrtb.service.SendBotMessageService;importorg.telegram.telegrambots.meta.api.objects.Update;/**
* Unknown {@link Command}.
*/publicclassUnknownCommandimplementsCommand{publicstaticfinalString UNKNOWN_MESSAGE ="Не понимаю вас \uD83D\uDE1F, напишите /help чтобы узнать что я понимаю.";privatefinalSendBotMessageService sendBotMessageService;publicUnknownCommand(SendBotMessageService sendBotMessageService){this.sendBotMessageService = sendBotMessageService;}@Overridepublicvoidexecute(Update update){
sendBotMessageService.sendMessage(update.getMessage().getChatId().toString(), UNKNOWN_MESSAGE);}}
Next, let's add a container for our commands. It will store the objects of our commands, and upon request, we expect to receive the necessary command. Let's call it CommandContainer :
packagecom.github.codegymcommunity.jrtb.command;importcom.github.codegymcommunity.jrtb.service.SendBotMessageService;importcom.google.common.collect.ImmutableMap;importstaticcom.github.codegymcommunity.jrtb.command.CommandName.*;/**
* Container of the {@link Command}s, which are using for handling telegram commands.
*/publicclassCommandContainer{privatefinalImmutableMap<String,Command> commandMap;privatefinalCommand unknownCommand;publicCommandContainer(SendBotMessageService sendBotMessageService){
commandMap =ImmutableMap.<string, command="">builder().put(START.getCommandName(),newStartCommand(sendBotMessageService)).put(STOP.getCommandName(),newStopCommand(sendBotMessageService)).put(HELP.getCommandName(),newHelpCommand(sendBotMessageService)).put(NO.getCommandName(),newNoCommand(sendBotMessageService)).build();
unknownCommand =newUnknownCommand(sendBotMessageService);}publicCommandretrieveCommand(String commandIdentifier){return commandMap.getOrDefault(commandIdentifier, unknownCommand);}}
As you can see, everything is done simply. We have an immutable map with a key in the form of a command value and with a value in the form of a command object of type Command. In the constructor, we fill the immutable map once and refer to it all the time the application is running. The main and only method for working with a container is retrieveCommand(String commandIdentifier) . There is a command UnknownCommand which is responsible for cases when we cannot find the corresponding command. Now we are ready to inject the container into our bot class - in CodeGymTelegramBot: This is how our bot class looks now:
packagecom.github.codegymcommunity.jrtb.bot;importcom.github.codegymcommunity.jrtb.command.CommandContainer;importcom.github.codegymcommunity.jrtb.service.SendBotMessageServiceImpl;importorg.springframework.beans.factory.annotation.Value;importorg.springframework.stereotype.Component;importorg.telegram.telegrambots.bots.TelegramLongPollingBot;importorg.telegram.telegrambots.meta.api.objects.Update;importstaticcom.github.codegymcommunity.jrtb.command.CommandName.NO;/**
* Telegram bot for Javarush Community from Javarush community.
*/@ComponentpublicclassJavarushTelegramBotextendsTelegramLongPollingBot{publicstaticString COMMAND_PREFIX ="/";@Value("${bot.username}")privateString username;@Value("${bot.token}")privateString token;privatefinalCommandContainer commandContainer;publicJavarushTelegramBot(){this.commandContainer =newCommandContainer(newSendBotMessageServiceImpl(this));}@OverridepublicvoidonUpdateReceived(Update update){if(update.hasMessage()&& update.getMessage().hasText()){String message = update.getMessage().getText().trim();if(message.startsWith(COMMAND_PREFIX)){String commandIdentifier = message.split(" ")[0].toLowerCase();
commandContainer.retrieveCommand(commandIdentifier).execute(update);}else{
commandContainer.retrieveCommand(NO.getCommandName()).execute(update);}}}@OverridepublicStringgetBotUsername(){return username;}@OverridepublicStringgetBotToken(){return token;}}
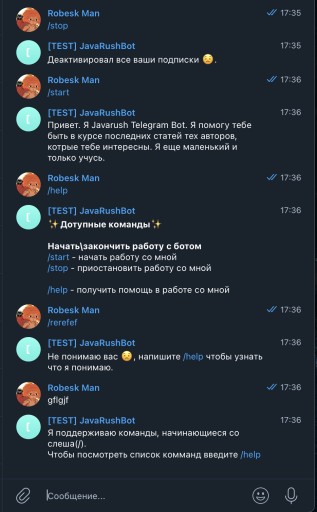
And that's it, the changes in the code are finished. How to check it? You need to start the bot and check that everything works. To do this, I update the token in application.properties, set it to the correct one, and launch the application in the JavarushTelegramBotApplication class: Now we need to check that the commands work as they should. Step by step check:
StopCommand;
StartCommand;
HelpCommand;
NoCommand;
UnknownCommand.
Here's what happened: The bot worked exactly as we expected. Continued at the link .

 And already in this package there will be all the classes that relate to the implementation of the command. We need one interface to work with commands. For this case, let's create it:

 Now we need to check that the commands work as they should. Step by step check:
 The bot worked exactly as we expected. Continued at the link .
GO TO FULL VERSION