In this article, you will get acquainted with one of the most popular enterprise frameworks for Java and create your first application using Hibernate. Never heard of Hibernate? Maybe you've heard about it, but haven't used it? Or tried to start, but didn’t succeed? In all three cases, welcome to the cut :) Hello everyone! In this article, I will talk about the main features of the Hibernate framework and help you write your first mini-application. For this we need:
Intellij Idea Ultimate Edition;
Download from the official website and activate the 30-day trial version.
PostgeSQL is one of the most popular modern database management systems (DBMS);
Maven (already built into IDEA);
A little patience.
The article is aimed primarily at those who have never worked with this technology, so the amount of code has been reduced as much as possible. Let's get started!
What is Hibernate?
This is one of the most popular implementations of the ORM model. The object-relational model describes the relationships between software objects and records in the database. Of course, Hibernate's functionality is very wide, but we will focus on the simplest functions. Our goal: to create a CRUD application (Create, Read, Update, Delete) that will be able to:
Create users (User), as well as search for them in the database by ID, update their data in the database, and also delete them from the database.
Assign vehicle objects (Auto) to users. Create, edit, find and delete cars from the database.
In addition, the application should automatically remove “orphan” cars from the database. Those. When a user is deleted, all cars belonging to him must also be deleted from the database.
The structure of our project will be as follows: As you can see, nothing complicated. 6 classes + 1 file with configs. First, let's create a new maven project in Intellij Idea. File -> New Project. From the proposed project types, select Maven and move on. Apache Maven is a framework for automating the assembly of projects based on a description of their structure in files in the POM language. The entire structure of your project will be described in the pom.xml file, which IDEA itself will create in the root of your project. In the project settings you will need to specify the Maven parameters - groupId and artifactId. Typically in projects groupId is the name of the organization or division, and the domain name of the organization or project site is written there. In turn, artifactId is the name of the project. For groupdId you can specify com.вашНикнейм.javarush, this will not affect the operation of the application in any way. For artifactId, select any project name you like. You can also leave Version unchanged. On the last screen, simply confirm your previously entered data. So, we have created the project, all that remains is to write the code and make it work :) First of all, if we want to create an application that works with a database, we definitely cannot do without a database! Download PostgreSQL from here (I use version 9). PostgreSQL has a default user 'postgres', you will need to create a password for it during installation. Don't forget your password, we'll need it later! (In general, using the default database in applications is bad practice, but in order to reduce the amount of hemorrhoids, we’ll make do with creating our own database). If you are not comfortable with the command line and SQL queries, there is good news. Intellij IDEA provides a quite suitable user interface for working with the database. It looks like this: (located on the right sidebar of IDEA, Database tab) To create a connection, click “+”, select our provider (PostgeSQL). Fill in the fields with the user, database name (both are postgres) and enter the password that you set when installing PostgreSQL. If necessary, download the Postgres driver, this can be done on this same page. Click "Test Connection" to check that the connection to the database is established. If you see the inscription “Successful”, we move on. Now let's create the tables we need. There will be two of them - users and autos. Parameters for the users table: Please note that id is the primary key. If you don’t know what a primary key is in SQL, Google it, it’s important. Setting for the autos table: For autos you need to configure Foreign Key - foreign key. It will link our tables. I advise you to read more about him; To put it very simply, it refers to an external table, in our case, users. If the car belongs to a user with id=1, then in the user_id field of the autos table it will have 1. This is how we connect users with their cars in our application. In our autos table, the user_id field will serve as a foreign key. It will refer to the id field of the users table. Thus, we have created a database with two tables. It remains to understand how to manage it from Java code. We will start with the pom.xml file, in which we need to include the necessary libraries (in Maven language they are called dependencies). All libraries are stored in the central Maven repository. Those of them that you specify in pom.xml, you can use in the project. Your pom.xml should look like this: Nothing complicated as you can see. We added only 2 dependencies - for using PostgreSQL and Hibernate.
Now let's move on to the Java code. Create all the necessary packages and classes for the project. To begin with, we will need data models - classes Userand Auto.
packagemodels;importjavax.persistence.*;importjava.util.ArrayList;importjava.util.List;@Entity@Table(name ="users")publicclassUser{@Id@GeneratedValue(strategy =GenerationType.IDENTITY)privateint id;@Column(name ="name")privateString name;//you can not specify Column name if it matches the name of the column in the tableprivateint age;@OneToMany(mappedBy ="user", cascade =CascadeType.ALL, orphanRemoval =true)privateList<Auto> autos;publicUser(){}publicUser(String name,int age){this.name = name;this.age = age;
autos =newArrayList<>();}publicvoidaddAuto(Auto auto){
auto.setUser(this);
autos.add(auto);}publicvoidremoveAuto(Auto auto){
autos.remove(auto);}publicintgetId(){return id;}publicStringgetName(){return name;}publicvoidsetName(String name){this.name = name;}publicintgetAge(){return age;}publicvoidsetAge(int age){this.age = age;}publicList<Auto>getAutos(){return autos;}publicvoidsetAutos(List<Auto> autos){this.autos = autos;}@OverridepublicStringtoString(){return"models.User{"+"id="+ id +", name='"+ name +'\''+", age="+ age +'}';}}
packagemodels;importjavax.persistence.*;@Entity@Table(name ="autos")publicclassAuto{@Id@GeneratedValue(strategy =GenerationType.IDENTITY)privateint id;@Column(name ="model")privateString model;//you can not specify Column name if it matches the name of the column in the tableprivateString color;@ManyToOne(fetch =FetchType.LAZY)@JoinColumn(name ="user_id")privateUser user;publicAuto(){}publicAuto(String model,String color){this.model = model;this.color = color;}publicintgetId(){return id;}publicStringgetModel(){return model;}publicvoidsetModel(String model){this.model = model;}publicStringgetColor(){return color;}publicvoidsetColor(String color){this.color = color;}publicUsergetUser(){return user;}publicvoidsetUser(User user){this.user = user;}@OverridepublicStringtoString(){return color +" "+ model;}}
As you can see, the classes are equipped with a bunch of still unclear annotations. Let's start dealing with them. The main annotation for us is @Entity. Read about it on Wikipedia and remember everything, this is the basis of the basics. This annotation allows Java objects of your class to be associated with the database. For a class to be an entity, it must meet the following requirements:
Must have an empty constructor ( publicor protected);
Cannot be nested, interface or enum;
Cannot be finaland cannot contain final-fields/properties;
Must contain at least one @Id field.
Check your entity classes, these are a very popular place to shoot yourself in the foot. It's very easy to forget something. In this case, the entity can:
Contain non-empty constructors;
To be inherited and to be inherited;
Contain other methods and implement interfaces.
As you can see, the class Useris very similar to the users table. There are fields id, name, age. The annotations located above them do not need much explanation: it is already clear that @Id is an indication that the field is an identifier of objects of this class. The @Table annotation above the class specifies the name of the table into which the objects are written. Pay attention to the comment above the age field: if the field name in the class and the table is the same, you don’t have to add the @Column annotation, it will work like that. Regarding the “strategy = GenerationType.IDENTITY” indicated in parentheses: there are several ID generation strategies. You can google it, but within the framework of our application you don’t have to bother. The main thing is that ids for our objects will be generated automatically, so there is no setter for id, and we don’t specify it in the constructor either. UserHowever, the class still stands out in some ways . He has a list of cars! The @OneToMany annotation appears above the list. It means that one object of the user class can correspond to several machines. The "mappedBY" setting points to the user field of the class Auto. In this way, machines and users are connected to each other. The orphanRemoval setting translates quite well from English - “remove orphans”. If we delete a user from the database, all cars associated with him will also be deleted. In turn, in the class Autoyou will see the user field with the @ManyToOne annotation (many Autos can correspond to one User) and the @JoinColumn annotation. It indicates through which column in the autos table the connection with the users table occurs (the same foreign key that we talked about earlier). After creating a data model, it’s time to teach our program to perform operations on this data in the database. Let's start with the HibernateSessionFactoryUtil utility class. It has only one task - to create a session factory for our application to work with the database (hello, the “Factory!” pattern). He can't do anything else.
In this class, we create a new configuration object, Configuration, and pass to it the classes that it should perceive as entities - Userand Auto. Pay attention to the method configuration.getProperties(). What other properties? Where? Properties are parameters for how hibernate works, specified in a special file hibernate.cfg.xml. Hibernate.cfg.xml is read here: new Configuration().configure(); As you can see, there is nothing special in it - parameters for connecting to the database, and a special parameter show_sql. It is needed so that all SQL queries that hibernate will execute against our database are output to the console. This way, you will see exactly what Hibernate is doing at each moment in time and get rid of the “magic” effect. Next we need the class UserDAO. (In a good way, you need to program through interfaces - create an interface UserDAOand separately implement it UserDAOImpl, but to reduce the amount of code I will omit this. Don’t do this in real projects!). DAO (data access object) is one of the most common design patterns, “Data Access”. Its meaning is simple - to create a layer in the application that is responsible only for accessing data, and nothing else. Get data from the database, update the data, delete the data - and that’s it. Read more about DAOs; you will use them constantly in your work. What can our class do UserDao? Actually, like all DAOs, it can only work with data. Find a user by id, update his data, delete him, pull out a list of all users from the database or save a new user in the database - that’s all its functionality.
The methods UserDaoare similar to each other. In most of them, we receive a Session object (a session connecting to our database) using our Session Factory, create a single transaction within this session, perform the necessary data transformations, save the transaction result in the database and close the session. The methods themselves, as you can see, are quite simple. The DAO is the “heart” of our application. However, we will not create the DAO directly and call its methods in our main(). All logic will be moved to the UserService.
Service is a data layer in the application that is responsible for executing business logic. If your program needs to perform some business logic, it does it through services. The service contains inside itself UserDaoand calls DAO methods in its methods. This may seem like duplication of functions to you (why not just call methods from a dao object), but with a large number of objects and complex logic, breaking the application into layers has huge benefits (this is good practice, remember this information for the future and read about “application layers” "). In our service, the logic is simple, but in real projects, service methods will contain much more than one line of code :) Now we have everything we need for the application to work! Let's create main()a user and machines for him in the method, connect them to each other and save them in the database.
importmodels.Auto;importmodels.User;importservices.UserService;importjava.sql.SQLException;publicclassMain{publicstaticvoidmain(String[] args)throwsSQLException{UserService userService =newUserService();User user =newUser("Masha",26);
userService.saveUser(user);Auto ferrari =newAuto("Ferrari","red");
ferrari.setUser(user);
user.addAuto(ferrari);Auto ford =newAuto("Ford","black");
ford.setUser(user);
user.addAuto(ford);
userService.updateUser(user);}}
As you can see, the users table has its own entry, and the autos table has its own. Let's try to rename our user. Let's clear the users table and run the code
importmodels.Auto;importmodels.User;importservices.UserService;importjava.sql.SQLException;publicclassMain{publicstaticvoidmain(String[] args)throwsSQLException{UserService userService =newUserService();User user =newUser("Masha",26);
userService.saveUser(user);Auto ferrari =newAuto("Ferrari","red");
user.addAuto(ferrari);Auto ford =newAuto("Ford","black");
ford.setUser(user);
user.addAuto(ford);
userService.updateUser(user);
user.setName("Sasha");
userService.updateUser(user);}}
Works! What if you delete a user? Let's clear the users table (autos will clear itself) and execute the code
importmodels.Auto;importmodels.User;importservices.UserService;importjava.sql.SQLException;publicclassMain{publicstaticvoidmain(String[] args)throwsSQLException{UserService userService =newUserService();User user =newUser("Masha",26);
userService.saveUser(user);Auto ferrari =newAuto("Ferrari","red");
user.addAuto(ferrari);Auto ford =newAuto("Ford","black");
ford.setUser(user);
user.addAuto(ford);
userService.updateUser(user);
user.setName("Sasha");
userService.updateUser(user);
userService.deleteUser(user);}}
And our tables are completely empty (pay attention to the console, all queries that Hibernate has executed will be displayed there). You can play around with the application and try out all its features. For example, create a user with machines, save it in the database, see what ID is assigned to it, and try using the method main()to “pull” the user from the database by this id and display a list of his machines in the console. Of course, we only saw a small part of Hibernate's functionality. Its capabilities are very wide, and it has long been one of the industry standards for Java development. If you want to study it in detail, I can recommend the book “Java Persistence API and Hibernate”, which I reviewed in one of my previous articles. I hope this article was useful to readers. If you have any questions, ask them in the comments, I will be happy to answer :) Also, do not forget to support the author in the competition by "Like" him. Or better yet - “I like it very much” :) Good luck in your studies!
 As you can see, nothing complicated. 6 classes + 1 file with configs. First, let's create a new maven project in Intellij Idea. File -> New Project. From the proposed project types, select Maven and move on.
 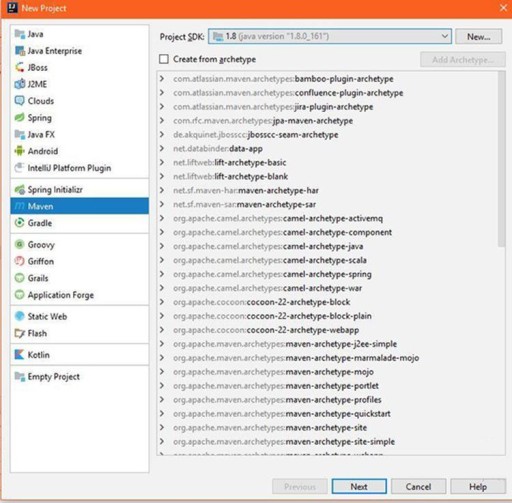 Apache Maven is a framework for automating the assembly of projects based on a description of their structure in files in the POM language. The entire structure of your project will be described in the pom.xml file, which IDEA itself will create in the root of your project. In the project settings you will need to specify the Maven parameters - groupId and artifactId. Typically in projects groupId is the name of the organization or division, and the domain name of the organization or project site is written there. In turn, artifactId is the name of the project. For groupdId you can specify
  On the last screen, simply confirm your previously entered data.
  So, we have created the project, all that remains is to write the code and make it work :) First of all, if we want to create an application that works with a database, we definitely cannot do without a database! Download PostgreSQL from here (I use version 9). PostgreSQL has a default user 'postgres', you will need to create a password for it during installation. Don't forget your password, we'll need it later! (In general, using the default database in applications is bad practice, but in order to reduce the amount of hemorrhoids, we’ll make do with creating our own database). If you are not comfortable with the command line and SQL queries, there is good news. Intellij IDEA provides a quite suitable user interface for working with the database. It looks like this:
  (located on the right sidebar of IDEA, Database tab) To create a connection, click “+”, select our provider (PostgeSQL). Fill in the fields with the user, database name (both are postgres) and enter the password that you set when installing PostgreSQL. If necessary, download the Postgres driver, this can be done on this same page. Click "Test Connection" to check that the connection to the database is established. If you see the inscription “Successful”, we move on. Now let's create the tables we need. There will be two of them - users and autos. Parameters for the users table:
  Please note that id is the primary key. If you don’t know what a primary key is in SQL, Google it, it’s important. Setting for the autos table:
  For autos you need to configure Foreign Key - foreign key. It will link our tables. I advise you to read more about him; To put it very simply, it refers to an external table, in our case, users. If the car belongs to a user with id=1, then in the user_id field of the autos table it will have 1. This is how we connect users with their cars in our application. In our autos table, the user_id field will serve as a foreign key. It will refer to the id field of the users table.
  Thus, we have created a database with two tables. It remains to understand how to manage it from Java code. We will start with the pom.xml file, in which we need to include the necessary libraries (in Maven language they are called dependencies). All libraries are stored in the central Maven repository. Those of them that you specify in pom.xml, you can use in the project. Your pom.xml should look like this:
  Nothing complicated as you can see. We added only 2 dependencies - for using PostgreSQL and Hibernate.

 Hibernate.cfg.xml is read here:
 Let's try to rename our user. Let's clear the users table and run the code
 What if you delete a user? Let's clear the users table (autos will clear itself) and execute the code
GO TO FULL VERSION