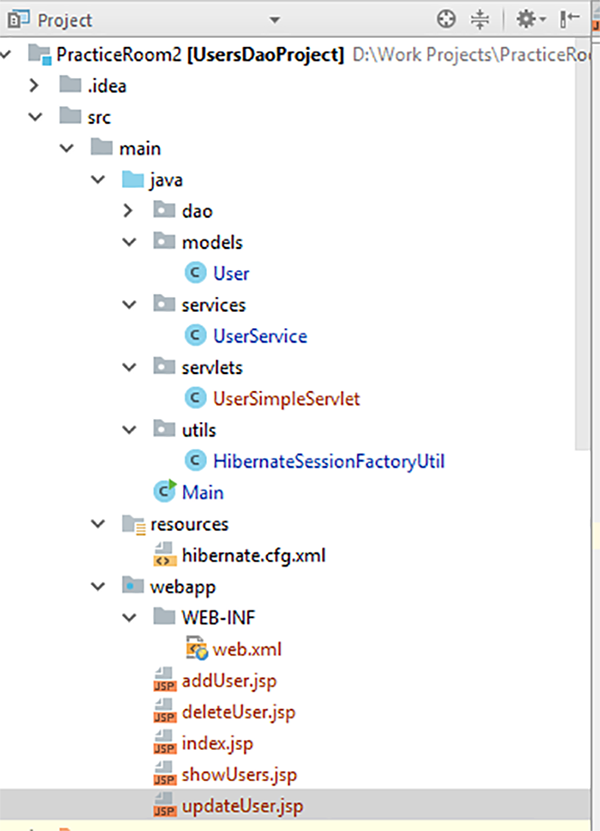
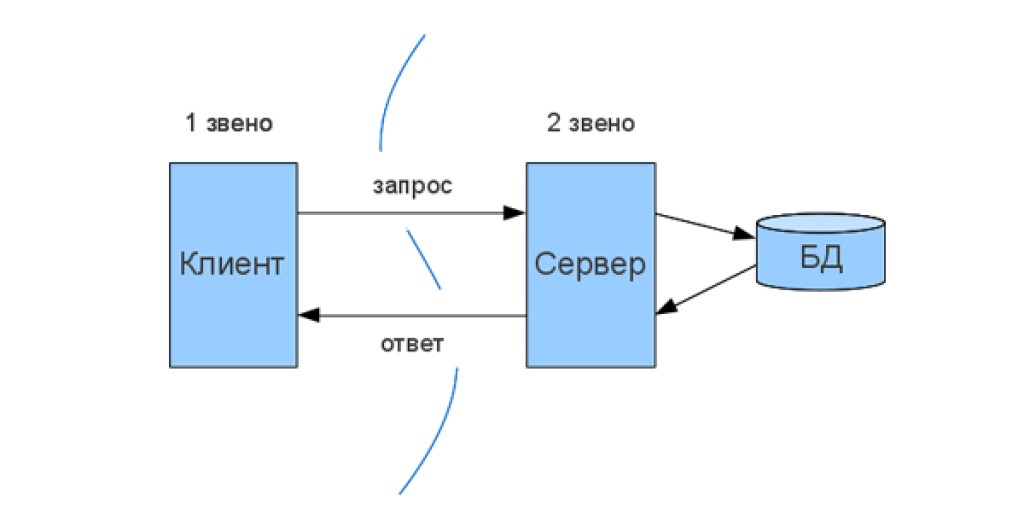
Hi all! In this article, you will become familiar with the basic web development concept of servlets and be able to write a simple application using them. To avoid unnecessary steps, we will not start from scratch, and will continue to work on our application from my previous article about Hibernate . However, since we are just getting started with servlets, I removed everything related to the Auto class from the application and left only the User class and its actions. The project structure will look like this: So, servlets! Wikipedia says: "A servlet is a Java interface whose implementation extends the functionality of the server. A servlet interacts with clients through a request-response principle." And indeed it is. Here we first encounter the concept of “client-server application architecture”. Its essence is quite simple and fits into one picture (taken from here ).
The client contacts the server by sending an HTTP request. The server generates the necessary data (for example, receives it from the database) and returns it to the client. The simplest example: on a certain social network you click on the “Friends” button and thus send a request to the server. The server checks the list of your friends in the database and returns it to you (the client). The list of HTTP requests is quite large, but if you have never encountered them, then for a better understanding it is better to read about them, for example, here . Our task is to: Create a CRUD application using servlets. The application must be able to create, modify, and delete users from the database using a servlet that processes HTTP requests. Our application from the article about Hibernate already knew how to do this, but it was controlled directly from Java code, more precisely, from the main() method. Here the requests will be sent by the client, that is, you :) The first thing we need to do is add new dependencies to our pom.xml file
JSTL tag library. It will be needed to create the client side, namely JSP pages;
Spring-WebMVC. We will need one Spring class, which we will talk about a little later.
The operation of servlets is managed by the servlet container. In our case we will use Apache Tomcat. Quite a popular thing, and you've probably already heard of it :) The life cycle of a servlet consists of the following steps:
If there is no servlet in the container.
The servlet class is loaded by the container.
The container creates an instance of the servlet class.
The container calls the init() method. This method initializes the servlet and is called first before the servlet can service requests. The init() method is called only once during its entire lifecycle.
Serving a client request. Each request is processed in its own separate thread. The container calls the service() method for each request. This method determines the type of the incoming request and distributes it to the method corresponding to this type for processing the request. The servlet developer must provide implementations for these methods. If a request is received for which a method is not implemented, the method of the parent class is called and usually ends with an error being returned to the requester.
In case the container needs to delete a servlet, it calls the destroy() method, which removes the servlet from service. Like the init() method, this method is also called once during the entire servlet cycle.
Our servlet will look quite simple:
packageservlets;importmodels.User;importservices.UserService;importjavax.servlet.RequestDispatcher;importjavax.servlet.ServletConfig;importjavax.servlet.ServletException;importjavax.servlet.http.HttpServlet;importjavax.servlet.http.HttpServletRequest;importjavax.servlet.http.HttpServletResponse;importjava.io.IOException;importjava.util.List;publicclassUserSimpleServletextendsHttpServlet{privateUserService service =newUserService();publicvoidinit(ServletConfig servletConfig){try{super.init(servletConfig);}catch(ServletException e){
e.printStackTrace();}}@OverrideprotectedvoiddoGet(HttpServletRequest req,HttpServletResponse resp)throwsServletException,IOException{List<User> users = service.findAllUsers();
req.setAttribute("users", users);RequestDispatcher dispatcher = req.getRequestDispatcher("/showUsers.jsp");
dispatcher.forward(req, resp);}@OverrideprotectedvoiddoPost(HttpServletRequest req,HttpServletResponse resp)throwsServletException,IOException{String name = req.getParameter("name");int age =Integer.parseInt(req.getParameter("age"));User user =newUser(name, age);
service.saveUser(user);
resp.sendRedirect("/users");}@OverrideprotectedvoiddoPut(HttpServletRequest req,HttpServletResponse resp)throwsServletException,IOException{int id =Integer.parseInt(req.getParameter("id"));User user = service.findUser(id);
user.setName(req.getParameter("name"));
user.setAge(Integer.parseInt(req.getParameter("age")));
service.updateUser(user);
resp.sendRedirect("/users");}@OverrideprotectedvoiddoDelete(HttpServletRequest req,HttpServletResponse resp)throwsIOException{int id =Integer.parseInt(req.getParameter("id"));
service.deleteUser(service.findUser(id));
resp.sendRedirect("/users");}}
As you can see, it contains the init() method, which was described above, and implements 4 methods that match four HTTP requests - doGet(), doPost(), doPut() and doDelete(). Each of them will allow us, respectively, to receive, create, edit and delete users. The methods take as input objects of the javax.servlet.http.HttpServletRequest and javax.servlet.http.HttpServletResponse classes - that is, the request sent to the server and the response that the client receives. Inside the methods, the necessary methods of the UserService class are executed, a response is generated for the client, and then redirected to the /users address. For example, in the doGet() method we get a list of all users. Next, we create an object of the RequestDispatcher class, which allows us to include objects in an Http request, as well as redirect it to a specific resource (for example, a client JSP page). In the doPut() method (updating user data), we process the HTTP request, extract the id, name and age parameters from it, find the user with the specified id, assign to him the name and age that came with him in the request, and return to page /users. However, for all these methods to work correctly, we need to configure the servlet. For this we use the web.xml file in the WEB-INF folder.
All the tags in this file are, in principle, intuitive, but let's go through them sequentially. <welcome-file-list> - the starting JSP page is specified, which will be opened first when the application is launched. In our case, this is the index.jsp page. <servlet> - registering our UserSimpleServlet class as a servlet. <servlet-mapping> is a very important tag. It defines the URLs that will be processed by the servlet. In our case, these are all URLs, so we simply indicate “/”. But, for example, if we had an application with users and their machines, then we could create a second servlet - SimpleAutoServlet. Then the mapping for the user servlet would be “/users” (that is, requests related to processing users), and for the auto servlet it would be “/autos”. And finally, <filter>. It defines internally an object of the class org.springframework.web.filter.HiddenHttpMethodFilter. The article does not concern Spring, so I will not talk about it in detail. Let me just say that it is attached to our application only as an additional feature. The point is that we will use JSP pages to create the client side. Our data will be displayed on the page as a table with a list of users. Inside JSP pages, HTML <form/> tags will be used. And only HTTP GET and POST requests can be used to send data from <form/>. That is, for all three operations - updating, deleting and creating a user - we would have to use only POST requests. Using PUT and DELETE requests would not be available to us. And, in principle, this is quite normal and easy to implement, but the HiddenHttpMethodFilter class allows us to use them. This will make the differences between the operations in the application more clear to the reader. Finally, let's move on to the client side. It is represented by five JSP pages. index.jsp
<%@ page contentType="text/html;charset=UTF-8" language="java"%><html><head><title>Здравствуйте!</title></head><body>
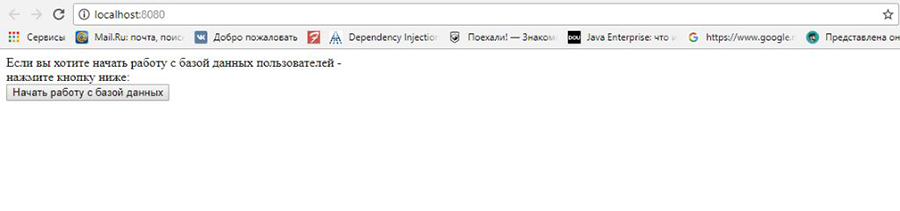
Если вы хотите начать работу с базой данных пользователей -<br>
нажмите кнопку ниже:<form action ="users" method="get"><input type="submit" value="Начать работу с базой данных"></form></body></html>
A JSP page (Java Server Page) contains two types of text: static source data, which can be in one of the text formats (HTML, SVG, WML, or XML), and JSP elements, which construct dynamic content. To understand what JSP is, I will allow myself to copy and paste a piece of a very good article by one author ( from here ). "Essentially, JSP is converted into a servlet the first time it is accessed and works as a servlet. This is very important to understand. JSP IS NOT a page like an HTML page - it is important for a novice programmer to clearly understand that this is another servlet - you just don’t need to program its output. It you can simply draw. And substitute the data in the right places. But since the JSP page at least somehow resembles HTML, it will obviously be easier for the designer. And I once again STRONGLY tell beginners - JSP is a SERVLET . It is prepared with all the data on the server. This is where all the data is inserted. And the user receives a ready-made HTML page in the browser, which does not have any signs of JAVA." You can see for yourself that the JSP page is indeed a servlet, because each page contains a method that needs to be executed. For example, the start page index.jsp states that when you click on the "Start working with the database" button, method="get" will be executed. On the addUser.jsp page, which is responsible for creating a new user, when you click on the save button, method="post" will be executed. The rest of the JSP consists of ordinary static HTML markup, so we will not dwell on them in detail - this is the topic of a separate article, of which there are many on the Internet. So, we have created our application, all that remains is to test it in action! To do this, we will need the Apache Tomcat servlet container mentioned above. You can download the cat from the official website (I use version 8). Next, we need to create a configuration in IDEA to run our application via Tomcat. To do this, open the "Edit Configurations" tab, create a new configuration and select Tomcat Server Local. In the Application Server tab, specify the path to the folder where Tomcat is located. Next, go to the Deployment tab. Here we configure the deployment of our application on a local server. Click "+", select "Artifact" -> Your Project Name: war (we will assemble the application into a war file). That's basically it! On the "Server" page you can see that the same application will run at "http://localhost:8080/". Save this configuration and name it something (my config name is “Tommy”). Next, on the Maven tab in IDEA (on the right side) we will use the war plugin to build our project into a war file (Plugins -> war -> war:war). Success! The start page has launched. Now click on the “Start working with the database” button. Our JSP page index.jsp will generate a GET request that will be processed by the server. The server will generate a response and return it to us in the form of a list of all existing users (if, of course, they are in the database). And here they are! Let's try to delete one of the users: It works too! So we wrote our first application using servlets. As you can see, everything turned out to be not so difficult :) As homework, you can, for example, return the functionality of working with cars from the previous article to the application. Those. create a separate servlet and jsp pages for cars and teach our application to display a list of the user’s cars, add new cars to him, as well as edit and delete them. PS Servlets and JSP are quite ancient technologies, and on the Internet you can often find comments in the spirit of “who needs this junk?” The answer is quite simple - it is needed primarily by those who will work on real projects, in which it is quite possible that there will be a lot of code written using them. And sawing up “old stuff” into something new, without understanding how it works, is still a pleasure :) For a more thorough study of the topic of JSP and servlets, you can use the book “Head First Servlets and JSP” (in English only). It was written by the same authors as the famous super-book "Head First Java", which for many can be a guarantee of quality :) I hope this article was useful for readers! If you would like to see new articles, do not forget to support the author in the competition by "Like" him. Or better yet - “I like it very much” :) Thank you for your attention, and good luck in your studies!
 So, servlets! Wikipedia says: "A servlet is a Java interface whose implementation extends the functionality of the server. A servlet interacts with clients through a request-response principle." And indeed it is. Here we first encounter the concept of “client-server application architecture”. Its essence is quite simple and fits into one picture (taken from here ).

 create a new configuration
  and select Tomcat Server Local. In the Application Server tab, specify the path to the folder where Tomcat is located.
 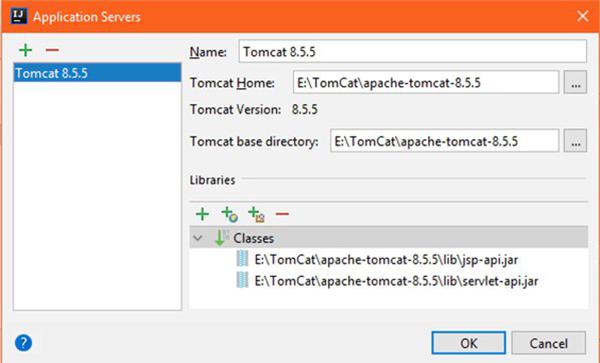 Next, go to the Deployment tab.
  Here we configure the deployment of our application on a local server. Click "+", select "Artifact" -> Your Project Name: war (we will assemble the application into a war file).
  That's basically it! On the "Server" page you can see that the same application will run at "http://localhost:8080/". Save this configuration and name it something (my config name is “Tommy”). Next, on the Maven tab in IDEA (on the right side) we will use the war plugin to build our project into a war file (Plugins -> war -> war:war).
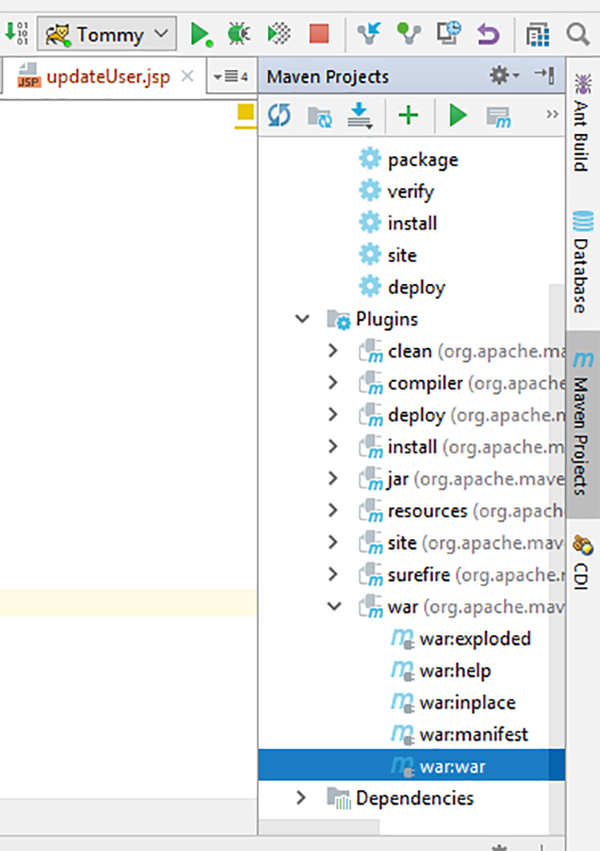
 Success! The start page has launched. Now click on the “Start working with the database” button. Our JSP page index.jsp will generate a GET request that will be processed by the server. The server will generate a response and return it to us in the form of a list of all existing users (if, of course, they are in the database). And here they are!
 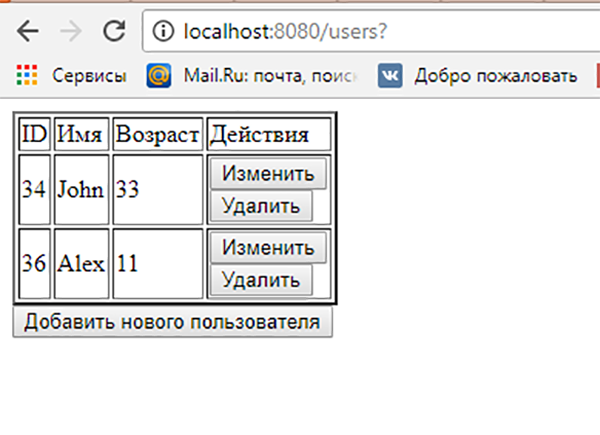 Let's try to delete one of the users:
 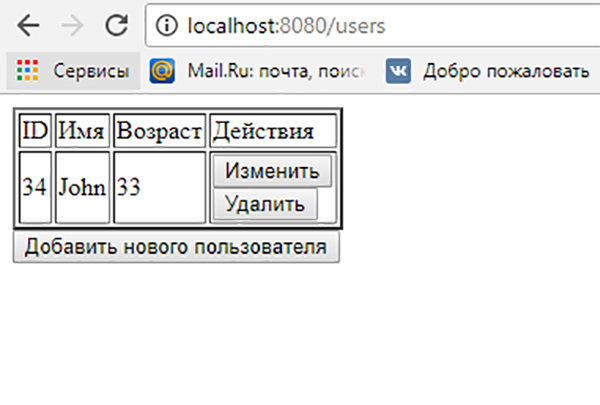 It works too! So we wrote our first application using servlets. As you can see, everything turned out to be not so difficult :) As homework, you can, for example, return the functionality of working with cars from the previous article to the application. Those. create a separate servlet and jsp pages for cars and teach our application to display a list of the user’s cars, add new cars to him, as well as edit and delete them. PS Servlets and JSP are quite ancient technologies, and on the Internet you can often find comments in the spirit of “who needs this junk?” The answer is quite simple - it is needed primarily by those who will work on real projects, in which it is quite possible that there will be a lot of code written using them. And sawing up “old stuff” into something new, without understanding how it works, is still a pleasure :) For a more thorough study of the topic of JSP and servlets, you can use the book “Head First Servlets and JSP” (in English only). It was written by the same authors as the famous super-book "Head First Java", which for many can be a guarantee of quality :) I hope this article was useful for readers! If you would like to see new articles, do not forget to support the author in the competition by "Like" him. Or better yet - “I like it very much” :) Thank you for your attention, and good luck in your studies!
GO TO FULL VERSION