親愛なる皆さん、こんにちは。今日は、ニーズに合わせてコマンド設計のテンプレート (テンプレートはパターンであり、この文脈では同じものです) を実装します。このテンプレートを使用すると、ボットのコマンドの処理を便利かつ正確に行うことができます。 ![「Java プロジェクトの A から Z まで」: ボットを操作するためのコマンド パターンを実装します。 パート 1 - 1]()
まず、これがどのようなパターンであるかについて話すと良いでしょう - コマンド。しかし、これを行うと、記事が非常に大きくなり、煩雑になります。そこで、独学用の教材を選びました。
![「Java プロジェクトの A から Z まで」: ボットを操作するためのコマンド パターンを実装します。 パート 1 ~ 2]() このパッケージには、コマンドの実装に関連するすべてのクラスがすでに含まれています。コマンドを操作するためのインターフェースが 1 つ必要です。この場合は、次のように作成しましょう。
このパッケージには、コマンドの実装に関連するすべてのクラスがすでに含まれています。コマンドを操作するためのインターフェースが 1 つ必要です。この場合は、次のように作成しましょう。
![Java-университет]()
ボットを通じてメッセージを送信するサービスも必要です。これを行うには、コマンドpackageの隣にサービスパッケージを作成し、そこに必要なサービスをすべて追加します。 ここで、この場合の「サービス」という言葉の意味に注目してみる価値があります。アプリケーションを検討する場合、多くの場合、エンドポイントを操作するレイヤー (コントローラー)、ビジネス ロジックのレイヤー (サービス)、データベースを操作するレイヤー (リポジトリ) の複数のレイヤーに分割されます。したがって、この場合、サービスは、ある種のビジネス ロジックを実装するクラスです。 サービスを正しく作成するにはどうすればよいですか? まず、そのインターフェイスと実装を作成します。SpringBoot アプリケーションのアプリケーション コンテキストに「@Service」アノテーションを使用して実装を追加し、必要に応じて「@Autowired」アノテーションを使用して実装を強化します。したがって、SendBotMessageService インターフェイスを作成します (ネーミング サービスでは通常、名前の最後に Service が追加されます)。
![「Java プロジェクトの A から Z まで」: ボットを操作するためのコマンド パターンを実装します。 パート 1 ~ 3]() 次に、コマンドが期待どおりに機能することを確認する必要があります。段階的に確認していきます。
次に、コマンドが期待どおりに機能することを確認する必要があります。段階的に確認していきます。
![「Java プロジェクトの A から Z まで」: ボットを操作するためのコマンド パターンを実装します。 パート 1 ~ 4]() ボットは予想どおりに機能しました。続きはリンクからどうぞ。
ボットは予想どおりに機能しました。続きはリンクからどうぞ。
| 皆さん、 Javarush Telegram Bot プロジェクトは好きですか? 怠惰にしないでください。星を付けてください。こうすることで、彼が興味深い人であることが明確になり、彼を成長させるのがより楽しくなります。 |
- これは4年前の私の記事です。中学生の頃に書いた作品なので、あまり厳しい評価はしないでください。
- YouTube にある、非常に感情的でインタラクティブなスウェーデン人のビデオ。ぜひお勧めします。彼は美しく話し、英語は明瞭でわかりやすいです。そして一般的に、彼は他のデザインパターンに関するビデオを持っています。
- 私の記事へのコメントで、Nullptr35さんがこのビデオを勧めてくれました。
JRTB-3と書きます
すべては以前と同じです:- メインブランチを更新します。
- 更新されたメイン ブランチに基づいて、新しいJRTB-3を作成します。
- パターンを実装してみましょう。
- 実行された作業を説明する新しいコミットを作成します。
- プルリクエストを作成してチェックし、すべてがOKであれば作業をマージします。
if (message.startsWith("/start")) {
   doStartCommand();
} else if(message.startsWith("/stop")) {
   doStopCommand();
} else if(message.startsWith("/addUser")) {
   doAddUserCommand();
}
...
else if(message.startsWith("/makeMeHappy")) {
   doMakeMeHappyCommand();
}if (message.startsWith(COMMAND_PREFIX)) {
String commandIdentifier = message.split(" ")[0].toLowerCase();
commandContainer.getCommand(commandIdentifier, userName).execute(update);
} else {
commandContainer.getCommand(NO.getCommand(), userName).execute(update);
} このパッケージには、コマンドの実装に関連するすべてのクラスがすでに含まれています。コマンドを操作するためのインターフェースが 1 つ必要です。この場合は、次のように作成しましょう。
package com.github.javarushcommunity.jrtb.command;

import org.telegram.telegrambots.meta.api.objects.Update;

/**
* Command interface for handling telegram-bot commands.
*/
public interface Command {

   /**
    * Main method, which is executing command logic.
    *
    * @param update provided {@link Update} object with all the needed data for command.
    */
   void execute(Update update);
}package com.github.javarushcommunity.jrtb.command;
/**
* Enumeration for {@link Command}'s.
*/
public enum CommandName {
START("/start"),
STOP("/stop");
private final String commandName;
CommandName(String commandName) {
this.commandName = commandName;
}
public String getCommandName() {
return commandName;
}
}
package com.github.javarushcommunity.jrtb.service;

/**
* Service for sending messages via telegram-bot.
*/
public interface SendBotMessageService {

   /**
    * Send message via telegram bot.
    *
    * @param chatId provided chatId in which messages would be sent.
    * @param message provided message to be sent.
    */
   void sendMessage(String chatId, String message);
}package com.github.javarushcommunity.jrtb.service;
import com.github.javarushcommunity.jrtb.bot.JavarushTelegramBot;
import org.springframework.beans.factory.annotation.Autowired;
import org.springframework.stereotype.Service;
import org.telegram.telegrambots.meta.api.methods.send.SendMessage;
import org.telegram.telegrambots.meta.exceptions.TelegramApiException;
/**
* Implementation of {@link SendBotMessageService} interface.
*/
@Service
public class SendBotMessageServiceImpl implements SendBotMessageService {
private final JavarushTelegramBot javarushBot;
@Autowired
public SendBotMessageServiceImpl(JavarushTelegramBot javarushBot) {
this.javarushBot = javarushBot;
}
@Override
public void sendMessage(String chatId, String message) {
SendMessage sendMessage = new SendMessage();
sendMessage.setChatId(chatId);
sendMessage.enableHtml(true);
sendMessage.setText(message);
try {
javarushBot.execute(sendMessage);
} catch (TelegramApiException e) {
//todo add logging to the project.
e.printStackTrace();
}
}
}SendMessage sendMessage = new SendMessage();
sendMessage.setChatId(chatId);
sendMessage.setText(message);
try {
javarushBot.execute(sendMessage);
} catch (TelegramApiException e) {
//todo add logging to the project.
e.printStackTrace();
}package com.github.javarushcommunity.jrtb.command;
import com.github.javarushcommunity.jrtb.service.SendBotMessageService;
import org.telegram.telegrambots.meta.api.objects.Update;
/**
* Start {@link Command}.
*/
public class StartCommand implements Command {
private final SendBotMessageService sendBotMessageService;
public final static String START_MESSAGE = "Привет. Я Javarush Telegram Bot. Я помогу тебе быть в курсе последних " +
"статей тех авторов, котрые тебе интересны. Я еще маленький и только учусь.";
// Здесь не добавляем сервис через получение из Application Context.
// Потому что если это сделать так, то будет циклическая зависимость, которая
// ломает работу applications.
public StartCommand(SendBotMessageService sendBotMessageService) {
this.sendBotMessageService = sendBotMessageService;
}
@Override
public void execute(Update update) {
sendBotMessageService.sendMessage(update.getMessage().getChatId().toString(), START_MESSAGE);
}
}package com.github.javarushcommunity.jrtb.command;
import com.github.javarushcommunity.jrtb.service.SendBotMessageService;
import org.telegram.telegrambots.meta.api.objects.Update;
/**
* Stop {@link Command}.
*/
public class StopCommand implements Command {
private final SendBotMessageService sendBotMessageService;
public static final String STOP_MESSAGE = "Деактивировал все ваши подписки \uD83D\uDE1F.";
public StopCommand(SendBotMessageService sendBotMessageService) {
this.sendBotMessageService = sendBotMessageService;
}
@Override
public void execute(Update update) {
sendBotMessageService.sendMessage(update.getMessage().getChatId().toString(), STOP_MESSAGE);
}
}- NoCommand - メッセージがまったくコマンドで始まらない場合に対応します。
- HelpCommand はユーザーのためのガイド、一種のドキュメントになります。
package com.github.javarushcommunity.jrtb.command;

import com.github.javarushcommunity.jrtb.service.SendBotMessageService;
import org.telegram.telegrambots.meta.api.objects.Update;

import static com.github.javarushcommunity.jrtb.command.CommandName.*;

/**
* Help {@link Command}.
*/
public class HelpCommand implements Command {

   private final SendBotMessageService sendBotMessageService;

   public static final String HELP_MESSAGE = String.format("✨<b>Дотупные команды</b>✨\n\n"

                   + "<b>Начать\\закончить работу с ботом</b>\n"
                   + "%s - начать работу со мной\n"
                   + "%s - приостановить работу со мной\n\n"
                   + "%s - получить помощь в работе со мной\n",
           START.getCommandName(), STOP.getCommandName(), HELP.getCommandName());

   public HelpCommand(SendBotMessageService sendBotMessageService) {
       this.sendBotMessageService = sendBotMessageService;
   }

   @Override
   public void execute(Update update) {
       sendBotMessageService.sendMessage(update.getMessage().getChatId().toString(), HELP_MESSAGE);
   }
}package com.github.javarushcommunity.jrtb.command;
import com.github.javarushcommunity.jrtb.service.SendBotMessageService;
import org.telegram.telegrambots.meta.api.objects.Update;
/**
* No {@link Command}.
*/
public class NoCommand implements Command {
private final SendBotMessageService sendBotMessageService;
public static final String NO_MESSAGE = "Я поддерживаю команды, начинающиеся со слеша(/).\n"
+ "Whatбы посмотреть список команд введите /help";
public NoCommand(SendBotMessageService sendBotMessageService) {
this.sendBotMessageService = sendBotMessageService;
}
@Override
public void execute(Update update) {
sendBotMessageService.sendMessage(update.getMessage().getChatId().toString(), NO_MESSAGE);
}
}package com.github.javarushcommunity.jrtb.command;
import com.github.javarushcommunity.jrtb.service.SendBotMessageService;
import org.telegram.telegrambots.meta.api.objects.Update;
/**
* Unknown {@link Command}.
*/
public class UnknownCommand implements Command {
public static final String UNKNOWN_MESSAGE = "Не понимаю вас \uD83D\uDE1F, напишите /help чтобы узнать что я понимаю.";
private final SendBotMessageService sendBotMessageService;
public UnknownCommand(SendBotMessageService sendBotMessageService) {
this.sendBotMessageService = sendBotMessageService;
}
@Override
public void execute(Update update) {
sendBotMessageService.sendMessage(update.getMessage().getChatId().toString(), UNKNOWN_MESSAGE);
}
}package com.github.javarushcommunity.jrtb.command;
import com.github.javarushcommunity.jrtb.service.SendBotMessageService;
import com.google.common.collect.ImmutableMap;
import static com.github.javarushcommunity.jrtb.command.CommandName.*;
/**
* Container of the {@link Command}s, which are using for handling telegram commands.
*/
public class CommandContainer {
private final ImmutableMap<String, Command> commandMap;
private final Command unknownCommand;
public CommandContainer(SendBotMessageService sendBotMessageService) {
commandMap = ImmutableMap.<string, command="">builder()
.put(START.getCommandName(), new StartCommand(sendBotMessageService))
.put(STOP.getCommandName(), new StopCommand(sendBotMessageService))
.put(HELP.getCommandName(), new HelpCommand(sendBotMessageService))
.put(NO.getCommandName(), new NoCommand(sendBotMessageService))
.build();
unknownCommand = new UnknownCommand(sendBotMessageService);
}
public Command retrieveCommand(String commandIdentifier) {
return commandMap.getOrDefault(commandIdentifier, unknownCommand);
}
}package com.github.javarushcommunity.jrtb.bot;
import com.github.javarushcommunity.jrtb.command.CommandContainer;
import com.github.javarushcommunity.jrtb.service.SendBotMessageServiceImpl;
import org.springframework.beans.factory.annotation.Value;
import org.springframework.stereotype.Component;
import org.telegram.telegrambots.bots.TelegramLongPollingBot;
import org.telegram.telegrambots.meta.api.objects.Update;
import static com.github.javarushcommunity.jrtb.command.CommandName.NO;
/**
* Telegram bot for Javarush Community from Javarush community.
*/
@Component
public class JavarushTelegramBot extends TelegramLongPollingBot {
public static String COMMAND_PREFIX = "/";
@Value("${bot.username}")
private String username;
@Value("${bot.token}")
private String token;
private final CommandContainer commandContainer;
public JavarushTelegramBot() {
this.commandContainer = new CommandContainer(new SendBotMessageServiceImpl(this));
}
@Override
public void onUpdateReceived(Update update) {
if (update.hasMessage() && update.getMessage().hasText()) {
String message = update.getMessage().getText().trim();
if (message.startsWith(COMMAND_PREFIX)) {
String commandIdentifier = message.split(" ")[0].toLowerCase();
commandContainer.retrieveCommand(commandIdentifier).execute(update);
} else {
commandContainer.retrieveCommand(NO.getCommandName()).execute(update);
}
}
}
@Override
public String getBotUsername() {
return username;
}
@Override
public String getBotToken() {
return token;
}
} 次に、コマンドが期待どおりに機能することを確認する必要があります。段階的に確認していきます。
- 停止コマンド;
- 開始コマンド;
- ヘルプコマンド;
- いいえコマンド;
- 不明なコマンド。
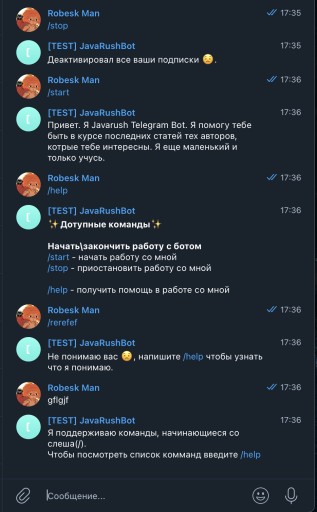 ボットは予想どおりに機能しました。続きはリンクからどうぞ。
GO TO FULL VERSION