이것은 주제에 몰입하고 나와 같은 생각을 하는 데 충분할 것입니다. 글쎄, 이 디자인 패턴에 익숙한 사람들은 건너뛰고 계속 진행할 수 있습니다.
JRTB-3을 쓴다
모든 것이 이전과 동일합니다.
우리는 메인 브랜치를 업데이트합니다.
업데이트된 메인 브랜치를 기반으로 새로운 JRTB-3을 생성합니다 .
패턴을 구현해보자.
완료된 작업을 설명하는 새로운 커밋을 만듭니다.
풀 요청을 생성하고 확인한 후 모든 것이 정상이면 작업을 병합합니다.
1~2번 항목은 보여드리지 않겠습니다. 이전 글에서 아주 자세하게 설명했으므로 바로 템플릿 구현을 진행하겠습니다. 이 템플릿이 우리에게 적합한 이유는 무엇입니까? 예, 명령을 실행할 때마다 onUpdateReceived(Update update) 메서드 로 이동 하고 명령에 따라 다른 논리를 실행하기 때문입니다. 이 패턴이 없다면 우리는 수많은 if-else if 문을 가지게 될 것입니다. 이 같은:
그게 다야! 그리고 얼마나 많은 명령을 추가하더라도 이 코드 섹션은 변경되지 않습니다. 그는 무엇을 하고 있나요? 첫 번째 if는 메시지가 명령 접두사 "/"로 시작하는지 확인합니다. 이 경우 첫 번째 공백까지 줄을 선택하고 CommandContainer에서 해당 명령을 찾습니다. 발견하자마자 명령을 실행합니다. 그게 전부입니다...) 원하는 바와 시간이 있다면 먼저 한 수업에서 여러 가지 조건과 모든 것을 갖춘 다음 템플릿을 사용하여 팀 작업을 구현할 수 있습니다. 당신은 차이점을 볼 수 있습니다. 얼마나 아름다울까요! 먼저 봇 패키지 옆에 command 라는 패키지를 생성해 보겠습니다 . 그리고 이미 이 패키지에는 명령 구현과 관련된 모든 클래스가 있습니다. 명령 작업을 위해서는 하나의 인터페이스가 필요합니다. 이 경우에는 다음을 생성해 보겠습니다.
packagecom.github.javarushcommunity.jrtb.command;importorg.telegram.telegrambots.meta.api.objects.Update;/**
* Command interface for handling telegram-bot commands.
*/publicinterfaceCommand{/**
* Main method, which is executing command logic.
*
* @param update provided {@link Update} object with all the needed data for command.
*/voidexecute(Update update);}
이 시점에서는 명령의 역방향 작업을 구현할 필요가 없으므로 이 메서드(실행 취소)를 건너뜁니다. 실행 메소드에서 Update 객체는 인수로 제공됩니다 . 이는 봇의 기본 메소드에 제공되는 것과 정확히 같습니다. 이 개체에는 명령을 처리하는 데 필요한 모든 것이 포함됩니다. 다음으로 명령 값(시작, 중지 등)을 저장할 열거형을 추가하겠습니다. 왜 이것이 필요합니까? 따라서 팀 이름에 대한 정보 소스는 단 하나뿐입니다. 또한 명령 패키지 에서도 이를 생성합니다 . CommandName 이라고 부르겠습니다 .
또한 봇을 통해 메시지를 보내는 서비스도 필요합니다. 이를 위해 package 명령 옆에 서비스 패키지를 생성 하고 여기에 필요한 모든 서비스를 추가합니다. 이 경우 서비스라는 단어가 의미하는 바에 초점을 맞출 가치가 있습니다. 애플리케이션을 고려하면 엔드포인트 작업을 위한 레이어(컨트롤러), 비즈니스 로직 레이어(서비스), 데이터베이스 작업을 위한 레이어(저장소) 등 여러 레이어로 나누어지는 경우가 많습니다. 따라서 우리의 경우 서비스는 일종의 비즈니스 로직을 구현하는 클래스입니다. 서비스를 올바르게 만드는 방법은 무엇입니까? 먼저 이에 대한 인터페이스와 구현을 만듭니다. SpringBoot 애플리케이션의 애플리케이션 컨텍스트에 `@Service` 주석을 사용하여 구현을 추가하고, 필요한 경우 `@Autowired` 주석을 사용하여 이를 강화합니다. 따라서 SendBotMessageService 인터페이스를 만듭니다(네이밍 서비스에서는 일반적으로 이름 끝에 Service를 추가합니다).
packagecom.github.javarushcommunity.jrtb.service;/**
* Service for sending messages via telegram-bot.
*/publicinterfaceSendBotMessageService{/**
* Send message via telegram bot.
*
* @param chatId provided chatId in which messages would be sent.
* @param message provided message to be sent.
*/voidsendMessage(String chatId,String message);}
다음으로 구현을 만듭니다.
packagecom.github.javarushcommunity.jrtb.service;importcom.github.javarushcommunity.jrtb.bot.JavarushTelegramBot;importorg.springframework.beans.factory.annotation.Autowired;importorg.springframework.stereotype.Service;importorg.telegram.telegrambots.meta.api.methods.send.SendMessage;importorg.telegram.telegrambots.meta.exceptions.TelegramApiException;/**
* Implementation of {@link SendBotMessageService} interface.
*/@ServicepublicclassSendBotMessageServiceImplimplementsSendBotMessageService{privatefinalJavarushTelegramBot javarushBot;@AutowiredpublicSendBotMessageServiceImpl(JavarushTelegramBot javarushBot){this.javarushBot = javarushBot;}@OverridepublicvoidsendMessage(String chatId,String message){SendMessage sendMessage =newSendMessage();
sendMessage.setChatId(chatId);
sendMessage.enableHtml(true);
sendMessage.setText(message);try{
javarushBot.execute(sendMessage);}catch(TelegramApiException e){//todo add logging to the project.
e.printStackTrace();}}}
이것이 구현의 모습입니다. 가장 중요한 마법은 디자이너가 만들어지는 곳입니다. 생성자의 @Autowired 주석을 사용하여 SpringBoot는 애플리케이션 컨텍스트에서 이 클래스의 객체를 찾습니다. 그리고 그는 이미 거기에 있습니다. 이는 다음과 같이 작동합니다. 애플리케이션에서 어디에서나 봇에 액세스하여 작업을 수행할 수 있습니다. 그리고 이 서비스는 메시지 전송을 담당합니다. 그래서 우리는 언제 어디서나 다음과 같은 글을 쓰지 않습니다.
SendMessage sendMessage =newSendMessage();
sendMessage.setChatId(chatId);
sendMessage.setText(message);try{
javarushBot.execute(sendMessage);}catch(TelegramApiException e){//todo add logging to the project.
e.printStackTrace();}
우리는 이 로직을 별도의 클래스로 옮겼으며 필요한 경우 사용할 것입니다. 이제 StartCommand, StopCommand 및 UnknownCommand의 세 가지 명령을 구현해야 합니다. 명령을 위해 컨테이너를 채울 무언가를 갖기 위해 필요합니다. 현재로서는 텍스트가 무미건조하고 정보가 적으므로 이 작업의 목적에 있어서 이는 그다지 중요하지 않습니다. 따라서 StartCommand는 다음과 같습니다.
packagecom.github.javarushcommunity.jrtb.command;importcom.github.javarushcommunity.jrtb.service.SendBotMessageService;importorg.telegram.telegrambots.meta.api.objects.Update;/**
* Start {@link Command}.
*/publicclassStartCommandimplementsCommand{privatefinalSendBotMessageService sendBotMessageService;publicfinalstaticString START_MESSAGE ="Привет. Я Javarush Telegram Bot. Я помогу тебе быть в курсе последних "+"статей тех авторов, котрые тебе интересны. Я еще маленький и только учусь.";// Здесь не добавляем сервис через получение из Application Context.// Потому что если это сделать так, то будет циклическая зависимость, которая// ломает работу applications.publicStartCommand(SendBotMessageService sendBotMessageService){this.sendBotMessageService = sendBotMessageService;}@Overridepublicvoidexecute(Update update){
sendBotMessageService.sendMessage(update.getMessage().getChatId().toString(), START_MESSAGE);}}
디자이너님의 의견을 잘 읽어보시기 바랍니다. 순환 종속성( 순환 종속성 )은 올바르지 않은 아키텍처로 인해 발생할 수 있습니다. 우리의 경우 모든 것이 작동하고 올바른지 확인합니다. CommandContainer에 이미 명령을 생성할 때 응용 프로그램 컨텍스트의 실제 개체가 추가됩니다. 중지명령:
그리고 알 수 없는 명령. 왜 필요한가요? 우리에게 이것은 주어진 명령을 찾을 수 없을 때 응답할 중요한 명령입니다. NoCommand와 HelpCommand도 필요합니다.
NoCommand - 메시지가 명령으로 전혀 시작되지 않는 상황을 담당합니다.
HelpCommand는 일종의 문서로서 사용자를 위한 가이드가 될 것입니다.
HelpCommand를 추가해 보겠습니다.
packagecom.github.javarushcommunity.jrtb.command;importcom.github.javarushcommunity.jrtb.service.SendBotMessageService;importorg.telegram.telegrambots.meta.api.objects.Update;importstaticcom.github.javarushcommunity.jrtb.command.CommandName.*;/**
* Help {@link Command}.
*/publicclassHelpCommandimplementsCommand{privatefinalSendBotMessageService sendBotMessageService;publicstaticfinalString HELP_MESSAGE =String.format("✨<b>Дотупные команды</b>✨\n\n"+"<b>Начать\\закончить работу с ботом</b>\n"+"%s - начать работу со мной\n"+"%s - приостановить работу со мной\n\n"+"%s - получить помощь в работе со мной\n",
START.getCommandName(), STOP.getCommandName(), HELP.getCommandName());publicHelpCommand(SendBotMessageService sendBotMessageService){this.sendBotMessageService = sendBotMessageService;}@Overridepublicvoidexecute(Update update){
sendBotMessageService.sendMessage(update.getMessage().getChatId().toString(), HELP_MESSAGE);}}
명령 없음:
packagecom.github.javarushcommunity.jrtb.command;importcom.github.javarushcommunity.jrtb.service.SendBotMessageService;importorg.telegram.telegrambots.meta.api.objects.Update;/**
* No {@link Command}.
*/publicclassNoCommandimplementsCommand{privatefinalSendBotMessageService sendBotMessageService;publicstaticfinalString NO_MESSAGE ="Я поддерживаю команды, начинающиеся со слеша(/).\n"+"Whatбы посмотреть список команд введите /help";publicNoCommand(SendBotMessageService sendBotMessageService){this.sendBotMessageService = sendBotMessageService;}@Overridepublicvoidexecute(Update update){
sendBotMessageService.sendMessage(update.getMessage().getChatId().toString(), NO_MESSAGE);}}
그리고 이 작업에는 여전히 UnknownCommand가 있습니다.
packagecom.github.javarushcommunity.jrtb.command;importcom.github.javarushcommunity.jrtb.service.SendBotMessageService;importorg.telegram.telegrambots.meta.api.objects.Update;/**
* Unknown {@link Command}.
*/publicclassUnknownCommandimplementsCommand{publicstaticfinalString UNKNOWN_MESSAGE ="Не понимаю вас \uD83D\uDE1F, напишите /help чтобы узнать что я понимаю.";privatefinalSendBotMessageService sendBotMessageService;publicUnknownCommand(SendBotMessageService sendBotMessageService){this.sendBotMessageService = sendBotMessageService;}@Overridepublicvoidexecute(Update update){
sendBotMessageService.sendMessage(update.getMessage().getChatId().toString(), UNKNOWN_MESSAGE);}}
다음으로 명령을 위한 컨테이너를 추가해 보겠습니다. 이는 명령 개체를 저장하고 요청 시 필요한 명령을 받을 것으로 예상합니다. CommandContainer 라고 부르겠습니다 .
packagecom.github.javarushcommunity.jrtb.command;importcom.github.javarushcommunity.jrtb.service.SendBotMessageService;importcom.google.common.collect.ImmutableMap;importstaticcom.github.javarushcommunity.jrtb.command.CommandName.*;/**
* Container of the {@link Command}s, which are using for handling telegram commands.
*/publicclassCommandContainer{privatefinalImmutableMap<String,Command> commandMap;privatefinalCommand unknownCommand;publicCommandContainer(SendBotMessageService sendBotMessageService){
commandMap =ImmutableMap.<string, command="">builder().put(START.getCommandName(),newStartCommand(sendBotMessageService)).put(STOP.getCommandName(),newStopCommand(sendBotMessageService)).put(HELP.getCommandName(),newHelpCommand(sendBotMessageService)).put(NO.getCommandName(),newNoCommand(sendBotMessageService)).build();
unknownCommand =newUnknownCommand(sendBotMessageService);}publicCommandretrieveCommand(String commandIdentifier){return commandMap.getOrDefault(commandIdentifier, unknownCommand);}}
보시다시피 모든 것이 간단하게 완료되었습니다. 명령 값 형태의 키와 Command 유형의 명령 객체 형태의 값을 가진 불변 맵이 있습니다. 생성자에서 불변 맵을 한 번 채우고 애플리케이션 작업 전반에 걸쳐 액세스합니다. 컨테이너 작업을 위한 기본이자 유일한 방법은 retrieveCommand(String commandIdentifier) 입니다 . 해당 명령을 찾을 수 없는 경우를 담당하는 UnknownCommand라는 명령이 있습니다. 이제 JavaRushTelegramBot에서 봇 클래스에 컨테이너를 구현할 준비가 되었습니다. 이제 봇 클래스는 다음과 같습니다.
packagecom.github.javarushcommunity.jrtb.bot;importcom.github.javarushcommunity.jrtb.command.CommandContainer;importcom.github.javarushcommunity.jrtb.service.SendBotMessageServiceImpl;importorg.springframework.beans.factory.annotation.Value;importorg.springframework.stereotype.Component;importorg.telegram.telegrambots.bots.TelegramLongPollingBot;importorg.telegram.telegrambots.meta.api.objects.Update;importstaticcom.github.javarushcommunity.jrtb.command.CommandName.NO;/**
* Telegram bot for Javarush Community from Javarush community.
*/@ComponentpublicclassJavarushTelegramBotextendsTelegramLongPollingBot{publicstaticString COMMAND_PREFIX ="/";@Value("${bot.username}")privateString username;@Value("${bot.token}")privateString token;privatefinalCommandContainer commandContainer;publicJavarushTelegramBot(){this.commandContainer =newCommandContainer(newSendBotMessageServiceImpl(this));}@OverridepublicvoidonUpdateReceived(Update update){if(update.hasMessage()&& update.getMessage().hasText()){String message = update.getMessage().getText().trim();if(message.startsWith(COMMAND_PREFIX)){String commandIdentifier = message.split(" ")[0].toLowerCase();
commandContainer.retrieveCommand(commandIdentifier).execute(update);}else{
commandContainer.retrieveCommand(NO.getCommandName()).execute(update);}}}@OverridepublicStringgetBotUsername(){return username;}@OverridepublicStringgetBotToken(){return token;}}
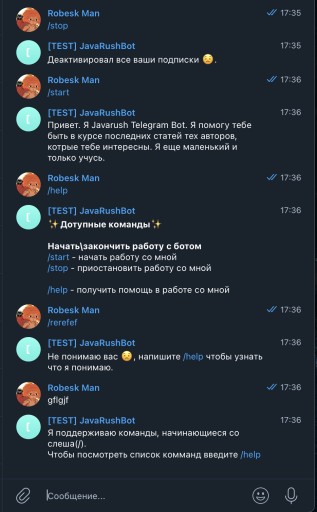
이제 코드 변경이 완료되었습니다. 어떻게 확인할 수 있나요? 봇을 실행하고 모든 것이 작동하는지 확인해야 합니다. 이를 위해 application.properties에서 토큰을 업데이트하고 올바른 토큰을 설정한 다음 JavarushTelegramBotApplication 클래스에서 애플리케이션을 시작합니다. 이제 명령이 예상대로 작동하는지 확인해야 합니다. 단계별로 확인합니다.
정지명령;
시작명령;
도움말명령;
명령 없음;
알 수 없는 명령.
일어난 일은 다음과 같습니다. 봇은 우리가 예상한 대로 정확히 작동했습니다. 링크를 통해 계속됩니다 .
 그리고 이미 이 패키지에는 명령 구현과 관련된 모든 클래스가 있습니다. 명령 작업을 위해서는 하나의 인터페이스가 필요합니다. 이 경우에는 다음을 생성해 보겠습니다.

 이제 명령이 예상대로 작동하는지 확인해야 합니다. 단계별로 확인합니다.
 봇은 우리가 예상한 대로 정확히 작동했습니다. 링크를 통해 계속됩니다 .
GO TO FULL VERSION