สวัสดีทุกคนเพื่อนรัก วันนี้เราจะใช้เทมเพลต (เทมเพลตคือรูปแบบ ในบริบทของเรา มันเป็นสิ่งเดียวกัน) ของการออกแบบ Command ตามความต้องการของเรา การใช้เทมเพลตนี้จะทำให้เราทำงานกับการประมวลผลคำสั่งของบอทได้อย่างสะดวกและถูกต้อง !["โปรเจ็กต์ Java จาก A ถึง Z": การใช้รูปแบบคำสั่งสำหรับการทำงานกับบอท ตอนที่ 1 - 1]()
อันดับแรก เป็นการดีที่จะพูดถึงรูปแบบนี้ - Command แต่ถ้าผมทำเช่นนี้ บทความจะใหญ่และยุ่งยากมาก ดังนั้นฉันจึงเลือกสื่อการเรียนด้วยตนเอง:
!["โปรเจ็กต์ Java จาก A ถึง Z": การใช้รูปแบบคำสั่งสำหรับการทำงานกับบอท ส่วนที่ 1 - 2]() และในแพ็คเกจนี้จะมีคลาสทั้งหมดที่เกี่ยวข้องกับการนำคำสั่งไปใช้แล้ว เราต้องการอินเทอร์เฟซเดียวสำหรับการทำงานกับคำสั่ง สำหรับกรณีนี้ มาสร้างมันขึ้นมา:
และในแพ็คเกจนี้จะมีคลาสทั้งหมดที่เกี่ยวข้องกับการนำคำสั่งไปใช้แล้ว เราต้องการอินเทอร์เฟซเดียวสำหรับการทำงานกับคำสั่ง สำหรับกรณีนี้ มาสร้างมันขึ้นมา:
![Java-университет]()
ณ จุดนี้ เราไม่จำเป็นต้องใช้การดำเนินการย้อนกลับของคำสั่ง ดังนั้นเราจะข้ามวิธีนี้ (ไม่ดำเนินการ) ในวิธีการดำเนินการ อ็อบเจ็กต์ Updateมาเป็นอาร์กิวเมนต์- เป็นอาร์กิวเมนต์ที่มาพร้อมกับวิธีการหลักของเราในบอท ออบเจ็กต์นี้จะมีทุกสิ่งที่จำเป็นในการประมวลผลคำสั่ง ต่อไป เราจะเพิ่ม enum ที่จะเก็บค่าคำสั่ง (start, stop และอื่นๆ) ทำไมเราถึงต้องการสิ่งนี้? เพื่อให้เรามีแหล่งความจริงเพียงแหล่งเดียวสำหรับชื่อทีม เรายังสร้างมันขึ้นมาใน แพ็คเกจ คำสั่ง ของเรา ด้วย ลองเรียกมันว่าCommandName :
!["โปรเจ็กต์ Java จาก A ถึง Z": การใช้รูปแบบคำสั่งสำหรับการทำงานกับบอท ส่วนที่ 1 - 3]() ตอนนี้เราต้องตรวจสอบว่าคำสั่งทำงานตามที่คาดไว้หรือไม่ ฉันตรวจสอบทีละขั้นตอน:
ตอนนี้เราต้องตรวจสอบว่าคำสั่งทำงานตามที่คาดไว้หรือไม่ ฉันตรวจสอบทีละขั้นตอน:
!["โปรเจ็กต์ Java จาก A ถึง Z": การใช้รูปแบบคำสั่งสำหรับการทำงานกับบอท ส่วนที่ 1 - 4]() บอททำงานได้ตรงตามที่เราคาดไว้ ติดตามต่อได้ตามลิงค์ครับ
บอททำงานได้ตรงตามที่เราคาดไว้ ติดตามต่อได้ตามลิงค์ครับ
| เพื่อนๆ คุณชอบโครงการ Javarush Telegram Bot ไหม ? อย่าขี้เกียจ: ให้ดาวเลย ด้วยวิธีนี้จะชัดเจนว่าเขาน่าสนใจและการพัฒนาเขาจะดีกว่า! |
- นี่คือบทความของฉันเมื่อ 4 ปีที่แล้ว ฉันเขียนมันตอนที่ฉันยังเป็นรุ่นน้อง ดังนั้นอย่าตัดสินมันรุนแรงเกินไป
- วิดีโอของชาวสวีเดนที่เข้าถึงอารมณ์และโต้ตอบได้บน YouTube ฉันขอแนะนำอย่างยิ่ง เขาพูดได้ไพเราะ ภาษาอังกฤษของเขาชัดเจนและเข้าใจได้ และโดยทั่วไป เขามีวิดีโอเกี่ยวกับรูปแบบการออกแบบอื่นๆ
- ในความคิดเห็นต่อบทความของฉัน มีคนNullptr35แนะนำวิดีโอนี้
เราเขียน JRTB-3
ทุกอย่างเหมือนเดิม:- เราอัพเดตสาขาหลัก
- ตามสาขาหลักที่อัปเดต เราสร้างJRTB -3 ใหม่
- ลองใช้รูปแบบกัน
- เราสร้างคอมมิตใหม่เพื่ออธิบายงานที่ทำเสร็จแล้ว
- เราสร้างคำขอดึง ตรวจสอบ และหากทุกอย่างเรียบร้อย เราจะรวมงานของเราเข้าด้วยกัน
if (message.startsWith("/start")) {
   doStartCommand();
} else if(message.startsWith("/stop")) {
   doStopCommand();
} else if(message.startsWith("/addUser")) {
   doAddUserCommand();
}
...
else if(message.startsWith("/makeMeHappy")) {
   doMakeMeHappyCommand();
}if (message.startsWith(COMMAND_PREFIX)) {
String commandIdentifier = message.split(" ")[0].toLowerCase();
commandContainer.getCommand(commandIdentifier, userName).execute(update);
} else {
commandContainer.getCommand(NO.getCommand(), userName).execute(update);
} และในแพ็คเกจนี้จะมีคลาสทั้งหมดที่เกี่ยวข้องกับการนำคำสั่งไปใช้แล้ว เราต้องการอินเทอร์เฟซเดียวสำหรับการทำงานกับคำสั่ง สำหรับกรณีนี้ มาสร้างมันขึ้นมา:
package com.github.javarushcommunity.jrtb.command;

import org.telegram.telegrambots.meta.api.objects.Update;

/**
* Command interface for handling telegram-bot commands.
*/
public interface Command {

   /**
    * Main method, which is executing command logic.
    *
    * @param update provided {@link Update} object with all the needed data for command.
    */
   void execute(Update update);
}
package com.github.javarushcommunity.jrtb.command;

/**
* Enumeration for {@link Command}'s.
*/
public enum CommandName {

   START("/start"),
   STOP("/stop");

   private final String commandName;

   CommandName(String commandName) {
       this.commandName = commandName;
   }

   public String getCommandName() {
       return commandName;
   }

}package com.github.javarushcommunity.jrtb.service;
/**
* Service for sending messages via telegram-bot.
*/
public interface SendBotMessageService {
/**
* Send message via telegram bot.
*
* @param chatId provided chatId in which messages would be sent.
* @param message provided message to be sent.
*/
void sendMessage(String chatId, String message);
}package com.github.javarushcommunity.jrtb.service;
import com.github.javarushcommunity.jrtb.bot.JavarushTelegramBot;
import org.springframework.beans.factory.annotation.Autowired;
import org.springframework.stereotype.Service;
import org.telegram.telegrambots.meta.api.methods.send.SendMessage;
import org.telegram.telegrambots.meta.exceptions.TelegramApiException;
/**
* Implementation of {@link SendBotMessageService} interface.
*/
@Service
public class SendBotMessageServiceImpl implements SendBotMessageService {
private final JavarushTelegramBot javarushBot;
@Autowired
public SendBotMessageServiceImpl(JavarushTelegramBot javarushBot) {
this.javarushBot = javarushBot;
}
@Override
public void sendMessage(String chatId, String message) {
SendMessage sendMessage = new SendMessage();
sendMessage.setChatId(chatId);
sendMessage.enableHtml(true);
sendMessage.setText(message);
try {
javarushBot.execute(sendMessage);
} catch (TelegramApiException e) {
//todo add logging to the project.
e.printStackTrace();
}
}
}SendMessage sendMessage = new SendMessage();
sendMessage.setChatId(chatId);
sendMessage.setText(message);
try {
javarushBot.execute(sendMessage);
} catch (TelegramApiException e) {
//todo add logging to the project.
e.printStackTrace();
}package com.github.javarushcommunity.jrtb.command;
import com.github.javarushcommunity.jrtb.service.SendBotMessageService;
import org.telegram.telegrambots.meta.api.objects.Update;
/**
* Start {@link Command}.
*/
public class StartCommand implements Command {
private final SendBotMessageService sendBotMessageService;
public final static String START_MESSAGE = "Привет. Я Javarush Telegram Bot. Я помогу тебе быть в курсе последних " +
"статей тех авторов, котрые тебе интересны. Я еще маленький и только учусь.";
// Здесь не добавляем сервис через получение из Application Context.
// Потому что если это сделать так, то будет циклическая зависимость, которая
// ломает работу applications.
public StartCommand(SendBotMessageService sendBotMessageService) {
this.sendBotMessageService = sendBotMessageService;
}
@Override
public void execute(Update update) {
sendBotMessageService.sendMessage(update.getMessage().getChatId().toString(), START_MESSAGE);
}
}package com.github.javarushcommunity.jrtb.command;
import com.github.javarushcommunity.jrtb.service.SendBotMessageService;
import org.telegram.telegrambots.meta.api.objects.Update;
/**
* Stop {@link Command}.
*/
public class StopCommand implements Command {
private final SendBotMessageService sendBotMessageService;
public static final String STOP_MESSAGE = "Деактивировал все ваши подписки \uD83D\uDE1F.";
public StopCommand(SendBotMessageService sendBotMessageService) {
this.sendBotMessageService = sendBotMessageService;
}
@Override
public void execute(Update update) {
sendBotMessageService.sendMessage(update.getMessage().getChatId().toString(), STOP_MESSAGE);
}
}- NoCommand - จะรับผิดชอบต่อสถานการณ์เมื่อข้อความไม่ได้ขึ้นต้นด้วยคำสั่งเลย
- HelpCommand จะเป็นคำแนะนำสำหรับผู้ใช้ซึ่งเป็นเอกสารประเภทหนึ่ง
package com.github.javarushcommunity.jrtb.command;

import com.github.javarushcommunity.jrtb.service.SendBotMessageService;
import org.telegram.telegrambots.meta.api.objects.Update;

import static com.github.javarushcommunity.jrtb.command.CommandName.*;

/**
* Help {@link Command}.
*/
public class HelpCommand implements Command {

   private final SendBotMessageService sendBotMessageService;

   public static final String HELP_MESSAGE = String.format("✨<b>Дотупные команды</b>✨\n\n"

                   + "<b>Начать\\закончить работу с ботом</b>\n"
                   + "%s - начать работу со мной\n"
                   + "%s - приостановить работу со мной\n\n"
                   + "%s - получить помощь в работе со мной\n",
           START.getCommandName(), STOP.getCommandName(), HELP.getCommandName());

   public HelpCommand(SendBotMessageService sendBotMessageService) {
       this.sendBotMessageService = sendBotMessageService;
   }

   @Override
   public void execute(Update update) {
       sendBotMessageService.sendMessage(update.getMessage().getChatId().toString(), HELP_MESSAGE);
   }
}package com.github.javarushcommunity.jrtb.command;
import com.github.javarushcommunity.jrtb.service.SendBotMessageService;
import org.telegram.telegrambots.meta.api.objects.Update;
/**
* No {@link Command}.
*/
public class NoCommand implements Command {
private final SendBotMessageService sendBotMessageService;
public static final String NO_MESSAGE = "Я поддерживаю команды, начинающиеся со слеша(/).\n"
+ "Whatбы посмотреть список команд введите /help";
public NoCommand(SendBotMessageService sendBotMessageService) {
this.sendBotMessageService = sendBotMessageService;
}
@Override
public void execute(Update update) {
sendBotMessageService.sendMessage(update.getMessage().getChatId().toString(), NO_MESSAGE);
}
}package com.github.javarushcommunity.jrtb.command;
import com.github.javarushcommunity.jrtb.service.SendBotMessageService;
import org.telegram.telegrambots.meta.api.objects.Update;
/**
* Unknown {@link Command}.
*/
public class UnknownCommand implements Command {
public static final String UNKNOWN_MESSAGE = "Не понимаю вас \uD83D\uDE1F, напишите /help чтобы узнать что я понимаю.";
private final SendBotMessageService sendBotMessageService;
public UnknownCommand(SendBotMessageService sendBotMessageService) {
this.sendBotMessageService = sendBotMessageService;
}
@Override
public void execute(Update update) {
sendBotMessageService.sendMessage(update.getMessage().getChatId().toString(), UNKNOWN_MESSAGE);
}
}package com.github.javarushcommunity.jrtb.command;
import com.github.javarushcommunity.jrtb.service.SendBotMessageService;
import com.google.common.collect.ImmutableMap;
import static com.github.javarushcommunity.jrtb.command.CommandName.*;
/**
* Container of the {@link Command}s, which are using for handling telegram commands.
*/
public class CommandContainer {
private final ImmutableMap<String, Command> commandMap;
private final Command unknownCommand;
public CommandContainer(SendBotMessageService sendBotMessageService) {
commandMap = ImmutableMap.<string, command="">builder()
.put(START.getCommandName(), new StartCommand(sendBotMessageService))
.put(STOP.getCommandName(), new StopCommand(sendBotMessageService))
.put(HELP.getCommandName(), new HelpCommand(sendBotMessageService))
.put(NO.getCommandName(), new NoCommand(sendBotMessageService))
.build();
unknownCommand = new UnknownCommand(sendBotMessageService);
}
public Command retrieveCommand(String commandIdentifier) {
return commandMap.getOrDefault(commandIdentifier, unknownCommand);
}
}package com.github.javarushcommunity.jrtb.bot;
import com.github.javarushcommunity.jrtb.command.CommandContainer;
import com.github.javarushcommunity.jrtb.service.SendBotMessageServiceImpl;
import org.springframework.beans.factory.annotation.Value;
import org.springframework.stereotype.Component;
import org.telegram.telegrambots.bots.TelegramLongPollingBot;
import org.telegram.telegrambots.meta.api.objects.Update;
import static com.github.javarushcommunity.jrtb.command.CommandName.NO;
/**
* Telegram bot for Javarush Community from Javarush community.
*/
@Component
public class JavarushTelegramBot extends TelegramLongPollingBot {
public static String COMMAND_PREFIX = "/";
@Value("${bot.username}")
private String username;
@Value("${bot.token}")
private String token;
private final CommandContainer commandContainer;
public JavarushTelegramBot() {
this.commandContainer = new CommandContainer(new SendBotMessageServiceImpl(this));
}
@Override
public void onUpdateReceived(Update update) {
if (update.hasMessage() && update.getMessage().hasText()) {
String message = update.getMessage().getText().trim();
if (message.startsWith(COMMAND_PREFIX)) {
String commandIdentifier = message.split(" ")[0].toLowerCase();
commandContainer.retrieveCommand(commandIdentifier).execute(update);
} else {
commandContainer.retrieveCommand(NO.getCommandName()).execute(update);
}
}
}
@Override
public String getBotUsername() {
return username;
}
@Override
public String getBotToken() {
return token;
}
} ตอนนี้เราต้องตรวจสอบว่าคำสั่งทำงานตามที่คาดไว้หรือไม่ ฉันตรวจสอบทีละขั้นตอน:
- หยุดคำสั่ง;
- เริ่มคำสั่ง;
- คำสั่งช่วยเหลือ;
- ไม่มีคำสั่ง;
- คำสั่งที่ไม่รู้จัก
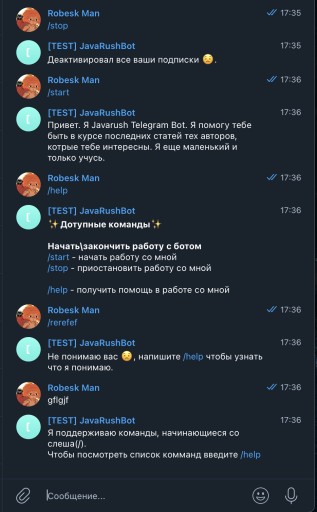 บอททำงานได้ตรงตามที่เราคาดไว้ ติดตามต่อได้ตามลิงค์ครับ
GO TO FULL VERSION