在编写我的应用程序时,我遇到了缺乏关于如何让用户通过电子邮件和社交网络注册的明确文章的情况。关于设置经典登录表单有很好的教程。关于OAuth2有很好的教程。关于如何结合这两种方法的信息少之又少。在搜索过程中,我们找到了可行的解决方案。它并不声称是终极真理,但它履行了它的功能。在本文中,我将展示如何从头开始使用类似的 Spring Security 配置实现笔记存储服务。 ![我们以 Notes 服务为例,介绍通过电子邮件和 OAuth2 定期登录 Spring Security - 1]() 注意:如果读者已经阅读了至少几个关于 Spring 的教程,那是很好的,因为注意力只会集中在 Spring Security 上,而不会详细解释存储库、控制器等。否则,一篇已经相当大的文章将变成是巨大的。 内容
注意:如果读者已经阅读了至少几个关于 Spring 的教程,那是很好的,因为注意力只会集中在 Spring Security 上,而不会详细解释存储库、控制器等。否则,一篇已经相当大的文章将变成是巨大的。 内容
![Java-университет]()
![我们以 Notes 服务为例,介绍通过电子邮件和 OAuth2 定期登录 Spring Security - 1]()
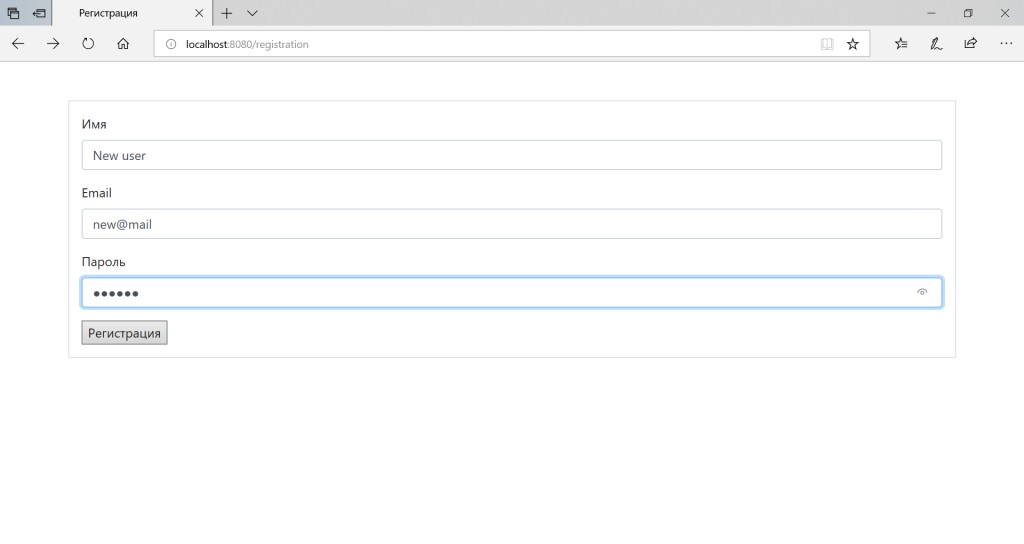
![我们以 Notes 服务为例,介绍通过电子邮件和 OAuth2 定期登录 Spring Security - 2]() 我们看到数据库中出现了一个新用户。密码已加密。
我们看到数据库中出现了一个新用户。密码已加密。
![我们以 Notes 服务为例,介绍通过电子邮件和 OAuth2 定期登录 Spring Security - 3]()
![我们以 Notes 服务为例,介绍通过电子邮件和 OAuth2 定期登录 Spring Security - 4]()
![我们以 Notes 服务为例,介绍通过电子邮件和 OAuth2 定期登录 Spring Security - 5]()
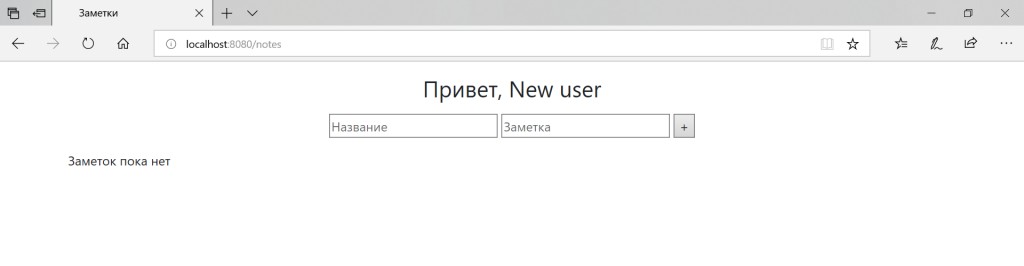
![我们以 Notes 服务为例,介绍通过电子邮件和 OAuth2 定期登录 Spring Security - 6]() 注释将保存到数据库中。
注释将保存到数据库中。
![我们以 Notes 服务为例,介绍通过电子邮件和 OAuth2 定期登录 Spring Security - 7]() 我们看到该项目已成功启动并运行。为了获得彻底的幸福,我们只需要能够通过社交网络登录即可。好吧,让我们开始吧!
现在 User 和 OAuth2Authentication 都可以充当主体。由于我们预先在 UserService 中考虑到通过 Google 数据加载用户,因此该应用程序将适用于两种类型的用户。我们修改项目的主页控制器,以便它将使用 OAuth2 登录的用户重定向到注释页面。
我们看到该项目已成功启动并运行。为了获得彻底的幸福,我们只需要能够通过社交网络登录即可。好吧,让我们开始吧!
现在 User 和 OAuth2Authentication 都可以充当主体。由于我们预先在 UserService 中考虑到通过 Google 数据加载用户,因此该应用程序将适用于两种类型的用户。我们修改项目的主页控制器,以便它将使用 OAuth2 登录的用户重定向到注释页面。
![我们以 Notes 服务为例,介绍通过电子邮件和 OAuth2 定期登录 Spring Security - 8]()
![我们以 Notes 服务为例,介绍通过电子邮件和 OAuth2 定期登录 Spring Security - 9]()
![我们以 Notes 服务为例,介绍通过电子邮件和 OAuth2 定期登录 Spring Security - 10]()
![我们以 Notes 服务为例,介绍通过电子邮件和 OAuth2 定期登录 Spring Security - 11]()
![我们以 Notes 服务为例,介绍通过电子邮件和 OAuth2 定期登录 Spring Security - 12]()
![我们以 Notes 服务为例,介绍通过电子邮件和 OAuth2 定期登录 Spring Security - 13]()
![我们以 Notes 服务为例,介绍通过电子邮件和 OAuth2 定期登录 Spring Security - 14]()
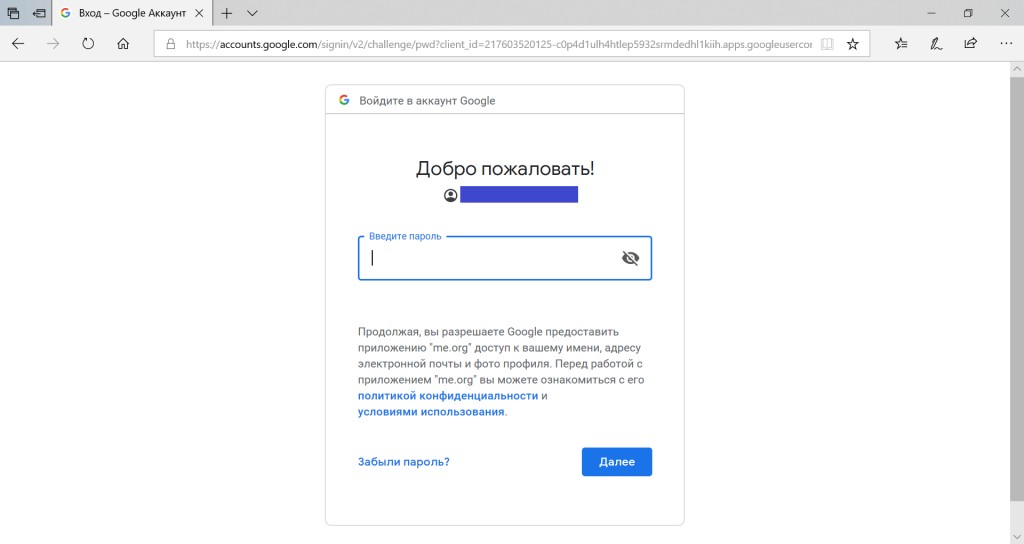
![我们以 Notes 服务为例,介绍通过电子邮件和 OAuth2 定期登录 Spring Security - 15]() 用户通过常规表单和 Google 帐户成功登录。这就是我们想要的!我希望这篇文章已经澄清了有关创建 Web 应用程序、使用 Spring Security 保护它以及组合不同登录方法的一些要点。有了完整的项目代码,您可以
用户通过常规表单和 Google 帐户成功登录。这就是我们想要的!我希望这篇文章已经澄清了有关创建 Web 应用程序、使用 Spring Security 保护它以及组合不同登录方法的一些要点。有了完整的项目代码,您可以
创建项目
我们访问start.spring.io并形成该项目的基础:- Web - 在内置 Tomcat 上启动应用程序、url 映射等;
- JPA——数据库连接;
- Mustache是一个用于生成网页的模板引擎;
- 安全-应用程序保护。这就是本文的创建目的。
<dependency>
     <groupId>mysql</groupId>
     <artifactId>mysql-connector-java</artifactId>
     <version>5.1.34</version>
</dependency>spring.datasource.url=jdbc:mysql://localhost:3306/springsectut?createDatabaseIfNotExist=true&useSSL=false&autoReconnect=true&useLegacyDatetimeCode=false&serverTimezone=UTC&useUnicode=yes&characterEncoding=UTF-8
spring.datasource.driver-class-name=com.mysql.jdbc.Driver
spring.datasource.username=yourUsername
spring.datasource.password=yourPassword
spring.jpa.generate-ddl=true
spring.jpa.hibernate.ddl-auto=update
spring.jpa.properties.connection.characterEncoding=utf-8
spring.jpa.properties.connection.CharSet=utf-8
spring.jpa.properties.connection.useUnicode=true
spring.mustache.expose-request-attributes=true创建实体和应用程序逻辑
实体
让我们创建一个包entities,在其中放置数据库实体。用户将由User实现该接口的类来描述UserDetails,Spring Security 配置需要该类。用户将拥有 ID、用户名(这是电子邮件)、密码、姓名、角色、活动标志、Google 帐户名和电子邮件(googleName和googleUsername)。
@Entity
@Table(name = "user")
public class User implements UserDetails
{
  @Id
  @GeneratedValue(strategy = GenerationType.AUTO)
  private Long id;

  private String username;
  private String password;
  private String name;
  private boolean active;
  private String googleName;
  private String googleUsername;

  @ElementCollection(targetClass = Role.class, fetch = FetchType.EAGER)
  @CollectionTable(name = "user_role", joinColumns = @JoinColumn(name = "user_id"))
  @Enumerated(EnumType.STRING)
  private Set<Role> roles;

    //Геттеры, сеттеры, toString(), equals(), hashcode(), имплементация UserDetails
}public enum Role implements GrantedAuthority
{
USER;
@Override
public String getAuthority()
{
return name();
}
}@Entity
@Table(name = "note")
public class Note
{
@Id
@GeneratedValue(strategy = GenerationType.AUTO)
private Long id;
private String title;
private String note;
private Long userId;
//Геттеры, сеттеры, toString(), equals(), hashcode()
}存储库
为了将实体保存到数据库中,我们需要存储库来为我们完成所有脏活。让我们创建一个包repos,在其中我们将创建从接口UserRepo继承的接口。 NoteRepoJpaRepository<Entity, Id>
@Service
@Repository
public interface UserRepo extends JpaRepository<User, Long>
{}

@Service
@Repository
public interface NoteRepo extends JpaRepository<Note, Long>
{
  List<Note> findByUserId(Long userId);
}
控制器
我们的笔记服务将包含以下页面:- 家;
- 登记;
- 入口;
- 用户注释列表。
controllers其中包含一个类IndexController,该类包含主页的常用获取映射。该类RegistrationController负责注册用户。后映射从表单中获取数据,将用户保存到数据库并重定向到登录页面。PasswordEncoder稍后将进行描述。它用于加密密码。
@Controller
public class RegistrationController
{
  @Autowired
  private UserRepo userRepo;

  @Autowired
  private PasswordEncoder passwordEncoder;

  @GetMapping("/registration")
  public String registration()
  {
     return "registration";
  }

  @PostMapping("/registration")
  public String addUser(String name, String username, String password)
  {
     User user = new User();
     user.setName(name);
     user.setUsername(username);
     user.setPassword(passwordEncoder.encode(password));
     user.setActive(true);
     user.setRoles(Collections.singleton(Role.USER));

     userRepo.save(user);

     return "redirect:/login";
}@Controller
public class NoteController
{
@Autowired
private NoteRepo noteRepo;
@GetMapping("/notes")
public String notes(Model model)
{
List<Note> notes = noteRepo.findAll();
model.addAttribute("notes", notes);
return "notes";
}
@PostMapping("/addnote")
public String addNote(String title, String note)
{
Note newNote = new Note();
newNote.setTitle(title);
newNote.setNote(note);
noteRepo.save(newNote);
return "redirect:/notes";
}
}config,并将类放置在那里MvcConfig。当我们编写Spring Security配置时,当我们使用“/login”时,它会知道我们指的是哪个页面。
@Configuration
public class MvcConfig implements WebMvcConfigurer
{
  public void addViewControllers(ViewControllerRegistry registry)
  {
     registry.addViewController("/login").setViewName("login");
     registry.setOrder(Ordered.HIGHEST_PRECEDENCE);
  }
}
页数
我使用Mustache 模板引擎来创建页面。您可以实现另一个,这并不重要。已为所有页面上使用的元信息创建了一个meta.mustache 文件。它还包括 Bootstrap 以使我们项目的页面看起来更漂亮。页面在“src/main/resources/templates”目录中创建。这些文件的扩展名是 Mustache。将html代码直接放在文章中会使其太大,因此这里提供了项目的GitHub存储库中的templates文件夹的链接。配置 Spring Security 进行经典登录
Spring Security 帮助我们保护应用程序及其资源免遭未经授权的访问。SecurityConfig我们将在继承自的类中创建一个简洁的工作配置WebSecurityConfigurerAdapter,并将其放置在包中config。让我们用 @EnableWebSecurity 注释来标记它,这将启用 Spring Security 支持,以及 @Configuration 注释,这表明该类包含一些配置。 注意:自动配置的pom.xml包含Spring Boot父组件2.1.4.RELEASE的版本,这导致安全性无法按既定方式实现。为避免项目冲突,建议将版本更改为2.0.1.RELEASE。
基本配置SecurityConfig
我们的配置将能够:-
使用以下方法加密密码
BCryptPasswordEncoder:@Autowired private PasswordEncoder passwordEncoder; @Bean PasswordEncoder passwordEncoder() { PasswordEncoder passwordEncoder = new BCryptPasswordEncoder(); return passwordEncoder; } -
使用专门编写的身份验证提供程序登录:
@Autowired private AuthProvider authProvider; @Override protected void configure(AuthenticationManagerBuilder auth) { auth.authenticationProvider(authProvider); } -
允许匿名用户访问主页、注册和登录页面。所有其他请求必须由登录用户执行。让我们将前面描述的“/login”指定为登录页面。如果登录成功,用户将进入包含注释列表的页面;如果出现错误,用户将保留在登录页面。成功退出后,用户将被带到主页。
@Override
protected void configure(HttpSecurity http) throws Exception
{
  http
        .authorizeRequests()
        .antMatchers("/resources/**", "/", "/login**", "/registration").permitAll()
        .anyRequest().authenticated()
        .and().formLogin().loginPage("/login")
        .defaultSuccessUrl("/notes").failureUrl("/login?error").permitAll()
        .and().logout().logoutSuccessUrl("/").permitAll();
}
自定义用户登录
自写的登录AuthProvider将允许用户不仅可以通过电子邮件登录,还可以通过用户名登录。
@Component
public class AuthProvider implements AuthenticationProvider
{
  @Autowired
  private UserService userService;

  @Autowired
  private PasswordEncoder passwordEncoder;

  public Authentication authenticate(Authentication authentication) throws AuthenticationException
  {
     String username = authentication.getName();
     String password = (String) authentication.getCredentials();

     User user = (User) userService.loadUserByUsername(username);

     if(user != null && (user.getUsername().equals(username) || user.getName().equals(username)))
     {
        if(!passwordEncoder.matches(password, user.getPassword()))
        {
           throw new BadCredentialsException("Wrong password");
        }

        Collection<? extends GrantedAuthority> authorities = user.getAuthorities();

        return new UsernamePasswordAuthenticationToken(user, password, authorities);
     }
     else
        throw new BadCredentialsException("Username not found");
  }

  public boolean supports(Class<?> arg)
  {
     return true;
  }
}UserService您可能已经注意到,位于包中的 类负责加载 user services。username在我们的例子中,它不仅像内置实现那样通过字段搜索用户,而且还通过用户名、Google 帐户名和 Google 帐户电子邮件来搜索用户。当我们通过 OAuth2 实现登录时,后两种方法将很有用。这里给出了该类的缩写版本。
@Service
public class UserService implements UserDetailsService
{
  @Autowired
  private UserRepo userRepo;

  @Override
  public UserDetails loadUserByUsername(String username) throws UsernameNotFoundException
  {
     User userFindByUsername = userRepo.findByUsername(username);
     //Остальные поиски

     if(userFindByUsername != null)
     {
        return userFindByUsername;
     }
     //Остальные проверки
     return null;
  }
}UserRepo!
让我们改进控制器
我们已经配置了 Spring Security。现在是在笔记控制器中利用这一点的时候了。现在,每个映射都将接受一个附加的主体参数,它将尝试通过该参数找到用户。为什么我不能直接注入类User?那么当我们通过社交网络编写登录时,就会因为用户类型不匹配而产生冲突。我们提前提供必要的灵活性。我们的笔记控制器代码现在如下所示:
@GetMapping("/notes")
public String notes(Principal principal, Model model)
{
  User user = (User) userService.loadUserByUsername(principal.getName());
  List<Note> notes = noteRepo.findByUserId(user.getId());
  model.addAttribute("notes", notes);
  model.addAttribute("user", user);

  return "notes";
}

@PostMapping("/addnote")
public String addNote(Principal principal, String title, String note)
{
  User user = (User) userService.loadUserByUsername(principal.getName());

  Note newNote = new Note();
  newNote.setTitle(title);
  newNote.setNote(note);
  newNote.setUserId(user.getId());

  noteRepo.save(newNote);

  return "redirect:/notes";
}发射
我们正在努力启动该项目。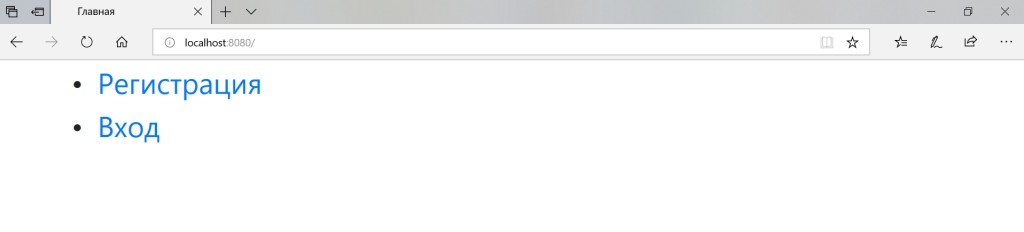


在 Spring Security 中使用 Google 设置 OAuth2 作为示例
在实现 OAuth2 时,我依赖于Spring 的官方教程。要支持 OAuth2,请将以下库添加到 pom.xml:<dependency>
<groupId>org.springframework.security.oauth.boot</groupId>
<artifactId>spring-security-oauth2-autoconfigure</artifactId>
<version>2.0.0.RELEASE</version>
</dependency>SecurityConfig。首先,我们添加 @EnableOAuth2Client 注释。它会自动提取您通过社交网络登录所需的内容。
过滤器配置和application.properties
让我们注入 OAuth2ClientContext 以在我们的安全配置中使用。@Autowired
private OAuth2ClientContext oAuth2ClientContext;FilterRegistrationBean,其中我们将过滤器的优先级设置为 -100。
@Bean
public FilterRegistrationBean oAuth2ClientFilterRegistration(OAuth2ClientContextFilter oAuth2ClientContextFilter)
{
  FilterRegistrationBean registration = new FilterRegistrationBean();
  registration.setFilter(oAuth2ClientContextFilter);
  registration.setOrder(-100);
  return registration;
}

private Filter ssoFilter()
{
  OAuth2ClientAuthenticationProcessingFilter googleFilter = new OAuth2ClientAuthenticationProcessingFilter("/login/google");
  OAuth2RestTemplate googleTemplate = new OAuth2RestTemplate(google(), oAuth2ClientContext);
  googleFilter.setRestTemplate(googleTemplate);
  CustomUserInfoTokenServices tokenServices = new CustomUserInfoTokenServices(googleResource().getUserInfoUri(), google().getClientId());
  tokenServices.setRestTemplate(googleTemplate);
  googleFilter.setTokenServices(tokenServices);
  tokenServices.setUserRepo(userRepo);
  tokenServices.setPasswordEncoder(passwordEncoder);
  return googleFilter;
}http.addFilterBefore(ssoFilter(), UsernamePasswordAuthenticationFilter.class);@Bean
@ConfigurationProperties("google.client")
public AuthorizationCodeResourceDetails google()
{
return new AuthorizationCodeResourceDetails();
}@Bean
@ConfigurationProperties("google.resource")
public ResourceServerProperties googleResource()
{
return new ResourceServerProperties();
}google.client.clientId=yourClientId
google.client.clientSecret=yourClientSecret
google.client.accessTokenUri=https://www.googleapis.com/oauth2/v4/token
google.client.userAuthorizationUri=https://accounts.google.com/o/oauth2/v2/auth
google.client.clientAuthenticationScheme=form
google.client.scope=openid,email,profile
google.resource.userInfoUri=https://www.googleapis.com/oauth2/v3/userinfo
google.resource.preferTokenInfo=true向Google Cloud Platform注册应用程序的要点
路径:API 和服务 -> 凭证 OAuth 访问请求窗口:- 应用名称: Spring登录表单和OAuth2教程
- 支持电子邮件地址:您的电子邮件
- Google API 的范围:电子邮件、个人资料、openid
- 授权域名: me.org
- 应用程序主页链接: http://me.org:8080
- 应用程序隐私政策链接: http://me.org:8080
- 应用程序使用条款链接: http://me.org:8080
- 类型:网络应用程序
- 标题: Spring 登录表单和 OAuth2 教程
- 允许的 JavaScript 源: http://me.org、http://me.org:8080
- 允许的重定向 URI: http://me.org:8080/login、http://me.org:8080/login/google
自定义用户信息令牌服务
您注意到过滤器功能说明中的“自定义”一词了吗?班级CustomUserInfoTokenServices。是的,我们将创建我们自己的类,具有二十一点和将用户保存在数据库中的能力!使用 IntelliJ IDEA 中的 Ctrl-N 键盘快捷键,您可以找到并查看UserInfoTokenServices默认值是如何实现的。让我们将其代码复制到新创建的类中CustomUserInfoTokenServices。其中大部分可以保持不变。在更改函数的逻辑之前,让我们添加UserRepo和作为类的私有字段PasswordEncoder。让我们为它们创建 setter。让我们将@Autowired UserRepo userRepo 添加到SecurityConfig 类中。我们看看过滤器创建方法中指向错误的指针是如何消失的,我们很高兴。为什么@Autowired 不能直接应用于CustomUserInfoTokenServices?因为这个类不会获取依赖关系,因为它本身没有任何 Spring 注解标记,并且它的构造函数是在声明过滤器时显式创建的。因此,Spring 的 DI 机制并不知道这一点。如果我们在此类中的任何内容上注释@Autowired,那么在使用时我们将得到一个NullPointerException。但通过显式设置器,一切都运行良好。实现必要的组件后,感兴趣的主要对象成为 loadAuthentication 函数,其中检索包含用户信息的 Map<String, Object>。正是在这个项目中,我实现了将通过社交网络登录的用户保存到数据库中。由于我们使用 Google 帐户作为 OAuth2 提供商,因此我们检查地图是否包含 Google 典型的“子”字段。如果存在,则表示已正确接收到有关用户的信息。我们创建一个新用户并将其保存到数据库中。
@Override
public OAuth2Authentication loadAuthentication(String accessToken)
     throws AuthenticationException, InvalidTokenException
{
  Map<String, Object> map = getMap(this.userInfoEndpointUrl, accessToken);

  if(map.containsKey("sub"))
  {
     String googleName = (String) map.get("name");
     String googleUsername = (String) map.get("email");

     User user = userRepo.findByGoogleUsername(googleUsername);

     if(user == null)
     {
        user = new User();
        user.setActive(true);
        user.setRoles(Collections.singleton(Role.USER));
     }

     user.setName(googleName);
     user.setUsername(googleUsername);
     user.setGoogleName(googleName);
     user.setGoogleUsername(googleUsername);
     user.setPassword(passwordEncoder.encode("oauth2user"));

     userRepo.save(user);
  }

  if (map.containsKey("error"))
  {
     this.logger.debug("userinfo returned error: " + map.get("error"));
     throw new InvalidTokenException(accessToken);
  }
  return extractAuthentication(map);
}@GetMapping("/")
public String index(Principal principal)
{
if(principal != null)
{
return "redirect:/notes";
}
return "index";
}项目最终启动
经过细微的外观更改并添加退出按钮后,我们进行了项目的最终启动。


GO TO FULL VERSION