1. One course, two places to take it
The browser is a convenient place to start: open the page, read the lecture, do the first task. The agent is there too - Claude Code is wired straight into the browser panel, so you can solve tasks together with it from day one. There are two limits: everything stays in the browser, and every task gets its own separate project.
IDEA is a professional tool where everything is at hand at once: the code, the requirements, the terminal and the agent in one window, with the project living on your own disk. At first it may feel like overkill. A few tasks later you'll find that working without an IDE is already awkward. I'd switch right away: getting used to a real working tool is cheaper while the tasks are still simple.
If you did not use the installer: install the plugins by hand
The installer from level 1 has already added the JavaRush and Claude Code plugins and set up the account login. If you ran it, you can skip this section. Not sure whether you ran it or not? Open the plugin list: if JavaRush and Claude Code are already there, you're fine - keep scrolling.
- Install the JavaRush plugin. On Windows and Linux open
File → Settings → Plugins, on macOS -IntelliJ IDEA → Preferences → Plugins. On theMarketplacetab typeJavaRushinto the search box and clickInstall. Don't restart IDEA yet: install the second plugin first.![Searching for the JavaRush plugin on the Marketplace tab in IntelliJ IDEA]()
- Install the official Claude Code plugin. Without leaving the
Marketplacetab, typeClaude Codeinto the search box, pickClaude Code [Beta]and clickInstall. Once both plugins are installed, restart IDEA. - After the installation click
Sign inon the top bar of the plugin. On the JavaRush website open Settings → Security and login, copy the secret key and paste it into the login window in IDEA.![Signing in to a JavaRush account through the plugin in IntelliJ IDEA]()


After you sign in, the JavaRush plugin downloads the course project, and you can start opening tasks right inside IDEA.
2. Where the task list lives
In IDEA's left sidebar, click Tasks. The list of available tasks opens.
Find the task card you need and click it. In the window that appears choose Open.
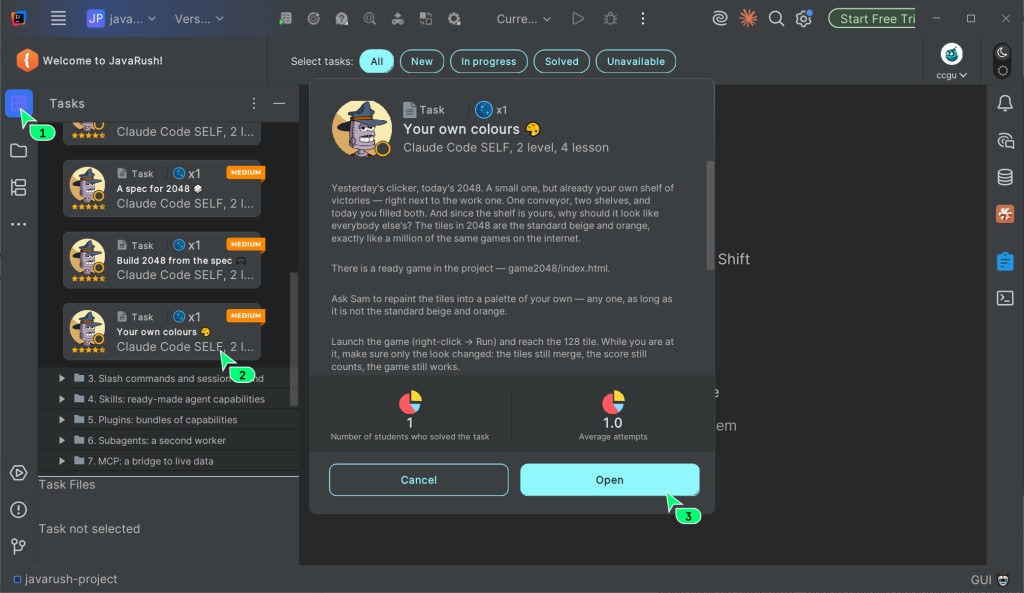
Every task from the website is available in the plugin. If you have already solved a task on the site and it passed review, your code is downloaded into the project in IDEA.
The task window looks overloaded at first. To begin with, you need exactly two things:
Condition- the task statement: what to do and which requirements to meet;- the project tree on the left - the task files you work with. They can be of different types and have different names:
index.html,Main.javaor something else - look for the one the statement asks for, not for a familiar name.
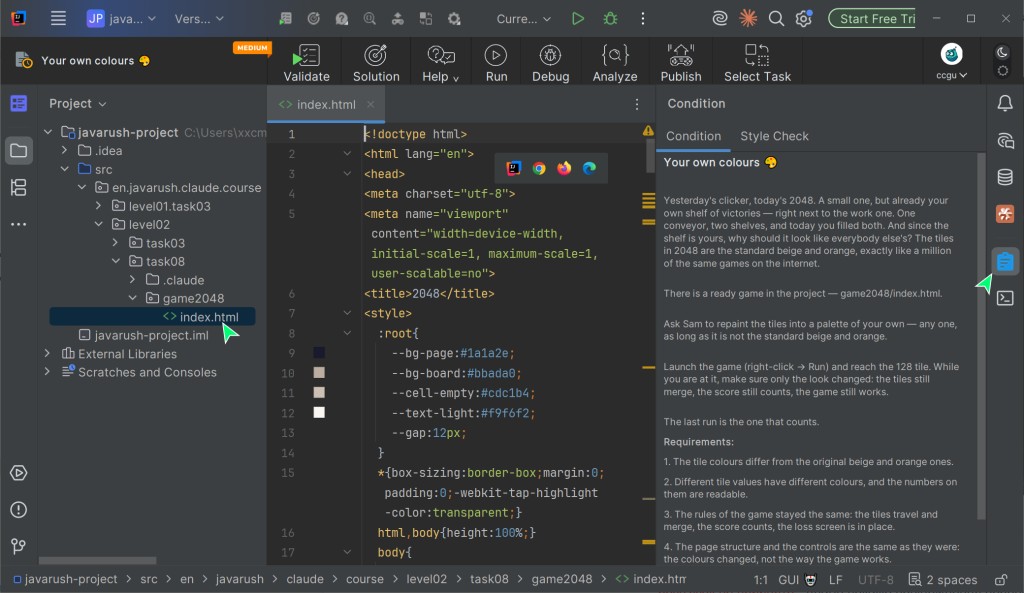
The logic is simple: read Condition first, then find the right file in the project tree and get to solving the task.

3. The agent sees the files, but not the statement
When you open a task, the plugin downloads its files to your disk. Claude Code works with files, so it does see the folder tree, the code and the rest of the task files - provided it was started in the right folder (more on that in the next section).
But the statement and the requirements live in the Condition panel. The agent doesn't see that panel automatically. Making sense of the task and pulling out the requirements is part of your learning, and it's important to do it yourself.
The temptation is understandable: paste the statement into the chat and let the agent figure out what's being asked of you. Do not copy the whole statement. You would skip the most important step - reading the statement, finding what matters and understanding the requirements.
Read the statement in full first and make sense of it. After that you can paste only the important fragments into the chat with the agent. Better still, describe the goal and the requirements in your own words. That way you genuinely understand the task, and Claude Code stays a helper rather than a replacement for learning.
4. Every task is a separate project
The main thing first, so you can read the rest without worrying: keeping track of folders isn't left to you alone. The agent notices when it's working on the wrong task, says so and offers to move to the right folder - and if you let it, it moves there itself.
What follows is the manual route: how to do the same thing with the tools of the IDE. You need it so you understand what's going on, and so you don't depend on the agent's hint.
Now the key fact about how the course is built. Every task here is a separate project. Not a file inside one shared project, but a project of its own: its own folder, its own files, its own rules for the agent in .claude. However many tasks the course has, that's how many projects there are.
The plugin puts them all into a single tree, javarush-project, so you don't have to open a separate window per task. It looks roughly like this:
javarush-project/
└── src/ru/javarush/claude/course/level01/     # course level
    ├── task05/                # a task = a separate project
    │   ├── .claude/           # agent rules for this task
    │   └── arkanoid.html      # the task file
    └── task09/                # another task = another project
        ├── .claude/           # its own rules
        ├── arkanoid.html      # task files, sometimes several
        ├── clicker.html
        └── tictactoe.html
Why this matters. Normally a project tree is exactly one project: the files in it are connected, and it helps the agent to see all of them. You start it at the root, it reads the project rules, it sees the neighboring files - and all of that works in your favor.
Here that habit lets you down. There's one tree, but it holds as many projects as there are tasks, and they aren't connected at all: task09 knows nothing about task05, and the .claude rules belong to each task separately. To the agent, the project root isn't "your project" but a storeroom of unrelated projects. There's no useful context in the neighboring tasks, and from there it picks up the rules of the task you need only partly and not right away: the task's instructions and skills load only when it opens that task's files, and the task's settings don't load at all.
This leads to something worth understanding right away: the agent sees whatever it was started from. Type claude at the project root and the whole course lands in its field of view: other tasks, other code, other rules. The agent will hunt for the file it needs among hundreds of unrelated ones, and in the worst case it'll edit a file from a neighboring task.
So the rule is simple: start the agent in the folder of the task you're solving.
How to start the agent in the task folder
- Find the task folder in the project tree on the left.
- Right-click it and pick
Open In-Terminal. A terminal tab opens, already sitting in that folder. - Type
claude.


It sounds like an extra step. In practice it's one right-click, done once per task.
There is no magic behind that click: the IDE simply types the cd command to the chosen folder for you. The same thing by hand in a terminal that is already open:
cd src/ru/javarush/claude/course/level01/task09
claude
One trap: in the project tree the IDE shows the package as a single dotted line - ru.javarush.claude.course.level01 - while on disk those are nested folders. Don't retype that path from the screen: on disk it's different. Copying is easier: right-click the task folder - Copy Path/Reference.
That merging has a follow-up, and this one isn't harmless. IDEA collapses into one line any chain of folders where a folder holds just one other folder and nothing else. In a task that so far contains nothing but .claude, that folder ends up in the same line too. It looks like the task folder, but a right-click on it applies to the deepest folder in the chain.
Open In - Terminal on such a line opens the terminal in src/ru/javarush/claude/course/level01/task02/.claude, not in src/ru/javarush/claude/course/level01/task02. Run claude there, and the agent takes a folder holding its own settings for the project: it starts creating your solution files right inside .claude instead of the task folder.
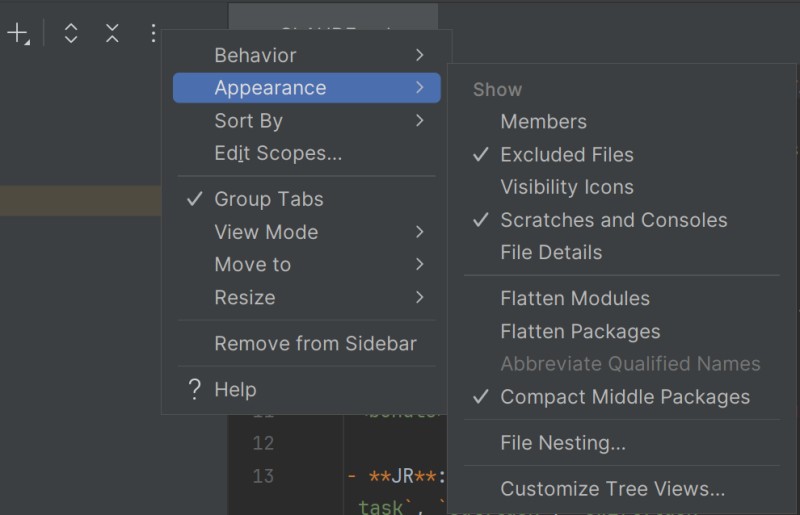
The safest fix is to turn the merging off altogether. Above the project tree, click the three-dots button, open Appearance and uncheck Compact Middle Packages. After that every folder gets its own line in the tree, and a right-click lands where you aimed.
If the terminal is already open and its path ends in .claude, go one level up with cd .. and only then start the agent.
Moved on to the next task
The working folder is fixed when the agent starts, and it doesn't follow you. Nothing complicated to do about it, though: the agent notices that the task has changed and offers to move to its folder.
If you'd rather do it yourself, go to the new task folder and start claude there: same right-click, or the cd command. You can also open a separate terminal tab for the new task, and then keep both at hand.
The agent tells you where it is
You don't have to watch this by hand. In the status line under the chat, the course profile of Claude Code prints the task it's working on: JR · claude.course · task02.
And if a different task is open in the IDE, a warning appears there in yellow - that the IDE has task01 open. That means you're looking at one file while the agent works in another folder. When you see it, stop and work out what got out of sync: either the agent was started in the wrong folder, or you opened a file from the wrong task.
The log of your study sessions
There is one more reason to start the agent inside the task folder, and it's worth spelling out.
The course profile for Claude Code is set up to keep a work log. While you're solving a task, a .javarush folder appears inside it, and a record of the work goes there: your requests to the agent, the beginnings of its answers, which files it changed, which commands it ran.
This is what one task folder looks like once you have worked in it:
task09/
├── .claude/                  # agent rules for this task
├── .javarush/
│   ├── cc-transcript.txt     # the work log, plain text
│   └── cc-transcript.json
├── arkanoid.html             # the task files themselves
├── clicker.html
└── tictactoe.html
Why this is needed: the platform uses this log to check your solution. It's your "show your work" notebook: it shows not just the answer, but how you got there. Sounds unnerving, I know. It's just that without the log the platform only sees what came out at the end.
The log stays on your disk, next to the task: you can open the file and read it. And it appears wherever the agent was started. Start from the project root and that's where it lands, with nothing in the task folder. One more argument for not skipping the cd.

5. How to submit a solution for review
When the solution is ready, click the Verify button in the task window. The plugin sends the current version of the solution to the JavaRush server.
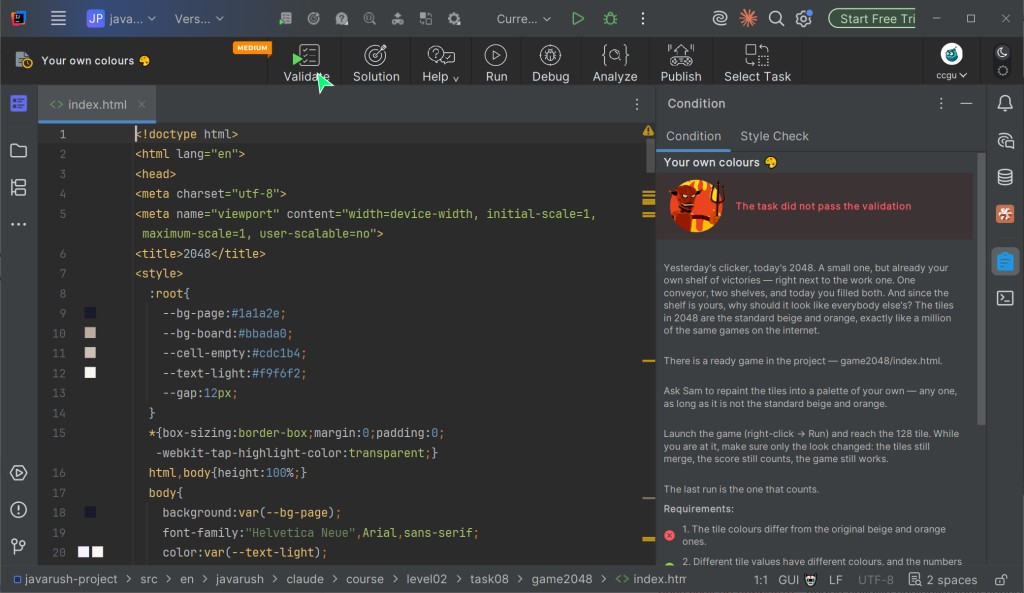
Once the check is done, the result appears in the same place, in the task interface. Then there are two possible outcomes:
- solution accepted - the requirements are met, the task is counted;
- solution not accepted - the plugin shows the review message, after which you can go back to the statement and fix the solution.
A rejected attempt is not a broken project. It's ordinary feedback. Read the message, open Condition again, compare it with your solution and fix one clear point. One, not all of them at once: that way you can see what actually helped.
You can submit a solution as many times as you like. That's what the check is for: make an attempt, get the result, fix it, submit again.
6. Plugin settings worth knowing
Task sync: the site and the plugin
The plugin shows the tasks of the active course - the one selected in your account on the site. There can be several courses, but only one can be active at a time.
The task list and its statuses refresh on their own: roughly every five minutes and after every successful submission. A task you solved on the site shows up in the plugin already solved.
To refresh right now, click the avatar in the top right and choose Sync tasks. After switching the active course this step is mandatory: until you sync or restart IDEA, the plugin keeps showing the tasks of the previous course.

How to hide the plugin navigation bar
It sounds odd, but the order is this: first you have to show the bar. It only appears when Beginner Mode is off - that's the simplified view of the plugin with some of the features hidden. And the checkbox that hides the bar lives on the bar itself, under the gear icon.
- Click the avatar in the top right and choose
Settings - Beginner Modeto turn it off. - A navigation bar appears at the top of the plugin. Click
Settings (⚙️)on it and clear the "Show plugin navigation bar" checkbox.
I hide it right away myself: screen space is worth more than a couple of buttons.

Installing the plugin manually
- Download the plugin.
- Open the settings: on Windows and Linux -
File → Settings, on macOS -IntelliJ IDEA → Preferences. - In the side menu pick the Plugins section, click the gear icon (⚙️) and choose
Install Plugin from Disk.![The Install Plugin from Disk item under the gear icon in the Plugins section]()
- Open the folder where the plugin file sits. Select the archive and click
OK, then restart IDEA.

GO TO FULL VERSION