You install the plugin, find the button, click it - and the first impression is usually this: it's a way to run claude without switching to a separate terminal window. Convenient, sure. But installing a whole plugin for one button would be an odd trade.
That impression is misleading. The IDE has had a built-in terminal all along, and nothing stopped you from typing claude into it by hand. The plugin does something else: it connects the agent to the editor so the two can see each other. What you have open and selected, what the linter is complaining about, how a proposed edit looks line by line - none of that is yours to relay any more. Launching with one button is the dullest thing in the set.
Claude Code is a terminal tool, and it works perfectly well without an IDE: open a terminal, type claude, then write in plain English.
The question isn't whether the agent starts. The question is what you check its work against. It changes files on your disk for real. With the editor closed, all you have is a report: "added error handling to three methods". Sounds plausible. Nothing to compare it with.
The plugin closes exactly that gap. Below is what it gives you and where people trip up most often.
1. What the editor connection gives you
The official plugin does five things. In order, starting with the one the whole thing was built for.
- Diff in the IDE window. A diff is a list of changes: which lines were removed, which were added, what changed between the old and the new version. Edits from the agent open in your editor's usual diff viewer instead of arriving as text in the terminal. Before on the left, after on the right.
- Selection context. Your open tab and whatever you have selected reach the agent automatically. No copying code into the chat and explaining in words which piece you mean.
- Sending code to the agent. Select some code, press the shortcut, and a reference to exactly those lines goes into the prompt, something like
@src/auth.ts#L1-99. - Diagnostics from the IDE. Linter and syntax errors, the ones your editor underlines in red, Claude can request from the IDE on its own, without you retelling them. People usually discover this one last, and it's among the most useful. It doesn't check them automatically after every edit, though, so if you need that, just ask it to look at the errors in the file.
- Quick launch. The Claude logo on the IDE panel or a keyboard shortcut - the agent opens without you leaving the editor.

2. Installing: two pieces, not one
This is the most common stumbling block. The plugin doesn't carry Claude Code inside it. It runs the claude command in your IDE's built-in terminal and connects to it. So you install both pieces:
- Claude Code itself - without it, the plugin tells you straight:
Cannot launch Claude Code; - the Claude Code [Beta] plugin by Anthropic PBC - install it from the
Marketplace, then restart the IDE completely, sometimes more than once.

If claude is installed but sits somewhere the IDE can't find it, set the full path in Settings → Tools → Claude Code [Beta] → Claude command.
3. Shortcuts you need right away
| Action | Windows / Linux | macOS |
|---|---|---|
| Open Claude Code | Ctrl+Esc | Cmd+Esc |
| Send the selected code to the agent | Ctrl+Alt+K | Cmd+Option+K |
| Open Claude Code when the shortcut doesn't fire | click the Claude logo on the IDE panel | |
That last row isn't there for decoration. Shortcuts don't always fire: the combination gets intercepted, sometimes by the system, sometimes by another plugin. Nothing is broken here, and it's no reason to go fixing your IDE. Open it with the mouse instead: slower, but it works everywhere.

You won't be looking for long: the plugin icon is the Claude logo, the same one you see everywhere else in the interface. You won't mistake it for anything else.
Send to Claude Code
The second shortcut is the workhorse. Select some code, press Ctrl+Alt+K, and a reference to exactly those lines jumps into the prompt. The same command sits in the action toolbar above the selection, as the Send to Claude Code item.
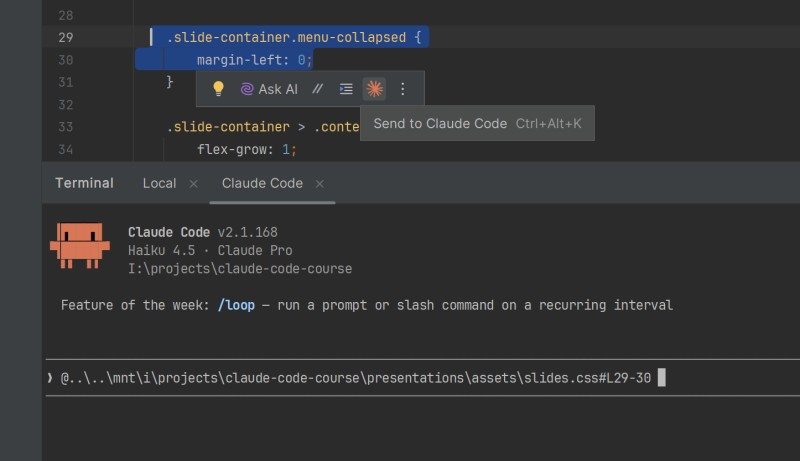
What lands in the prompt is a line like this - the file path and a line range:
@presentations/assets/slides.css#L29-30Then you type the actual request after it, in plain English:
@presentations/assets/slides.css#L29-30 remove margin-left, it breaks the layout on a narrow screenBoth sides win: the agent doesn't waste steps hunting for the file, and you don't spend context on that search.
If you do not have the plugin
You can build a line reference with the IDE alone: right-click the line - Copy / Paste Special - Copy Reference. You get src/utils/slides.js:16 on the clipboard.
The format is different - no @ and a colon instead. That no longer pulls the file into the context automatically; it's just text in your request. But as a "look here" pointer it does the job: the agent reads the path and opens the right place itself.
4. Two ways to start, and the /ide command
Start claude from your IDE's built-in terminal and every feature turns on by itself - nothing to set up.
Start it from an external terminal (a separate window, Windows Terminal, iTerm) and there's no connection to the editor until you say:
# connect Claude Code to the open IDE
/ide
I'd simply make it a rule to start the agent from the built-in terminal. Then you never have to think about /ide at all: you need it in exactly one case - when the terminal is external.
One more thing about the folder you start from. The agent looks at the files where it was started - from a neighboring folder it works on the wrong ones. In your own project, start it at the root, the same one that's open in the IDE.
Course tasks work differently: start the agent in the task folder, not at the root of javarush-project. Every task there is a folder of its own, with its own files and its own rules for the agent, and at the project root the whole course lands in the agent's field of view.
5. Where to show the diff
Where the diff shows up is a setting, not a given:
# open Claude Code settings
/config
There is a diff tool option in there: auto shows edits in the IDE, terminal keeps them in the terminal. This option appears only when the agent is connected to the IDE, so from an external terminal run /ide first. If the diff stubbornly stays in the terminal, this is where to look, rather than hunting for a bug in the plugin.
In the terminal a diff arrives as text, roughly like this:
diff --git a/src/main/java/RefundQueue.java b/src/main/java/RefundQueue.java
index 3a7f2bc..9d41a80 100644
--- a/src/main/java/RefundQueue.java
+++ b/src/main/java/RefundQueue.java
@@ -42,7 +42,7 @@ void prioritize(RefundRequest refundRequest) {
-    if (refundRequest.isUrgent()) {
+    if (refundRequest.isUrgent() || refundRequest.amount() > 100) {
         moveToTop(refundRequest);
     }
 }
You read it like this: the line with a minus was there before, the line with a plus is there now. Everything else is housekeeping: which file this is, and which line the fragment starts at.
And now the part that makes the IDE view worth turning on. In modes where Claude asks permission before every edit, the permission prompt doesn't only arrive as text in the terminal: IDEA opens the change in its own diff window with Reject and Apply buttons. You look at the highlighted lines in the context of the whole file and decide right there.

Comparing that with a text diff in the console is almost unfair: syntax highlighting, the surrounding lines, familiar navigation. You decide "accept or not" against the code itself, not against a description of it.
6. Three common traps
Esc does not interrupt the agent
In the JetBrains terminal the Esc key moves focus to the editor by default, so it never reaches Claude Code. It's a nasty moment: the agent is doing the wrong thing, you hit Esc, and nothing happens.
You fix this once and for all: Settings → Tools → Terminal, uncheck Move focus to the editor with Escape. I'd do this right after installing the plugin, before it catches you out the first time.
"No available IDEs detected"
The agent doesn't see the editor. Check in order: the plugin is installed and enabled; the IDE has been restarted completely; claude was started from the built-in terminal and not from an external window.

WSL: agent in Linux, IDE in Windows
A special case of the same error. If Claude Code lives in WSL2 while the IDE runs in Windows, the connection is usually blocked by WSL2 network isolation or by the firewall. The fix is a firewall rule, or switching WSL2 to mirrored networking - both are covered in the plugin documentation. Mirrored networking is only available on Windows 11 22H2 and later; on Windows 10 the firewall rule is what you have.
7. What all of this is for
The IDE connection gives you the main thing: you see what the agent is doing while it does it. From there the loop looks like this:
- Claude proposes a change;
- you look at the diff and decide whether to accept it;
- Git records what you accepted.
The third step is only outlined here. The Git rhythm, commits and rollbacks are a big topic of their own, and the course comes back to them later. For now one thing is enough: the save point appears after your review, not before it.
This cycle is only that neat on paper. In real work you'll accept half the edits without looking, because they're variable renames, and then get stuck on one for ten minutes and ask for a redo. That's normal. The point is not to read every line, but to have the option at the moment an edit looks odd.
Without an editor that option simply isn't there: you end up checking against a description instead of against the code.
Open any project in IDEA and click the Claude logo on the panel. The Ctrl+Esc shortcut (Cmd+Esc on macOS) does the same thing, but it doesn't always fire. It happens - just use the mouse.
Then select a couple of lines in a file and press Ctrl+Alt+K - a reference to those lines jumps into the prompt by itself. Ask for something small: "add a comment to this method". Watch the edit open in the diff window, and press Reject - rejecting is a skill too.
GO TO FULL VERSION