An article from a series about creating a Java project (links to other materials are at the end). Its goal is to analyze key technologies, the result is to write a telegram bot. Greetings, dear readers. As described in the previous part, we will go according to plan. We have already created a project and it's time to fill it with code. Now all issue will be added by separate commits. Everything that will be necessary, I will describe here. If I miss something or describe it not clearly enough - ask in the comments, I will try to answer.
Writing JRTB-0M
In this task, we need to add an empty SpringBoot framework for future work. We will do this in the same way as we did in the article about SpringBoot + Flyway . Download the project , open it in IDEA and create a new branch called JRTB-0 . How to do this through the idea I described here . So it will be more convenient and clearer for us in the future to track the work. Did you already know that there is no longer a master branch? Now it is called neutral - main . So we get used to it. Although, in truth, we can always rename it back to master. We go to Spring Initializr and create a SpringBoot framework for our bot.At the moment, the youngest proposed version of the boot sprint is 2.3.7, we take it. I will describe the following settings separately:
Project: Maven Project - we have already dismantled maven here and here . Therefore, I will additionally describe only what I did not disclose in previous articles. If there are such “white spots”, of course)
Language: Java - everything is clear here. There will be a desire - we can rewrite this case in Kotlin. I just bought myself a book Kotlin in Action, we will learn Kotlin together))
Spring Boot: 2.3.7 - we take the smallest of the proposed versions to eliminate any problems. This is already a completely modern version of the boot.
Project Metadata:
Group: com.github.codegymcommunity - here we select the domain hosting our group of repositories.
Artifact: codegym-telegrambot - the maximum description of the project.
Name: Javarush TelegramBot - we will write it in full here.
Description: Telegram bot for Javarush from community to community - here is a more detailed description of the project.
Package name: com.github.codegymcommunity.jrtb - here you can already use an abbreviation for the project name. Now the project will start with this package. Why so many? So that when we add other projects to the classpath, they are in different packages. Each in its own unique. This is important to keep the OOP principles.
Packaging: Jar is our standard)
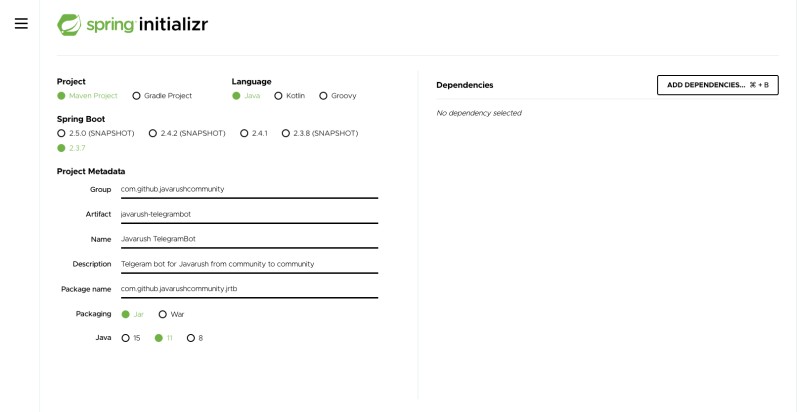
Java: 11 - let's be one step ahead. I do not think that I will use innovations after the eighth java, but let it be. He doesn’t ask for food) ... this decision will give us a little easter egg in the future)
For now, we will not add any dependencies. For this task, we do not need this. Having filled in all this, we get (here is a link to the generated project): Having filled in, press GENERATE and add all the insides in the archive to our project. Adding files to the project. As a result, we have an application. To check if it is built at all, go to the terminal and write: $ mvn clean package If you have the same as from here, everything is ok: the project is built, and the jar is ready in the target folder. On this, the task within the framework of the description is ready. It's simple, right? Therefore, we commit and push to our branch: We add the name of our task at the beginning of the commit description, so that later it will be clear what task the work was done under. Click Commit and Push ...Once again, we review and check what exactly we want to push from the local repository to the remote one, and after making sure that everything is OK, click Push . What is our next step? According to all the rules (which can be read in this article , in the part about the GitHub flow), you need to create a pull request for the main branch and wait for someone from the team to review the code. Since I am myself, I will formally create a pull request and review everything again. I go to the repository page, and the github already knows that we have an addition and offers to create a pull request: There are no obstacles to patriots (c) - we create it, as they suggest. We set the same label, project as on the task we are working on, and fill in the description: Click Create pull request .
Setting up the CI process
We go into the created pull request: at the bottom we see that we do not have Continuous Integration configured (hereinafter - CI). Well, not configured, so what? Why do we need CI at all? What is CI anyway? Here is roughly the list of questions that should worry us at this moment. In general, CIis a continuous process of merging code into a common codebase with a project build running before. The so-called build (from the English build). Every time we build a project, we make sure that the project has been compiled, all of its tests have passed, plus after building the project, you can add autotests from testers that run on this particular build to CI. In this way, it turns out that we become more confident that new changes work as we expect and do not break the previous functionality. Also, CI is good in that it starts automatically after updating the codebase. That is, we pushed our changes into the branch and the process began - assembly, tests, autotests and other steps. If any of these steps fail, the build is considered a broken build and cannot be merged into the main branch. This is what we will do now: Let's add GitHub Actions, which will run our code after the push. GitHub Actions fits perfectly with our GitHub Flow, so we will use it to automate the work. This tool is very powerful and big, but for now we will only use it to run the build and check that it builds as it should. To enable it, find the button on the repository pageActions and go through it: Find the Continuous Integration workflow we need: Click Set up this workflow. Further, we are offered to use their template: we fully agree, we will just clarify everything a little:
# This workflow will build a Java project withMaven
# For more information see: https://help.github.com/actions/language-and-framework-guides/building-and-testing-java-with-maven
name:Java CI withMaven
on:
push:
branches:[ main ]
pull_request:
branches:[ main ]
jobs:
build:
runs-on: ubuntu-latest
steps:-uses: actions/checkout@v2- name:Set up JDK 1.8uses: actions/setup-java@v1with:
java-version:1.8- name:BuildwithMaven
run: mvn -Bpackage--file pom.xml
Here it is indicated that the GitHub Action is called in two cases:
When a push is made to the main branch.
When a pull request is created in the main branch.
The jobs section describes the steps that will be performed. We have only one step - build. It shows that our project will be launched in ubuntu with the mvn -B package --file pom.xml command . This is exactly what we did locally. If you want to change something here, please. I will use this template, it will be enough for me. I click Start commit , choose create a new branch to set up the process and then Propose new file . But the build process crashed... As you can see, Failing after 14s - build. It looks like something has happened: let's go to the assembly and look at the details:He writes that he did not find such a memory. Why? Ahhh, exactly right! Because we have created changes in the master branch, but our task is not there yet. And that's why he didn't find the pomp... So now we're doing the following: merging this data into the master, then merging the main branch into JRTB-0, and then everything should go fine. In the pull request with github actions changes, click Merge pull request : And repeat Confirm merge . Next, the github prompts us to delete the branch in which we worked. We do not refuse and delete: Further, I did not find in the pull request with SpringBoot how to pull changes from the main branch from the website, so we will do it manually through IDEA.
Step 1: Update master branch to local repository.
The idea is to go to the master branch, press ctrl + t and update the master branch:
Step 2: Merge the changes from the master branch to the JRTB-0 branch.
We pass to JRTB-0 and merjim into it the main one.
Step 3: push the changes.
Press ctrl + shift + k and confirm the push. Now we are waiting for the build to pass and it will be green!)) But it is red again. What is it? We go into the action logs and see that we are out of sync in java versions. In GitHubActions it costs 8, and we use 11: Now there are two options: either correct the actions, or lower the version to the eighth. The first option seems to me to be better and more correct. We make changes in a separate commit: we will work not with the 8th, but with the 11th java. And after that, finally, everything worked out for us, and we were able to set up our CI process for the project. Such things need to be configured at the initial stage, so as not to worry about it later. Now it is already clear that the build has passed and you can merge without fear:
Setting up work with branches in the repository
You can also configure things in the repository, such as the rules for working with branches. I want to make it so that the main branch cannot be pushed directly, but only through pull requests, and make it impossible to merge the pull request if the build fails (that is, if GitHub Actions fell at some step ). To do this, find the Settings button and select Branches : At the moment there are no rules for branches, so let's add a new one via the Add rule button :There are many settings here, and everyone can do something to suit their needs. In order for the build to successfully pass before merging in the pull request, add a checkmark to Require status checks to pass before merging and select the status we need - build. Enough for now: then it will be possible to update this steering wheel and see what else you want. Click Create to create this wheel. Further, if we go back to our pull request, we can see that now our check has the required mark: Let's check our project page, which displays all the statuses of the tasks: You can immediately see which task is being worked on. Moreover, the work has already been done, and the task is in code review (code review) status.
Close JRTB-0
Now that we have prepared a pull request and made a CI for it, we need to complete the last stage: close the task, move it to the correct status, look at the changes in our project on the board. Our pull request is ready to be merged into the master. In the pull request, click the Merge pull request button : After a successful merge, you can delete, and usually they do. I won't do this to make it easier for you to see changes between branches/commits. Once a pull request is merged, it automatically goes to done on our project board: The last step is to close the issue with a link to the pull request it was in: This issue automatically goes to done on the board. A start has been made, the first task is done!
conclusions
It would seem that we have already started working and writing code, but settings are still needed. Yes, it takes time, but it will pay off a hundredfold when the project becomes larger and more complex and guarantees are needed that it won’t just break everything with one commit. The pull request in which it all happens is available here . Perhaps by the time you read it, it will already be closed. It's not scary: all the necessary information will be stored by the link. Thank you all for reading, see you soon. Further more!

 Did you already know that there is no longer a master branch? Now it is called neutral - main . So we get used to it. Although, in truth, we can always rename it back to master. We go to Spring Initializr and create a SpringBoot framework for our bot.
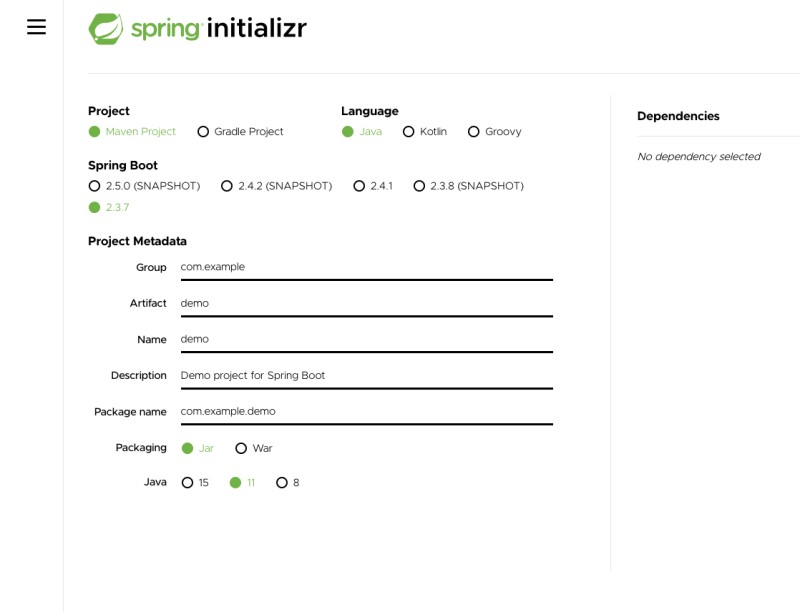 At the moment, the youngest proposed version of the boot sprint is 2.3.7, we take it. I will describe the following settings separately:

 Having filled in, press GENERATE and add all the insides in the archive to our project.
 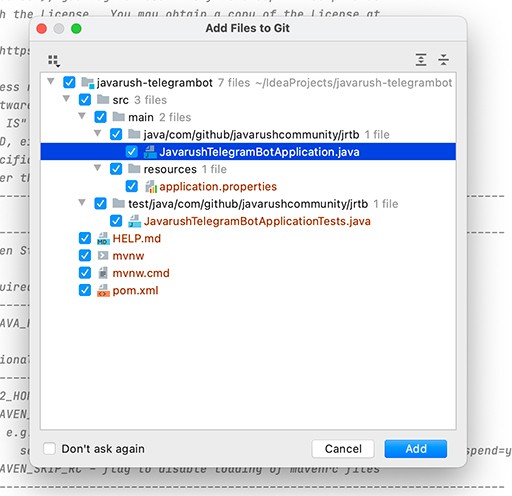 Adding files to the project. As a result, we have an application. To check if it is built at all, go to the terminal and write: $ mvn clean package
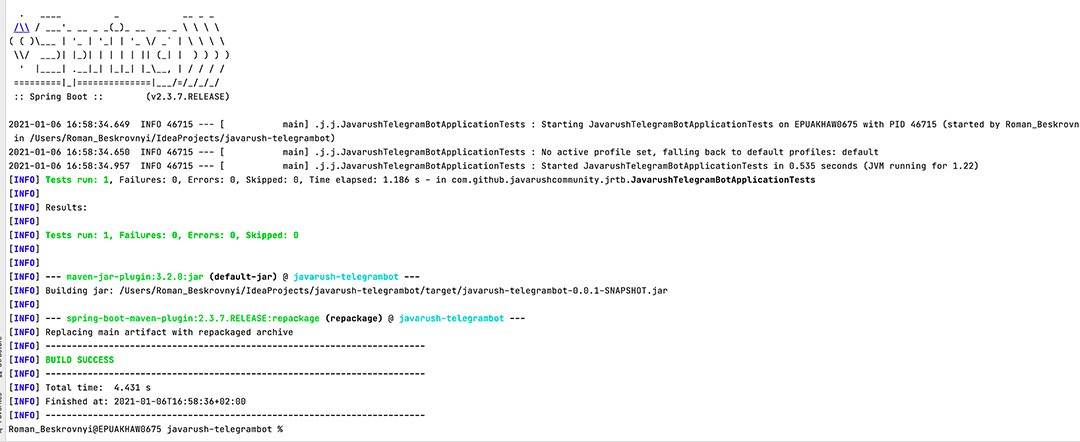 If you have the same as from here, everything is ok: the project is built, and the jar is ready in the target folder. On this, the task within the framework of the description is ready. It's simple, right? Therefore, we commit and push to our branch:
 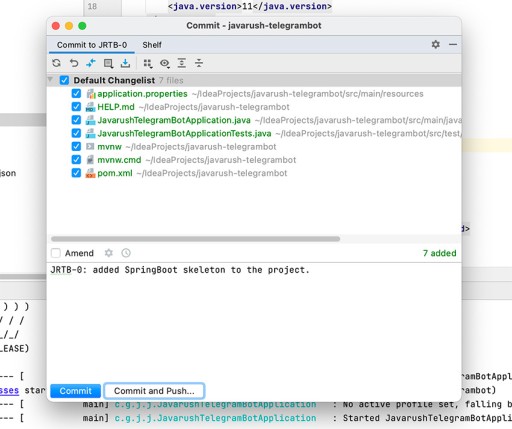 We add the name of our task at the beginning of the commit description, so that later it will be clear what task the work was done under. Click Commit and Push ...
 Once again, we review and check what exactly we want to push from the local repository to the remote one, and after making sure that everything is OK, click Push . What is our next step? According to all the rules (which can be read in this article , in the part about the GitHub flow), you need to create a pull request for the main branch and wait for someone from the team to review the code. Since I am myself, I will formally create a pull request and review everything again. I go to the repository page, and the github already knows that we have an addition and offers to create a pull request:
 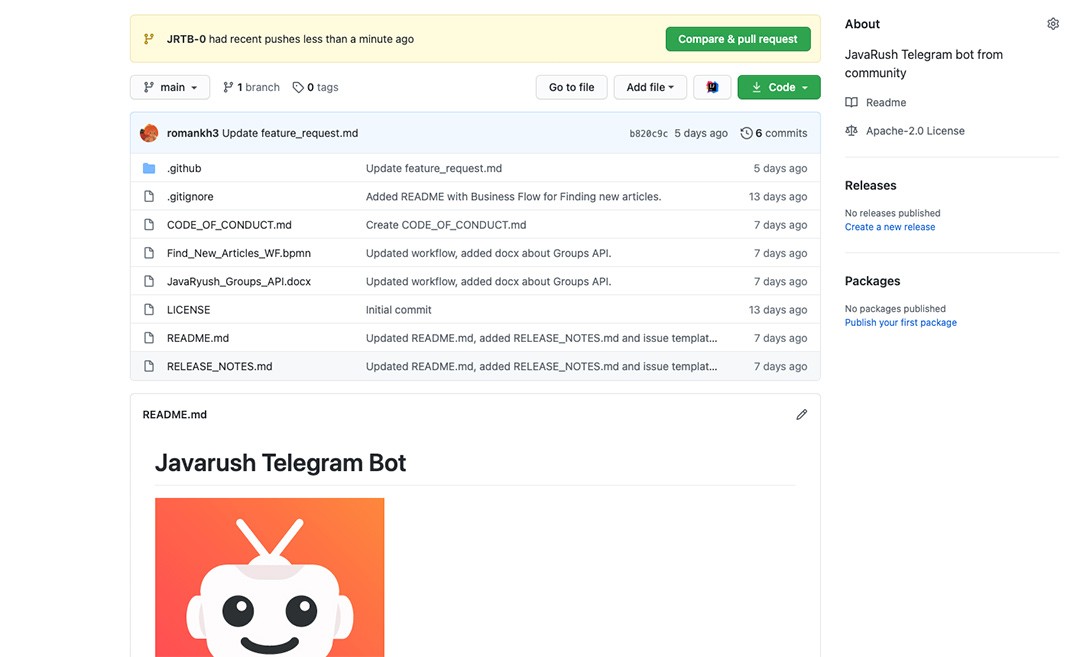 There are no obstacles to patriots (c) - we create it, as they suggest. We set the same label, project as on the task we are working on, and fill in the description:
 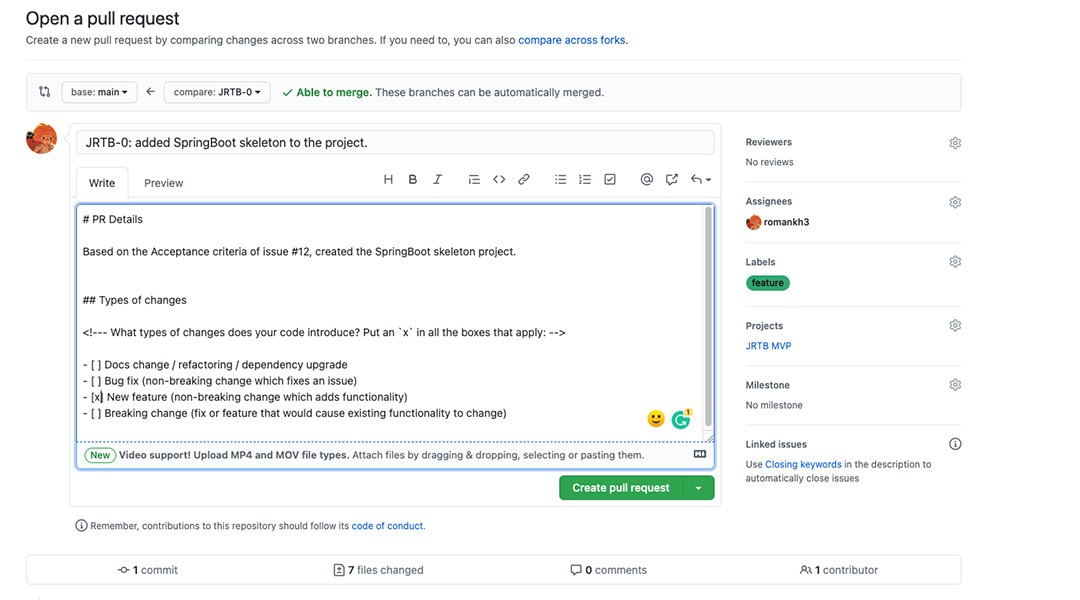 Click Create pull request .
 Well, not configured, so what? Why do we need CI at all? What is CI anyway? Here is roughly the list of questions that should worry us at this moment. In general, CIis a continuous process of merging code into a common codebase with a project build running before. The so-called build (from the English build). Every time we build a project, we make sure that the project has been compiled, all of its tests have passed, plus after building the project, you can add autotests from testers that run on this particular build to CI. In this way, it turns out that we become more confident that new changes work as we expect and do not break the previous functionality. Also, CI is good in that it starts automatically after updating the codebase. That is, we pushed our changes into the branch and the process began - assembly, tests, autotests and other steps. If any of these steps fail, the build is considered a broken build and cannot be merged into the main branch. This is what we will do now: Let's add GitHub Actions, which will run our code after the push. GitHub Actions fits perfectly with our GitHub Flow, so we will use it to automate the work. This tool is very powerful and big, but for now we will only use it to run the build and check that it builds as it should. To enable it, find the button on the repository pageActions and go through it:
 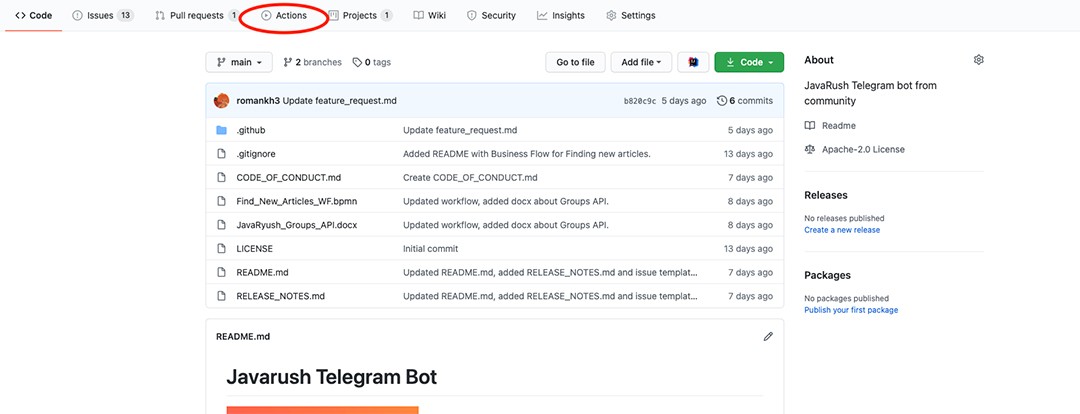 Find the Continuous Integration workflow we need:
  Click Set up this workflow. Further, we are offered to use their template: we fully agree, we will just clarify everything a little:
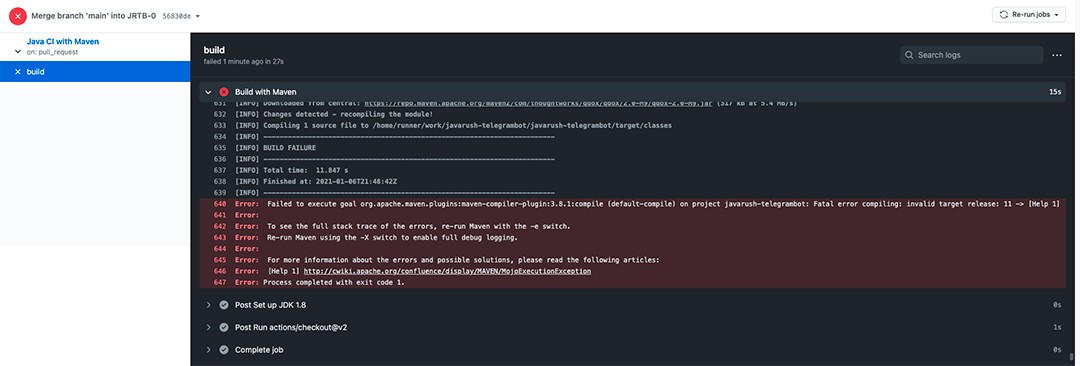
 As you can see, Failing after 14s - build. It looks like something has happened: let's go to the assembly and look at the details:
 He writes that he did not find such a memory. Why? Ahhh, exactly right! Because we have created changes in the master branch, but our task is not there yet. And that's why he didn't find the pomp... So now we're doing the following: merging this data into the master, then merging the main branch into JRTB-0, and then everything should go fine. In the pull request with github actions changes, click Merge pull request :
  And repeat Confirm merge . Next, the github prompts us to delete the branch in which we worked. We do not refuse and delete:
 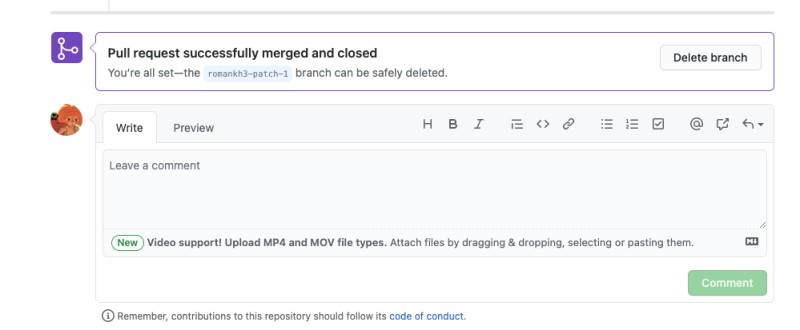 Further, I did not find in the pull request with SpringBoot how to pull changes from the main branch from the website, so we will do it manually through IDEA.


 Now there are two options: either correct the actions, or lower the version to the eighth. The first option seems to me to be better and more correct. We make changes in a separate commit: we will work not with the 8th, but with the 11th java.
  And after that, finally, everything worked out for us, and we were able to set up our CI process for the project. Such things need to be configured at the initial stage, so as not to worry about it later. Now it is already clear that the build has passed and you can merge without fear:
 At the moment there are no rules for branches, so let's add a new one via the Add rule button :
 There are many settings here, and everyone can do something to suit their needs. In order for the build to successfully pass before merging in the pull request, add a checkmark to Require status checks to pass before merging and select the status we need - build. Enough for now: then it will be possible to update this steering wheel and see what else you want. Click Create to create this wheel.
 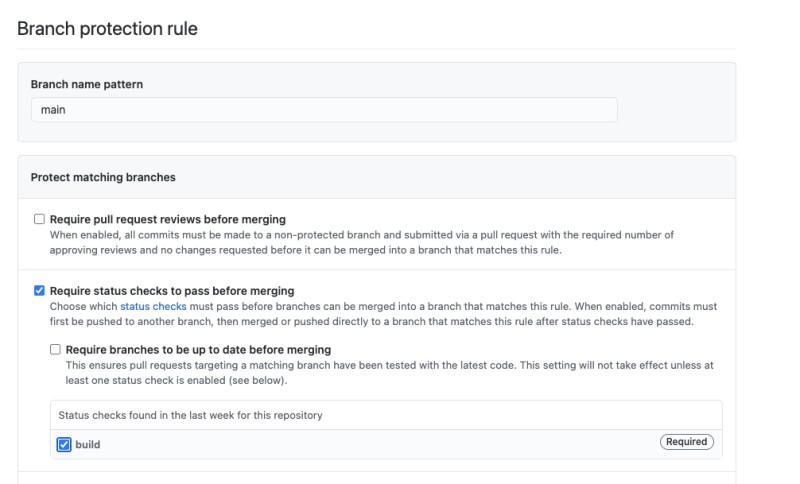 Further, if we go back to our pull request, we can see that now our check has the required mark:
  Let's check our project page, which displays all the statuses of the tasks:
  You can immediately see which task is being worked on. Moreover, the work has already been done, and the task is in code review (code review) status.
 After a successful merge, you can delete, and usually they do. I won't do this to make it easier for you to see changes between branches/commits. Once a pull request is merged, it automatically goes to done on our project board:
 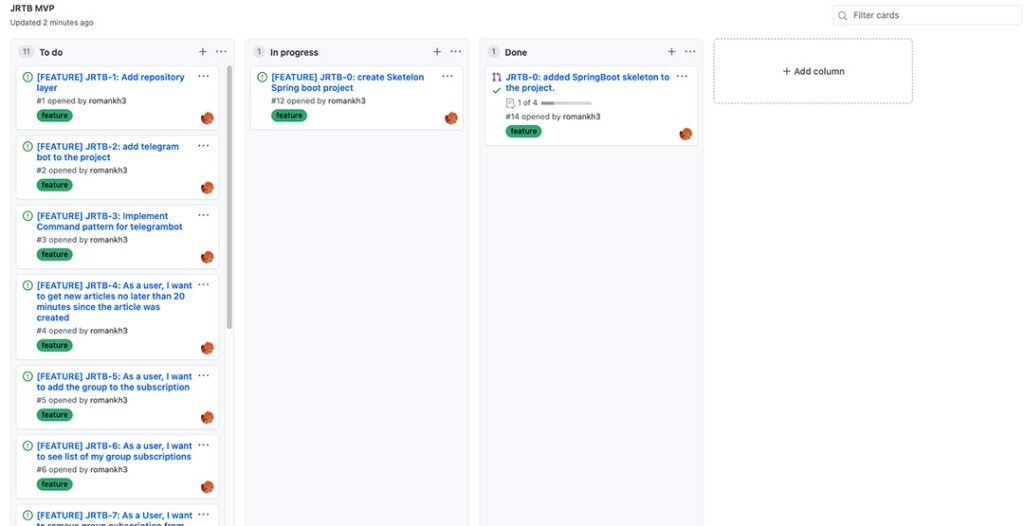 The last step is to close the issue with a link to the pull request it was in:
  This issue automatically goes to done on the board.
  A start has been made, the first task is done!

GO TO FULL VERSION