One day I had an idea to write a small desktop application for my needs - something like a small dictionary for learning foreign words - and I began to rack my brain, how could I do this? Naturally, the first thing that came to my mind was Swing. Everyone has probably heard of Swing . This is a library for creating user, graphical interfaces. Due to the fact that our beloved Oracle has not yet completely abandoned Swing, it is not considered obsolete, and applications still run on it. However, it is no longer being modernized by Swing, and the folks at Oracle have given us a taste of what the future of JavaFX is. And in fact, JavaFX uses Swing components as a service provider)
![Introduction to Java FX - 3]()
![Introduction to Java FX - 4]() So let's move a little towards the code. Since I use Java 8, I don’t need to pull up any dependencies, since JavaFx is in the JDK by default (as in Java 9.10), but if we have Java 11+, then we need to go to the maven repository and pull it from there dependencies.
So let's move a little towards the code. Since I use Java 8, I don’t need to pull up any dependencies, since JavaFx is in the JDK by default (as in Java 9.10), but if we have Java 11+, then we need to go to the maven repository and pull it from there dependencies.
![Python-университет]()
So what do we see here? Let's go through it line by line: 2 - set the name of the window itself (stage) 3.4 - set its dimensions 6.7 - set the path of the reading stream to the file (icon) ![Introduction to Java FX - 5]() 8 - create the file as an Image object, which is connected to the real file by the stream passed in the constructor 9 - set an icon in the top panel of the window 11 - create a button object 13-16 - set the reaction when the button is pressed 17 - create a scene where we place our button 18 - place the scene on our common window 20 - set the visibility flag for the window And as a result we get a small window to welcome our favorite pesels:
8 - create the file as an Image object, which is connected to the real file by the stream passed in the constructor 9 - set an icon in the top panel of the window 11 - create a button object 13-16 - set the reaction when the button is pressed 17 - create a scene where we place our button 18 - place the scene on our common window 20 - set the visibility flag for the window And as a result we get a small window to welcome our favorite pesels: ![Introduction to Java FX - 6]() Everything looks much simpler than Swing, doesn’t it? But it's not over yet. It is not good to write all the code to display an application; you need to divide it somehow in order to make it more understandable (graphical components in one basket, logic in another). And here xml comes into the picture... Oh my god, xml? Exactly. Specifically, we use its specific implementation for JavaFX - FXML, in which we define the graphical components of the application and their properties (all sorts of sizes, etc.), and then connect it to a controller, which helps manage the logic. Let's look at an example of this xml:
Everything looks much simpler than Swing, doesn’t it? But it's not over yet. It is not good to write all the code to display an application; you need to divide it somehow in order to make it more understandable (graphical components in one basket, logic in another). And here xml comes into the picture... Oh my god, xml? Exactly. Specifically, we use its specific implementation for JavaFX - FXML, in which we define the graphical components of the application and their properties (all sorts of sizes, etc.), and then connect it to a controller, which helps manage the logic. Let's look at an example of this xml:
![Introduction to Java FX - 7]()
![Introduction to Java FX - 8]()
![Introduction to Java FX - 9]()
(sort of like a window for registering dogs)
When you select a dog and press the Delete button, the dog is removed from our list. When you select a four-legged friend and change its fields, and after pressing the Edit button, the dog’s information is updated. When we press the New button, a window pops up to create a record for a new dog (to start with its name): ![Introduction to Java FX - 10]() Then click Save and fill in the rest of its fields in the first window, and then click the Edit button to save. Sounds easy, right? Let's see how this will look in our Java application. To begin with, I'll just leave here the xml layouts for these two windows generated in
Then click Save and fill in the rest of its fields in the first window, and then click the Edit button to save. Sounds easy, right? Let's see how this will look in our Java application. To begin with, I'll just leave here the xml layouts for these two windows generated in ![Introduction to Java FX - 11]() As you can see, there is nothing special, there are controllers that represent certain windows, there are models that represent our data. Let's take a look at the class that launches the application (Application implementation):
As you can see, there is nothing special, there are controllers that represent certain windows, there are models that represent our data. Let's take a look at the class that launches the application (Application implementation):
![Frontend-университет]()
Here we see two constructors. One is almost a regular one with all the arguments (almost, because we use special FX wrappers of simple types) and a constructor without arguments: we use it when creating a new dog, which at first has only a name. Controller for basic window: ![Introduction to Java FX - 12]() That's probably all I have for today. Today we briefly got acquainted with the basic concepts and an example of using JavaFX, and we can build small desktop applications (using additional information, which, fortunately, is abundant on the Internet). And you, in turn, like))
That's probably all I have for today. Today we briefly got acquainted with the basic concepts and an example of using JavaFX, and we can build small desktop applications (using additional information, which, fortunately, is abundant on the Internet). And you, in turn, like))
What is JavaFX?
JavaFX is essentially a GUI toolkit for Java. There will be a small digression here, and we will remember what a GUI is : Graphical user interface - a graphical user interface is a type of user interface in which all elements (buttons, menus, icons, lists) presented to the user on the display are made in the form of pictures, graphics . Unlike a command line interface, in a GUI the user has random access to visible objects using input devices. Often, interface elements are implemented in the form of metaphors and display their properties and purpose to facilitate user understanding. JavaFX is aimed at creating games and desktop applications in Java. In fact, it will replace Swing due to the proposed new GUI tool for Java. It also allows us to style GUI layout files (XML) and make them more elegant using CSS, similar to what we are used to in web applications. JavaFX additionally handles integrated 3D graphics as well as audio, video and embedded networking applications in a single GUI toolkit... It is easy to learn and well optimized. It supports many operating systems, as well as Windows, UNIX systems and Mac OS.
JavaFX Features:
- JavaFX initially comes with a large set of graphical interface parts, such as all sorts of buttons, text fields, tables, trees, menus, charts, etc., which in turn will save us a lot of time.
- JavaFX often uses CSS styles, and we will be able to use a special FXML format to create the GUI, rather than doing it in Java code. This makes it easy to quickly lay out a GUI or change the appearance or composition without having to play around with Java code for a long time.
- JavaFX has ready-to-use diagram parts so we don't have to write them from scratch any time you need a basic diagram.
- JavaFX additionally comes with 3D graphics support, which is often useful if we are developing some kind of game or similar applications.
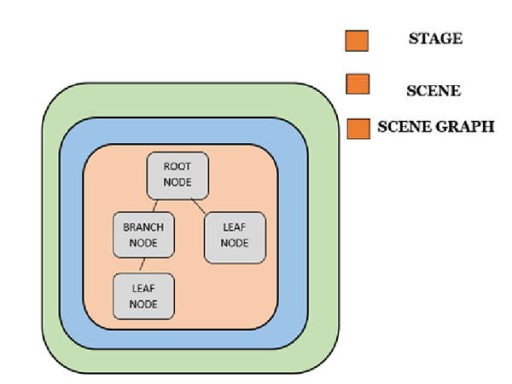
- Stage is essentially a surrounding window that acts as a starting canvas and contains the rest of the components. An application can have several stages, but in any case there must be one such component. Essentially, Stage is the main container and entry point.
- Scene - displays the contents of the stage (like a nesting doll). Each stage can contain several components - scene, which can be switched among themselves. Internally, this is implemented by an object graph called a Scene Graph (where each element is a node, also called Node ).
- Nodes are controls, such as label buttons, or even layouts, which can have multiple nested components inside them. Each scene can have one nested node, but it can be a layout with multiple components. Nesting can be multi-level, with layouts containing other layouts and regular components. Each such node has its own identifier, style, effects, state, and event handlers.
 So let's move a little towards the code. Since I use Java 8, I don’t need to pull up any dependencies, since JavaFx is in the JDK by default (as in Java 9.10), but if we have Java 11+, then we need to go to the maven repository and pull it from there dependencies.
JavaFX: usage examples
We create a regular class with a methodmain(entry point):
public class AppFX extends Application {

    public static void main(String[] args) {
        Application.launch();
    }

    @Override
    public void start(Stage primaryStage) throws Exception {
pimarySatge.show();
    }
}javafx.application.Application(which we have from the Bugaga box). In main we call the static Application method launch()to launch our window. Also, our idea will complain that we have not implemented the Application method, startwhich is what we ultimately do. What is it for? And in order to be able to manage the properties (the functionality of our window). To do this, we use an incoming argument primaryStageon which we call a method showso that we can see the window being launched in main. Let's fill out our method a little start:
public void start(Stage primaryStage) throws Exception {
    primaryStage.setTitle("Dogs application");
    primaryStage.setWidth(500);
    primaryStage.setHeight(400);

    InputStream iconStream =
    getClass().getResourceAsStream("/images/someImage.png");
    Image image = new Image(iconStream);
    primaryStage.getIcons().add(image);

    Button button = new Button("WOF WOF ???'");

    button.setOnAction(e -< {
      Alert alert = new Alert(Alert.AlertType.INFORMATION, "WOF WOF WOF!!!");
        alert.showAndWait();
    });
    Scene primaryScene = new Scene(button);
    primaryStage.setScene(primaryScene);

    primaryStage.show();
}
 8 - create the file as an Image object, which is connected to the real file by the stream passed in the constructor 9 - set an icon in the top panel of the window 11 - create a button object 13-16 - set the reaction when the button is pressed 17 - create a scene where we place our button 18 - place the scene on our common window 20 - set the visibility flag for the window And as a result we get a small window to welcome our favorite pesels:
 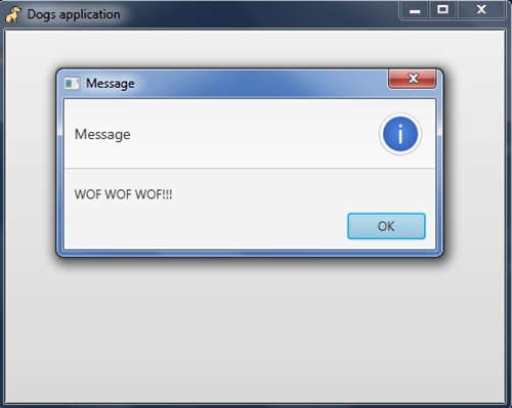 Everything looks much simpler than Swing, doesn’t it? But it's not over yet. It is not good to write all the code to display an application; you need to divide it somehow in order to make it more understandable (graphical components in one basket, logic in another). And here xml comes into the picture... Oh my god, xml? Exactly. Specifically, we use its specific implementation for JavaFX - FXML, in which we define the graphical components of the application and their properties (all sorts of sizes, etc.), and then connect it to a controller, which helps manage the logic. Let's look at an example of this xml:
<?xml version="1.0" encoding="UTF-8"?>
<?language javascript?>

<?import javafx.scene.control.Button?>
<?import javafx.scene.control.Label?>
<?import javafx.scene.layout.VBox?>

<VBox xmlns="http://javafx.com/javafx"  xmlns:fx="http://javafx.com/fxml"
   id="Dogs application" prefHeight="200" prefWidth="300" alignment="center">

  <Label text="Wow wow?"/>

  <Button fx:id="mainButton" text="Greeting" onAction="buttonClicked()"/>

    <fx:script>
       function buttonClicked() {
            mainButton.setText("Wow wow wow!!!")
       }
    </fx:script>
</VBox>start, but now this is not so important, and we will omit it (below there will be an example of pulling this file). So, xml is, of course, good (but not very good), writing them manually is very confusing, isn’t this the last century? 
Introducing JavaFX SceneBuilder
It is at this point that (drum roll) comes into play -SceneBuilder In JavaFX Scene Builder is a tool with which we can design our windows in the form of a graphical interface and then save them, and this program, based on the result, will construct xml files that we We will improve it in our application. The interface of this fmxl builder looks something like this: 
A small digression. JavaFX lessons
I will skip the installation details, and a detailed study of this tool too. These are topics worth exploring further. Therefore, I will still leave a couple of interesting links to JavaFX lessons: one (online tutorial on JavaFX) and two (another good tutorial). Let's run through a little example I sketched out. In the end I got something like: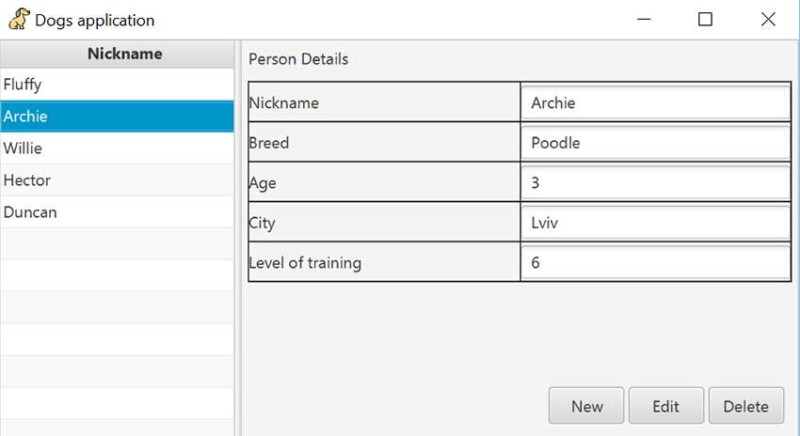
 Then click Save and fill in the rest of its fields in the first window, and then click the Edit button to save. Sounds easy, right? Let's see how this will look in our Java application. To begin with, I'll just leave here the xml layouts for these two windows generated in
 SceneBuilder: First (basic):
<?xml version="1.0" encoding="UTF-8"?>
<?import javafx.scene.control.Button?>
<?import javafx.scene.control.Label?>
<?import javafx.scene.control.SplitPane?>
<?import javafx.scene.control.TableColumn?>
<?import javafx.scene.control.TableView?>
<?import javafx.scene.control.TextField?>
<?import javafx.scene.layout.AnchorPane?>
<?import javafx.scene.layout.ColumnConstraints?>
<?import javafx.scene.layout.GridPane?>
<?import javafx.scene.layout.RowConstraints?>
<AnchorPane prefHeight="300.0" prefWidth="600.0" xmlns="http://javafx.com/javafx/8.0.171" xmlns:fx="http://javafx.com/fxml/1" fx:controller="com.tutorial.controller.BaseController">
   <children>
      <SplitPane dividerPositions="0.29797979797979796" prefHeight="300.0" prefWidth="600.0" AnchorPane.bottomAnchor="0.0" AnchorPane.leftAnchor="0.0" AnchorPane.rightAnchor="0.0" AnchorPane.topAnchor="0.0">
        <items>
          <AnchorPane minHeight="0.0" minWidth="0.0" prefHeight="160.0" prefWidth="100.0">
               <children>
                  <TableView fx:id="dogs" layoutX="-2.0" layoutY="-4.0" prefHeight="307.0" prefWidth="190.0" AnchorPane.bottomAnchor="-5.0" AnchorPane.leftAnchor="-2.0" AnchorPane.rightAnchor="-13.0" AnchorPane.topAnchor="-4.0">
                    <columns>
                      <TableColumn fx:id="nameList" prefWidth="100.33334350585938" text="Nickname" />
                    </columns>
                     <columnResizePolicy>
                        <TableView fx:constant="CONSTRAINED_RESIZE_POLICY" />
                     </columnResizePolicy>
                  </TableView>
               </children>
            </AnchorPane>
          <AnchorPane minHeight="0.0" minWidth="0.0" prefHeight="160.0" prefWidth="100.0">
               <children>
                  <Label layoutX="49.0" layoutY="25.0" text="Person Details" AnchorPane.leftAnchor="5.0" AnchorPane.topAnchor="5.0" />
                  <GridPane accessibleText="erreererer" gridLinesVisible="true" layoutX="5.0" layoutY="31.0" AnchorPane.leftAnchor="5.0" AnchorPane.rightAnchor="5.0" AnchorPane.topAnchor="31.0">
                    <columnConstraints>
                      <ColumnConstraints hgrow="SOMETIMES" minWidth="10.0" prefWidth="100.0" />
                      <ColumnConstraints hgrow="SOMETIMES" minWidth="10.0" prefWidth="100.0" />
                    </columnConstraints>
                    <rowConstraints>
                      <RowConstraints minHeight="10.0" prefHeight="30.0" vgrow="SOMETIMES" />
                      <RowConstraints minHeight="10.0" prefHeight="30.0" vgrow="SOMETIMES" />
                        <RowConstraints minHeight="10.0" prefHeight="30.0" vgrow="SOMETIMES" />
                        <RowConstraints minHeight="10.0" prefHeight="30.0" vgrow="SOMETIMES" />
                      <RowConstraints minHeight="10.0" prefHeight="30.0" vgrow="SOMETIMES" />
                    </rowConstraints>
                     <children>
                        <Label prefHeight="17.0" prefWidth="70.0" text="Nickname" />
                        <Label text="Breed" GridPane.rowIndex="1" />
                        <Label text="Age" GridPane.rowIndex="2" />
                        <Label text="City" GridPane.rowIndex="3" />
                        <Label text="Level of training" GridPane.rowIndex="4" />
                        <TextField fx:id="breed" GridPane.columnIndex="1" GridPane.rowIndex="1" />
                        <TextField fx:id="age" GridPane.columnIndex="1" GridPane.rowIndex="2" />
                        <TextField fx:id="city" GridPane.columnIndex="1" GridPane.rowIndex="3" />
                        <TextField fx:id="levelOfTraining" GridPane.columnIndex="1" GridPane.rowIndex="4" />
                        <TextField fx:id="name" GridPane.columnIndex="1" />
                     </children>
                  </GridPane>
                  <Button layoutX="251.0" layoutY="259.0" mnemonicParsing="false" onAction="#create" text="New" AnchorPane.bottomAnchor="10.0" AnchorPane.leftAnchor="230.0" AnchorPane.rightAnchor="130.0" AnchorPane.topAnchor="260.0" />
                  <Button layoutX="316.0" layoutY="262.0" mnemonicParsing="false" onAction="#edit" text="Edit" AnchorPane.bottomAnchor="10.0" AnchorPane.leftAnchor="290.0" AnchorPane.rightAnchor="70.0" AnchorPane.topAnchor="260.0" />
                  <Button layoutX="360.0" layoutY="262.0" mnemonicParsing="false" onAction="#delete" text="Delete" AnchorPane.bottomAnchor="10.0" AnchorPane.leftAnchor="350.0" AnchorPane.rightAnchor="10.0" AnchorPane.topAnchor="260.0" />
               </children>
            </AnchorPane>
        </items>
      </SplitPane>
   </children>
</AnchorPane><?xml version="1.0" encoding="UTF-8"?>
<?import javafx.scene.control.Button?>
<?import javafx.scene.control.Label?>
<?import javafx.scene.control.TextField?>
<?import javafx.scene.layout.AnchorPane?>
<?import javafx.scene.layout.ColumnConstraints?>
<?import javafx.scene.layout.GridPane?>
<?import javafx.scene.layout.RowConstraints?>
<?import javafx.scene.text.Font?>
<AnchorPane prefHeight="200.0" prefWidth="300.0" xmlns="http://javafx.com/javafx/8.0.171" xmlns:fx="http://javafx.com/fxml/1" fx:controller="com.tutorial.controller.NewDogController">
<children>
<GridPane layoutX="31.0" layoutY="25.0" prefHeight="122.0" prefWidth="412.0">
<columnConstraints>
<ColumnConstraints hgrow="SOMETIMES" maxWidth="185.0" minWidth="10.0" prefWidth="149.0" />
<ColumnConstraints hgrow="SOMETIMES" maxWidth="173.0" minWidth="10.0" prefWidth="146.0" />
</columnConstraints>
<rowConstraints>
<RowConstraints minHeight="10.0" prefHeight="30.0" vgrow="SOMETIMES" />
</rowConstraints>
<children>
<Label prefHeight="48.0" prefWidth="178.0" text="Please, write name:">
<font>
<Font size="20.0" />
</font>
</Label>
<TextField fx:id="nickName" prefHeight="36.0" prefWidth="173.0" GridPane.columnIndex="1" />
</children>
</GridPane>
<Button layoutX="222.0" layoutY="149.0" mnemonicParsing="false" onAction="#ok" prefHeight="37.0" prefWidth="95.0" text="Save" />
<Button layoutX="325.0" layoutY="149.0" mnemonicParsing="false" onAction="#cansel" prefHeight="37.0" prefWidth="95.0" text="Cansel" />
</children>
</AnchorPane> As you can see, there is nothing special, there are controllers that represent certain windows, there are models that represent our data. Let's take a look at the class that launches the application (Application implementation):
 @Data
public class AppFX extends Application {

    private Stage primaryStage;
    private AnchorPane rootLayout;
    private ObservableList listDog = FXCollections.observableArrayList();

    public AppFX() {
        listDog.add(new Dog("Fluffy", "Pug", 8, "Odessa", 2));
        listDog.add(new Dog("Archie", "Poodle", 3, "Lviv", 6));
        listDog.add(new Dog("Willie", "Bulldog", 5, "Kiev", 4));
        listDog.add(new Dog("Hector", "Shepherd", 9, "Minsk", 6));
        listDog.add(new Dog("Duncan", "Dachshund", 1, "Hogwarts", 9));
    }
public static void main(String[] args) {
        Application.launch();
    }

    @Override
    public void start(Stage primaryStage) throws Exception {
        this.primaryStage = primaryStage;
        this.primaryStage.setTitle("Dogs application");
        showBaseWindow();
}mainand the implementation start()that launches the application:
public void showBaseWindow() {
        try {
            FXMLLoader loader = new FXMLLoader();
            loader.setLocation(AppFX.class.getResource("/maket/rootWindow.fxml"));
            rootLayout = loader.load();
            Scene scene = new Scene(rootLayout);
            primaryStage.setScene(scene);
            InputStream iconStream = getClass().getResourceAsStream("/icons/someImage.png");
            Image image = new Image(iconStream);
            primaryStage.getIcons().add(image);
            BaseController controller = loader.getController();
            controller.setAppFX(this);
            primaryStage.show();
        } catch (IOException e) {
            e.printStackTrace();
        }
}start(), namely, the one that sets the settings of our base window. Such as in the xml layout in resources: giving it an icon, linking it to a specific controller, and giving the controller a link to thisthe class)
public void showCreateWindow(Dog dog) {
        try {
            FXMLLoader loader = new FXMLLoader();
            loader.setLocation(AppFX.class.getResource("/maket/new.fxml"));
            AnchorPane page = loader.load();
            Stage dialogStage = new Stage();
            dialogStage.setTitle("Wow Wow Wow");
            dialogStage.initModality(Modality.WINDOW_MODAL);
            dialogStage.initOwner(primaryStage);
            dialogStage.setScene(new Scene(page));
            CreateController controller = loader.getController();
            controller.setDialogStage(dialogStage);
            controller.setDog(dog);
            dialogStage.showAndWait();
        } catch (IOException e) {
            e.printStackTrace();
        }
    }
}@Data
public class Dog {

    private StringProperty name;
    private StringProperty breed;
    private IntegerProperty age;
    private StringProperty city;
    private IntegerProperty levelOfTraining;

    public Dog(String name, String breed, int age, String city, int levelOfTraining) {
        this.name = new SimpleStringProperty(name);
        this.breed = new SimpleStringProperty(breed);
        this.age = new SimpleIntegerProperty(age);
        this.city = new SimpleStringProperty(city);
        this.levelOfTraining = new SimpleIntegerProperty(levelOfTraining);
    }

    public Dog() {
        name = new SimpleStringProperty();
        breed = null;
        age = null;
        city = null;
        levelOfTraining = null;
    }
}
@Data
public class BaseController {

    @FXML
    private TableView dogs;
    @FXML
    private TableColumn nameList;
    @FXML
    private TextField name;
    @FXML
    private TextField breed;
    @FXML
    private TextField age;
    @FXML
    private TextField city;
    @FXML
    private TextField levelOfTraining;
    private AppFX appFX;
@FXML
private void initialize() {
    nameList.setCellValueFactory(
            cellData -> cellData.getValue().getName());
    dogs.getSelectionModel().selectedItemProperty().addListener(
            (observable, oldValue, newValue) -> showDogsInformation(newValue));
}public void setAppFX(AppFX appFX) {
this.appFX = appFX;
dogs.setItems(appFX.getListDog());
}
private void showDogsInformation(Dog dog) {
if (dog != null) {
name.setText(dog.getName() != null ? dog.getName().getValue() : null);
breed.setText(dog.getBreed() != null ? dog.getBreed().getValue() : null);
age.setText(dog.getAge() != null ? String.valueOf(dog.getAge().get()) : null);
city.setText(dog.getCity() != null ? dog.getCity().getValue() : null);
levelOfTraining.setText(dog.getLevelOfTraining() != null ? String.valueOf(dog.getLevelOfTraining().get()) : null);
} else {
name.setText("");
breed.setText("");
age.setText("");
city.setText("");
levelOfTraining.setText("");
}
}@FXML
private void delete() {
int selectedIndex = dogs.getSelectionModel().getSelectedIndex();
dogs.getItems().remove(selectedIndex);
}
@FXML
private void edit() {
int selectedIndex = dogs.getSelectionModel().getSelectedIndex();
dogs.getItems().set(selectedIndex, new Dog(name.getText(), breed.getText(), Integer.valueOf(age.getText()), city.getText(), Integer.valueOf(levelOfTraining.getText())));
}
@FXML
private void create() {
Dog someDog = new Dog();
appFX.showCreateWindow(someDog);
if (someDog.getName() != null && !someDog.getName().getValue().isEmpty()) {
appFX.getListDog().add(someDog);
}
}
}
- delete — delete the selected (selected) dog by index;
- edit - create a new dog with the transferred data, and set it instead of the one that was before;
- create - we create a new dog and call the method of calling the creation window, passing a new object, and after closing which, if the name is not null, then save the new pet.
@Data
public class CreateController {
    private Stage dialogStage;
    private Dog dog;

    @FXML
    private TextField nickName;

    @FXML
    private void ok() {
        if (nickName != null && !nickName.getText().isEmpty()) {
            dog.setName(new SimpleStringProperty(nickName.getText()));
            dialogStage.close();
        }
    }

    @FXML
    private void cansel() {
        dialogStage.close();
    }
}
GO TO FULL VERSION